


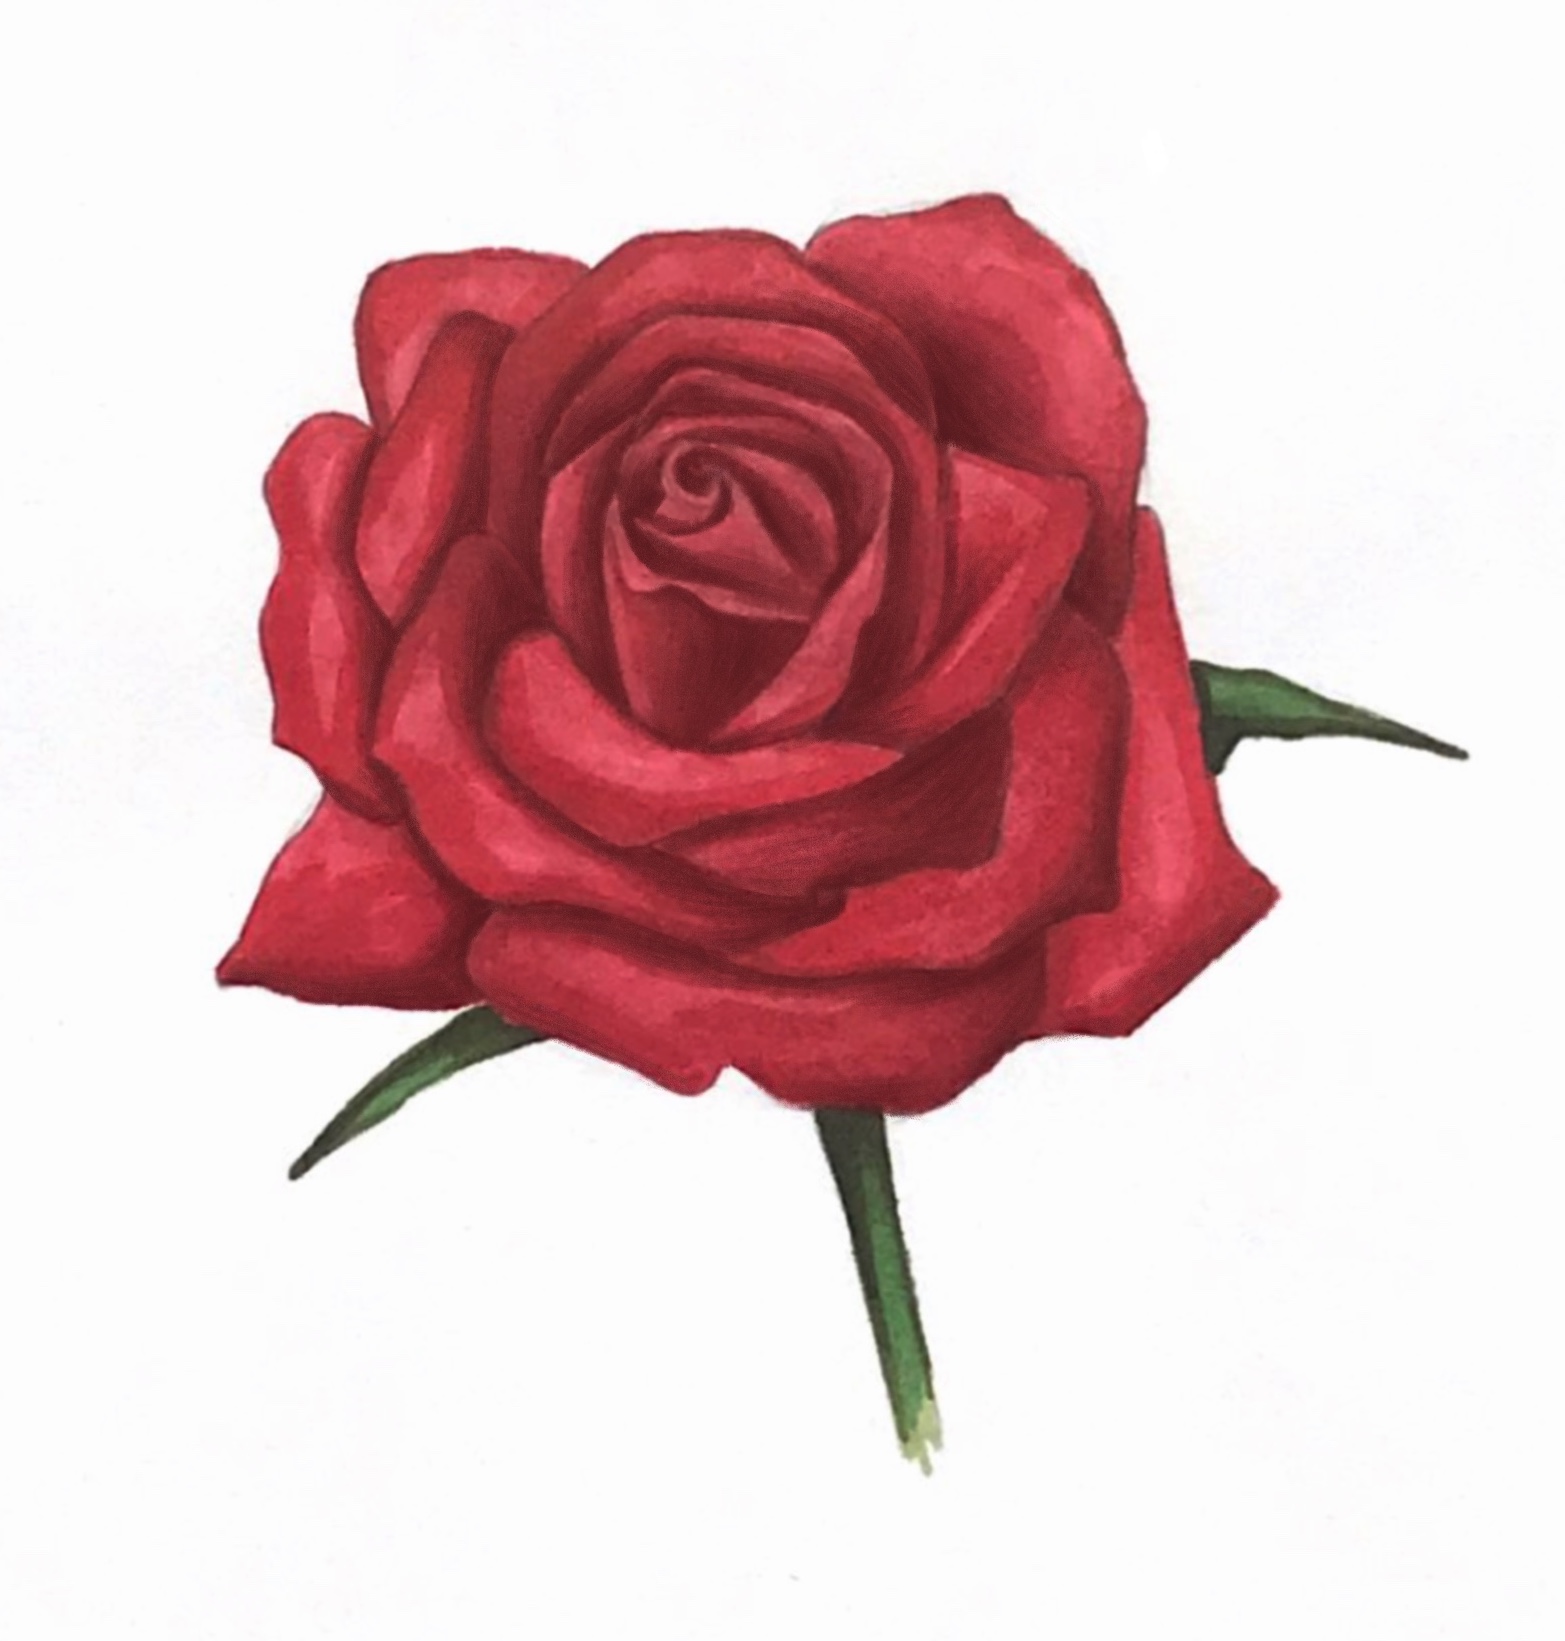
How to draw a rose with a pencil for a beginner
It is difficult for beginner artists to understand how to depict an object, real or imaginary, and convey it as accurately as possible. You should start with simple individual elements, and gradually connect them together to create a complete picture. One such simple image would be a pencil drawing of a rose. This graceful flower is pleasingly aesthetic – the only question is how to draw it.
- Drawings of roses in pencil
- How to draw a rose step by step. Rose with a half-opened pencil bud
- Half-opened rose with a simple pencil. Alternative way
- How to draw a rose with a pencil step by step for beginners. Scheme for an open bud
- Lush rose - pencil drawing. Letter drawing scheme
- Beautiful rose. How to draw flowers for a beginner
- So, we have to figure out how to draw a beautiful rose for a beginner, what materials will be required for this, and we will also analyze a few simple schemes for depicting a rose with a half-opened bud and step-by-step instructions for drawing a lush rose.
Content
Drawings of roses in pencil
The simplest and most accessible material for beginners' creativity is definitely a simple pencil. Learning about the different types of simple pencils by their stiffness, learning how to draw simple shapes and forms, and then gradually moving on to full-fledged images and paintings - this is the path that everyone who wants to draw should go through. Someone tries to master all the secrets on their own, someone chooses a proven ready-made course. The choice is yours, the main thing is not to give up.

Download program
[30+ video classes]
[21+ video classes]
FREE YOUR
CREATIVITY
CREATIVITY
[3 video classes]
SECTION 10.
ANIMAL SKETCH
ANIMAL SKETCH

[11 video classes]
SECTION 6. MEN'S FIGURET
VIEW DETAILS


[2 video classes]
SECTION 7. ABOUT THE PROFESSION OF FASHION ILLUSTRATOR
[5 video classes]
SECTION 5. MIXED TECHNIQUES
VIEW DETAILS


VIEW DETAILS

Online course
$49
$98

$49
$98
After mastering the basic shapes and lines, you can move on to a full-fledged drawing. An excellent start for creativity is botanical illustration, namely, pictures of roses in pencil. First you need to decide whether the bud will be closed or open, whether it is planned to be painted, and whether the flower will be alone or become part of the overall composition. After that, you can safely move on to the image.
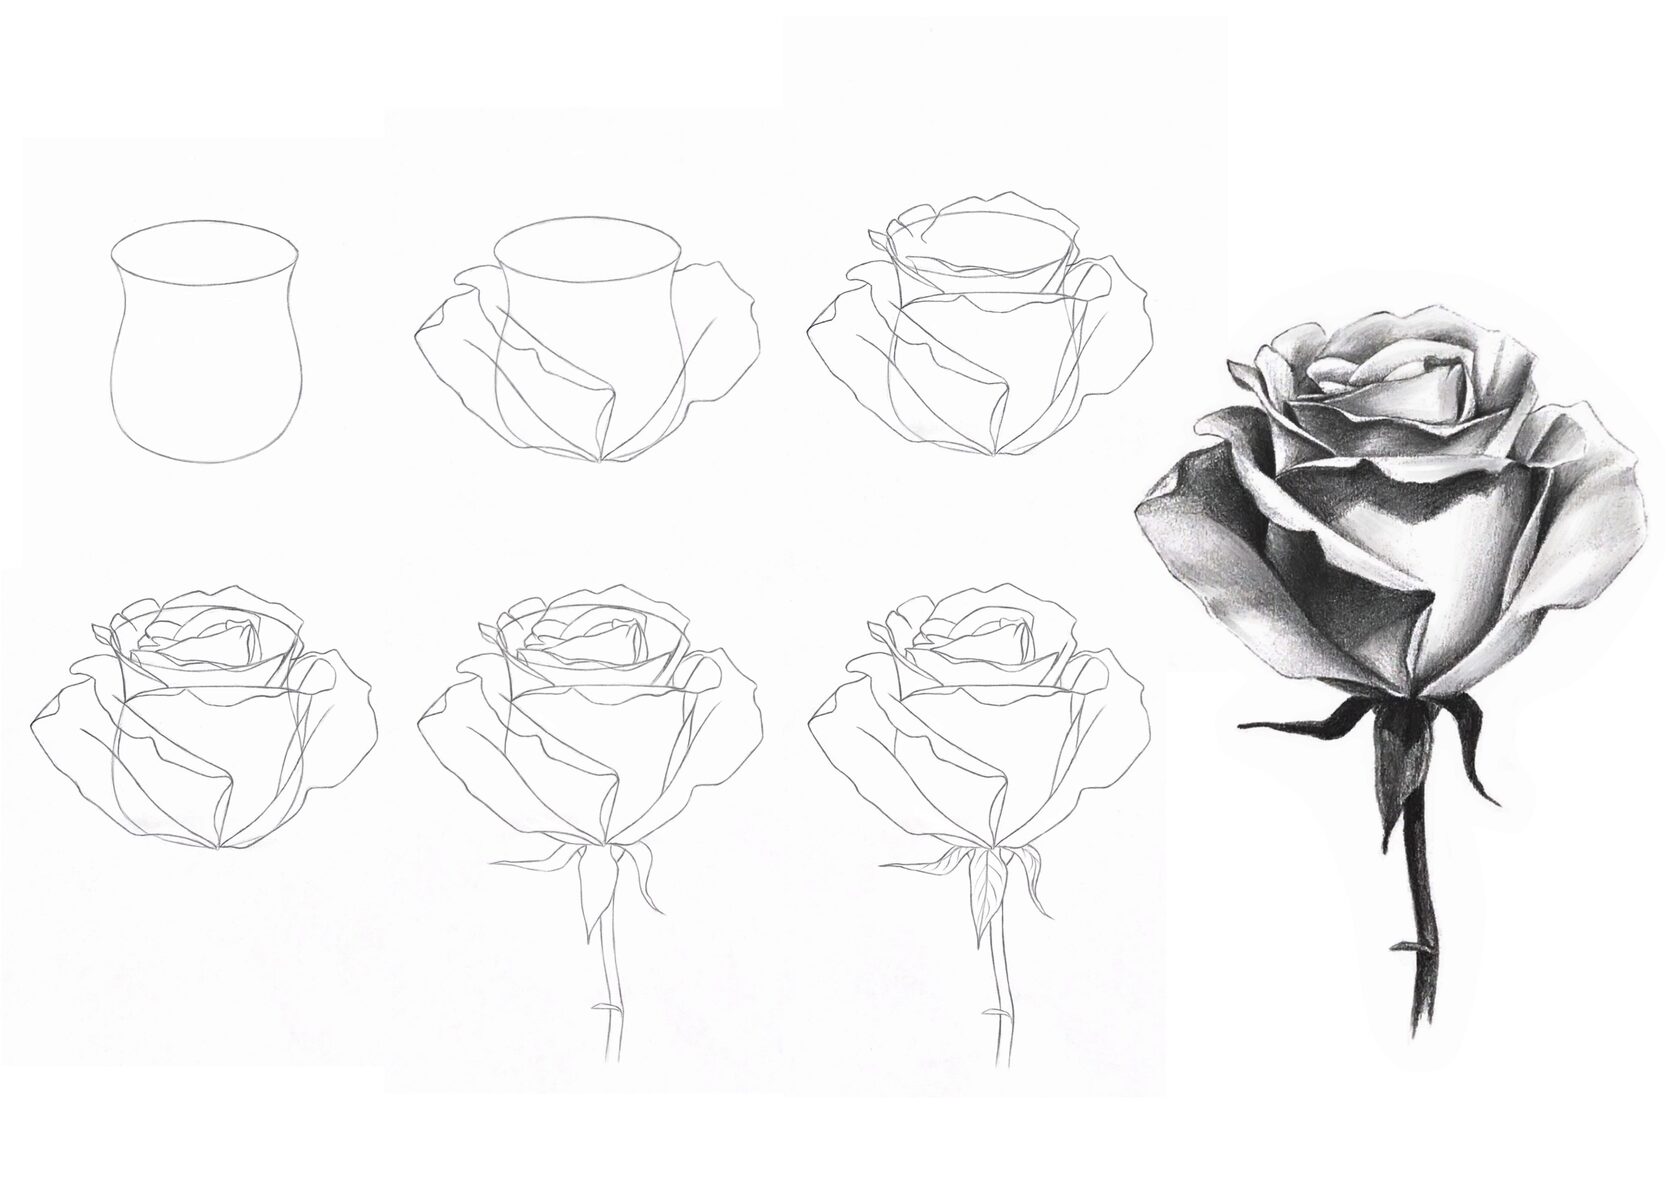
How to draw a rose step by step. Rose with a half-opened pencil bud
There are many different life hacks and step-by-step instructions for drawing a rose. Let's take a look at a few of the most successful ones.
1
Let's draw a circle and add a small hat to it in the direction of the inclination of the future bud.
2
We outline the stem and make a seal at the junction of the bud and stem in the form of a small cup, this is the receptacle of the flower.
3
Using smooth lines, add the petals from the outer edge to the middle, alternating overlapping petals from each other from different sides.
4
Similarly, we depict the middle of the flower, while the center of the bud will look like a small circle or oval. We add sepals, those very green leaves near the bud itself.
5
Let's move on to the detailed drawing of the stem. We thicken it, add kinks and bends characteristic of this flower. Along the stem, add the outlines of the leaves. Do not forget that the grouping of leaves in threes is characteristic of a rose.
6
We remove the auxiliary lines in the bud, draw in detail the parts of the leaf and add spikes.
Half-opened rose with a simple pencil. Alternative way
If the previous scheme seemed too complicated for you, then you can try using an alternative option.
1
We draw an oval at an angle and a smooth line from it, so that something like a vase comes out.
2
On both sides of the “vase”, we will depict the petals framing the bud using wavy lines.
3
Draw a wavy line between the side petals, which will be a wrapped petal at the middle of the flower. In the upper part of the oval, we also draw the edges of the petals.
4
We draw the middle of the flower with small wavy lines, twisting them towards the center.
5
We remove the auxiliary lines and add the stem and pointed leaves under the flower.
6
We draw all the lines with a thin pencil and draw the edges of the sheets.
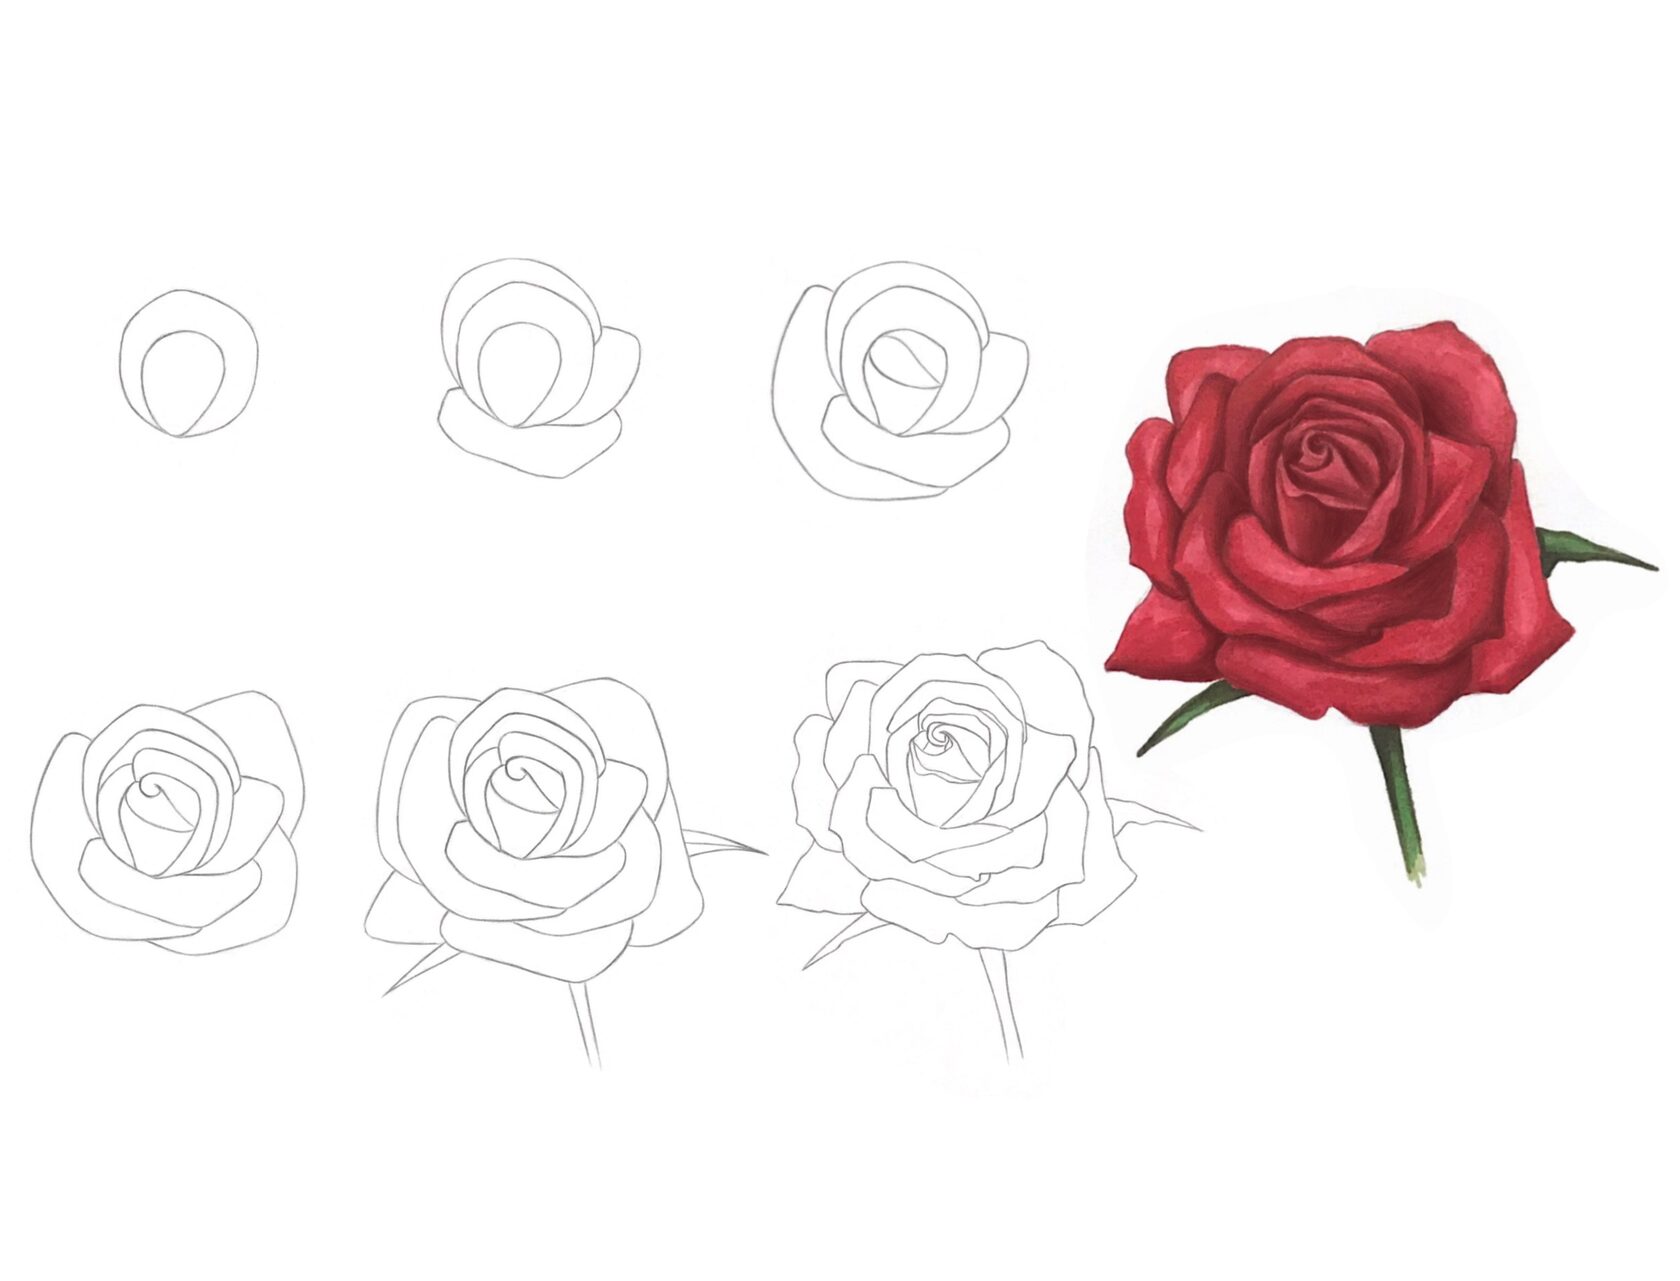
How to draw a rose with a pencil step by step for beginners. Scheme for an open bud
1
We depict a small drop, circle it, as if we are putting on a hat.
2
From below we add a curved line, as if we are tying a scarf, we add petals from above.
3
We divide the initial drop so that it becomes the middle of the future flower, add an open petal from below.
4
The contours of the flower begin to be seen. Add more petals to make the flower more magnificent. Their number depends on how lush the resulting bud should be. Add the stem and flower receptacle.
5
To make the flower more realistic, the edges of all the petals can be made less even by erasing even auxiliary lines in parallel. You can also decorate the rose if you wish.

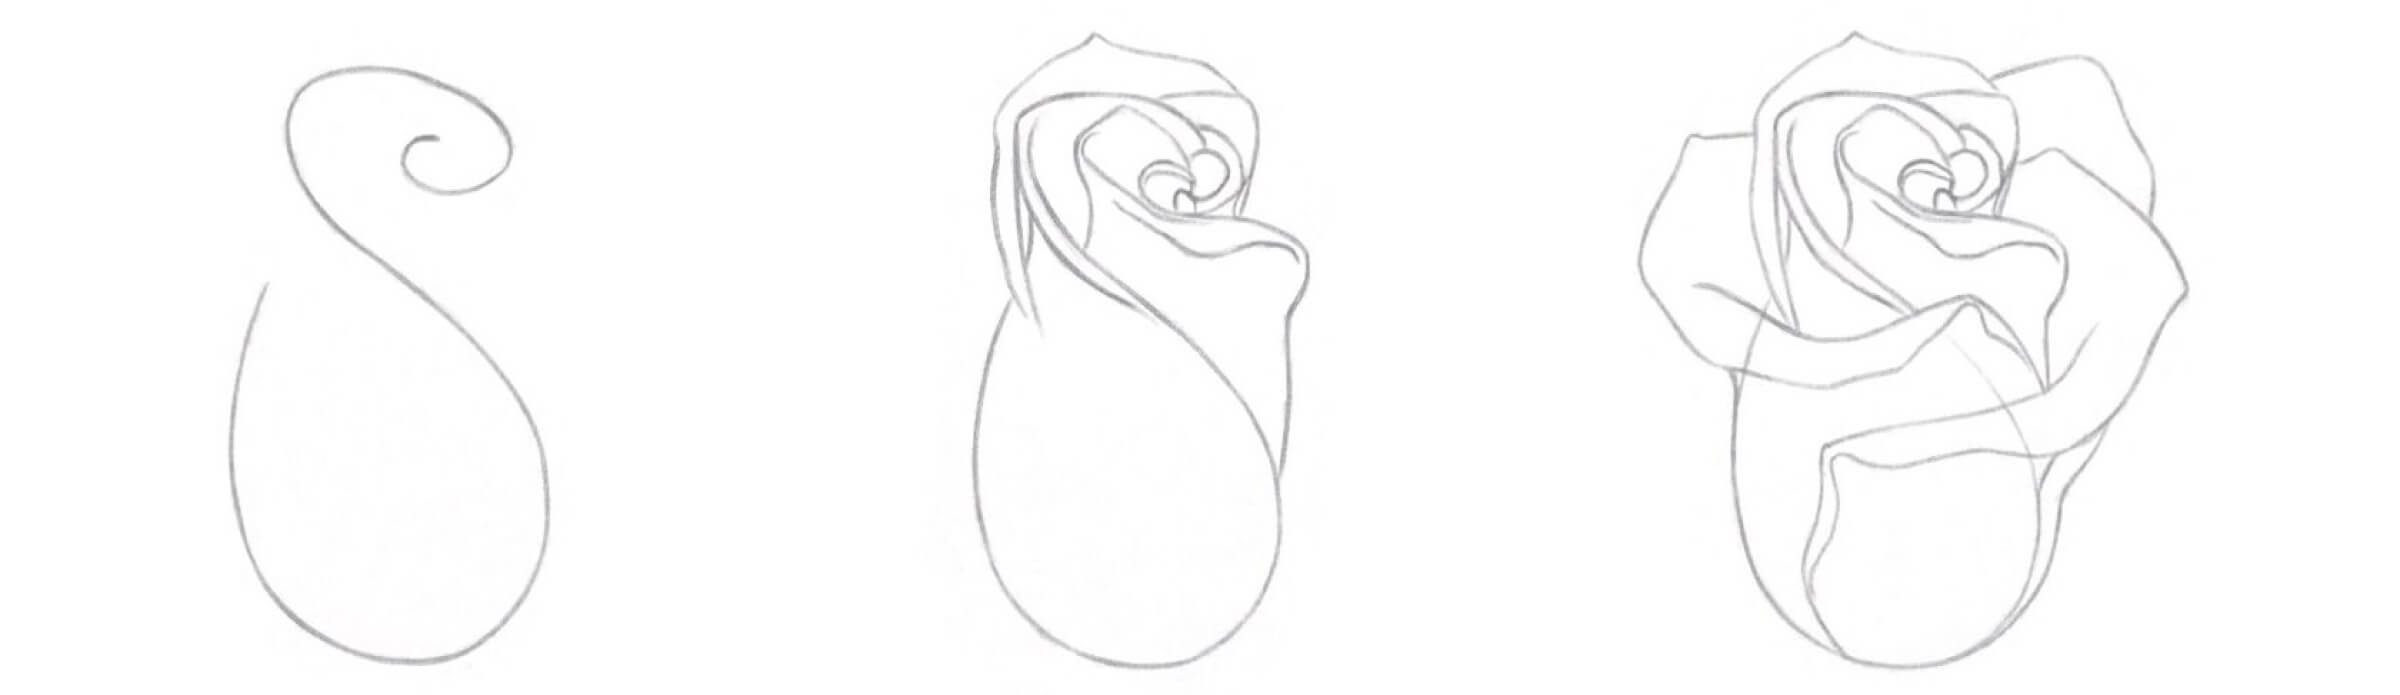
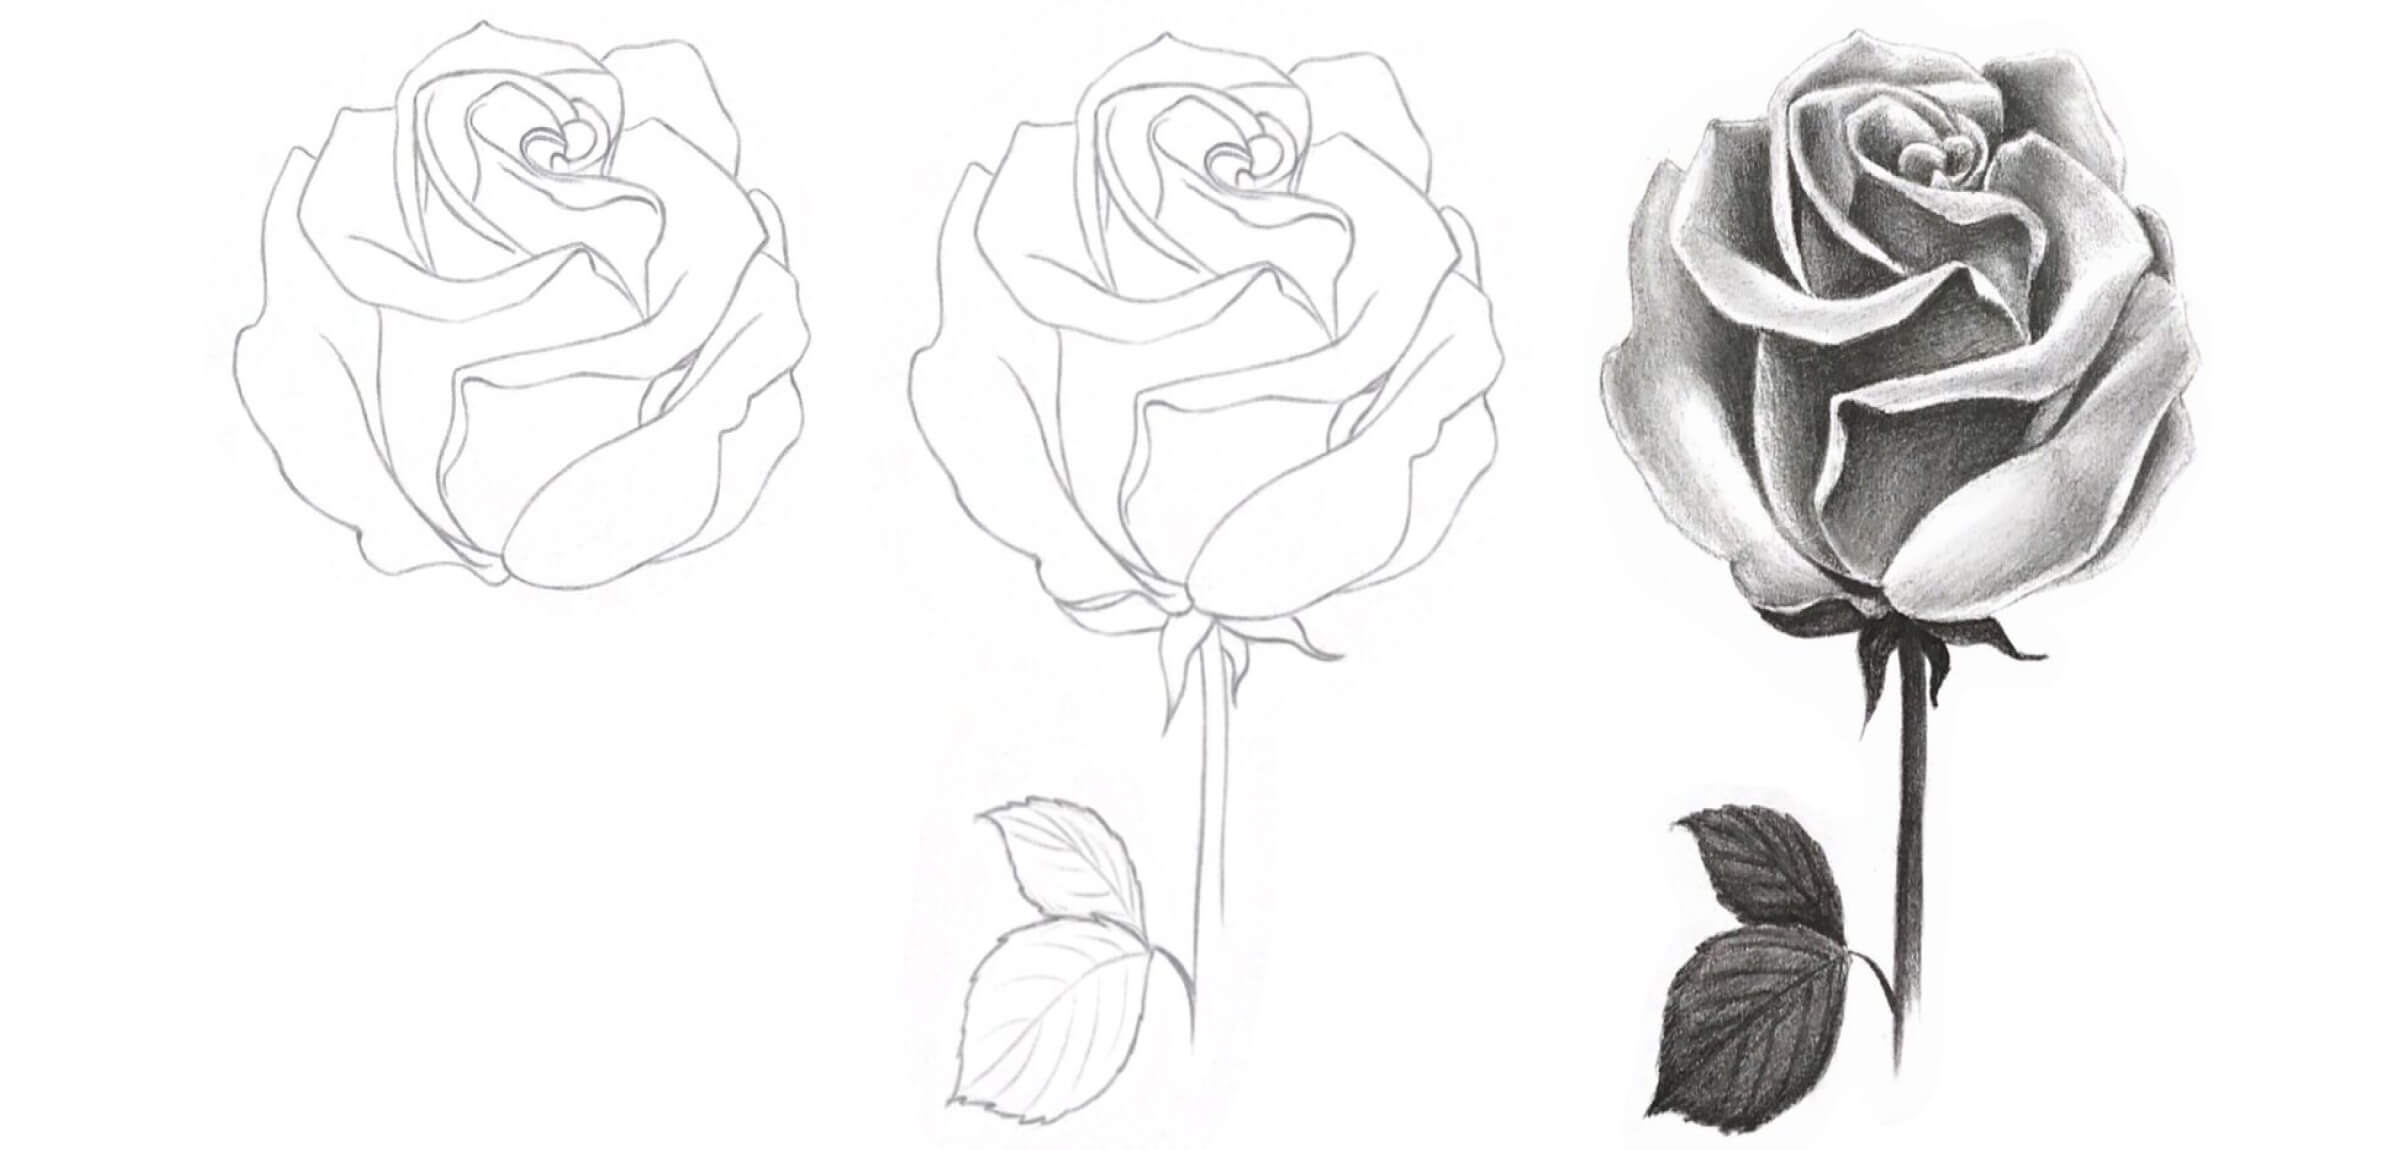
Lush rose - pencil drawing. Letter drawing scheme
1
The image of a rose will start with a swirling letter S.
2
We will add petals to the upper part so that the tail of the letter S turns out to be the middle of the flower. We will also add a line on the right side to get the outline of the bud.
3
Received a closed bud. We add petals in stages at the bottom of the flower to make it more magnificent.
4
Add leaves and hatch or color the resulting flower.
Beautiful rose. How to draw flowers for a beginner
There are many other schemes for depicting a rose, we have only suggested the most successful ones, in our opinion. To better master botanical illustration, we have prepared a separate course that would be of interest to those who plan to develop in the field of still life or just like to draw flowers and fruits. For those who are looking for simple schemes for depicting a rose, we will present a few more visual schemes below.
To wrap up, drawing a rose can be a rewarding and enjoyable experience, whether you're a beginner or an experienced artist. By following simple steps, you can create a beautiful rose sketch that captures the elegance and intricacy of this classic flower. Whether you're looking for inspiration from other rose drawings or just need tips on how to draw a rose easy, this guide offers you the tools to make your own roses to draw. Remember, each simple rose drawing starts with basic shapes and grows into a detailed and beautiful creation. So, take these techniques and start your journey into the world of roses drawing. With practice and creativity, you'll be creating stunning rose drawings in no time.


© Fantasy Room 2014–2025
service@fantasyroom.online
All rights reserved