


Today we will learn how to draw a woman’s face. Of course, all faces have its unique characteristics, influenced by their origin, age, number of ears, etc., and individual style of the artist of course. Sometimes even the same face can appear vastly different depending on the time of day. In this step-by-step tutorial we will learn some basic guidelines that portrait, caricature, comic and anime artists all over the worldwide have been using for many years when painting realistic faces. While these guidelines aren't strict rules, artists can adapt them to their own style. With a task as challenging as the female face, it can be very helpful to practice and keep this guide in mind.
In this guide, we're going to learn how to draw a woman's face from our mind. We'll share some key tricks and steps to make it look real. We'll start with the shape of the head, then put in the bits of the face, and end by making it better and adding color. I hope this guide fires you up and helps you use these ways on your own later.
This guide is mostly for new artists, but skilled ones might find cool stuff, too. I'll also talk about using a digital pad and the pluses of computer tools. But, you can still join in with just a pen and some paper if that's what you like.
To draw a female portrait you will need
- Paper;
- pencil;
- ruler;
- eraser.
We have already realized that the easiest way to start your artistic experience of depicting a person is with a simple pencil and ordinary paper. If you have not done drawing before, then a drawing online course for beginners can be considered an excellent way to get acquainted with the basic concepts of working with a simple pencil. This is an excellent opportunity to learn to distinguish pencils by degree of rigidity, master simple shapes and figures, learn how to make simple drawings, including learning how to depict a human figure.
It is better to start working with a simple pencil with an HB, that is, a hard-soft pencil. All other pencils are important for drawing details, adding shadows and penumbras, applying different shades for different lines.
How to draw a female face
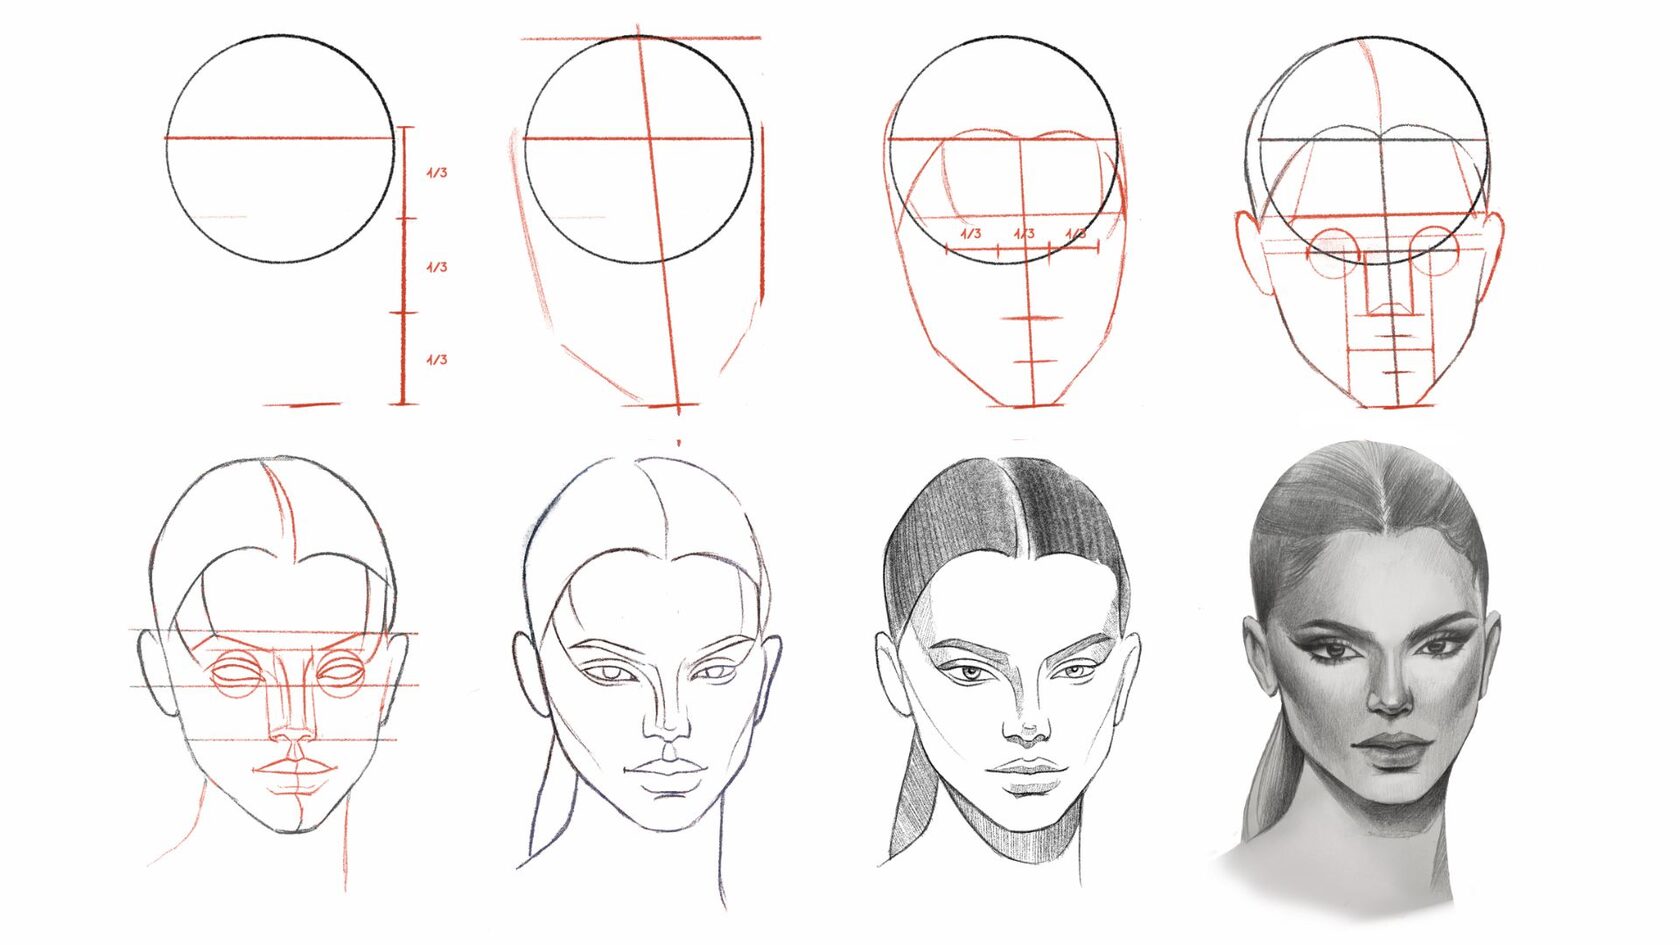
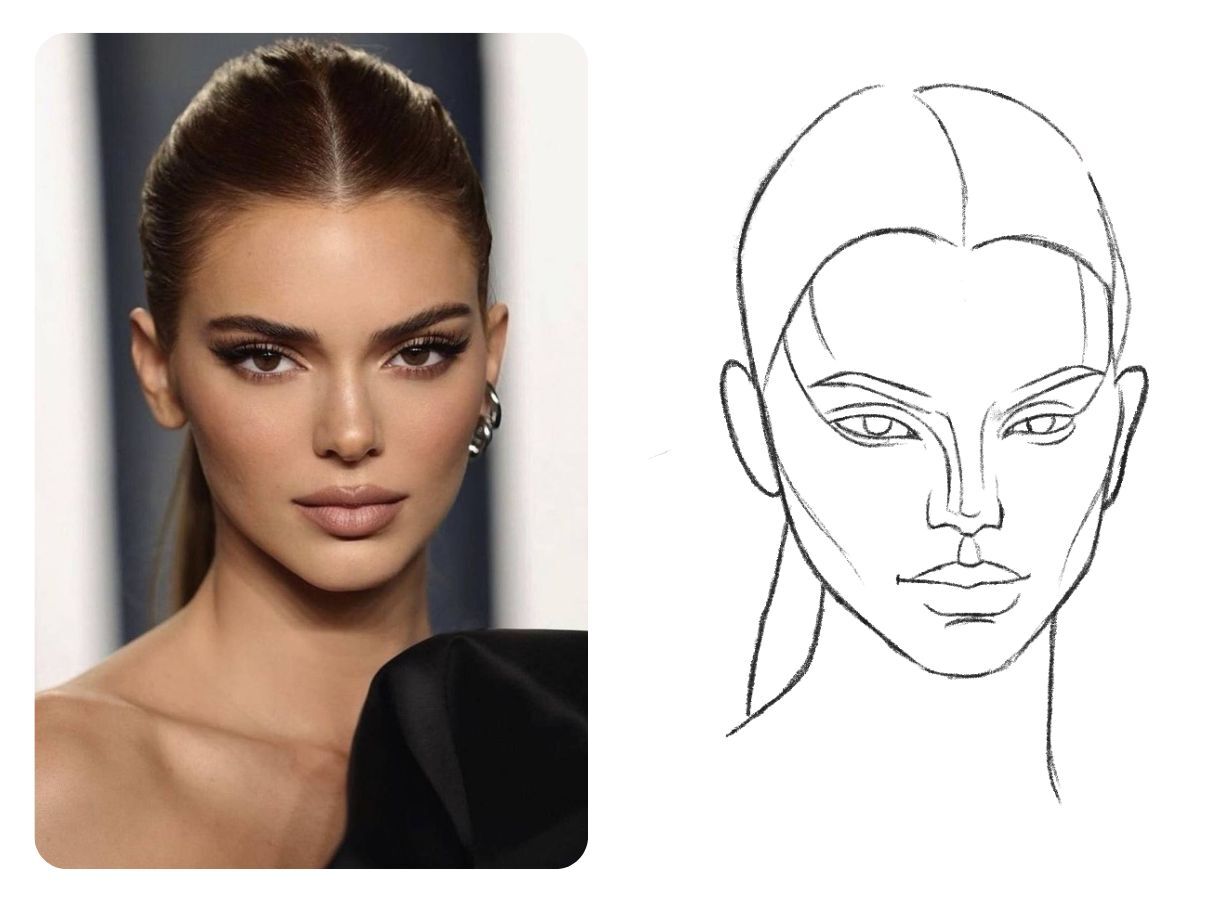
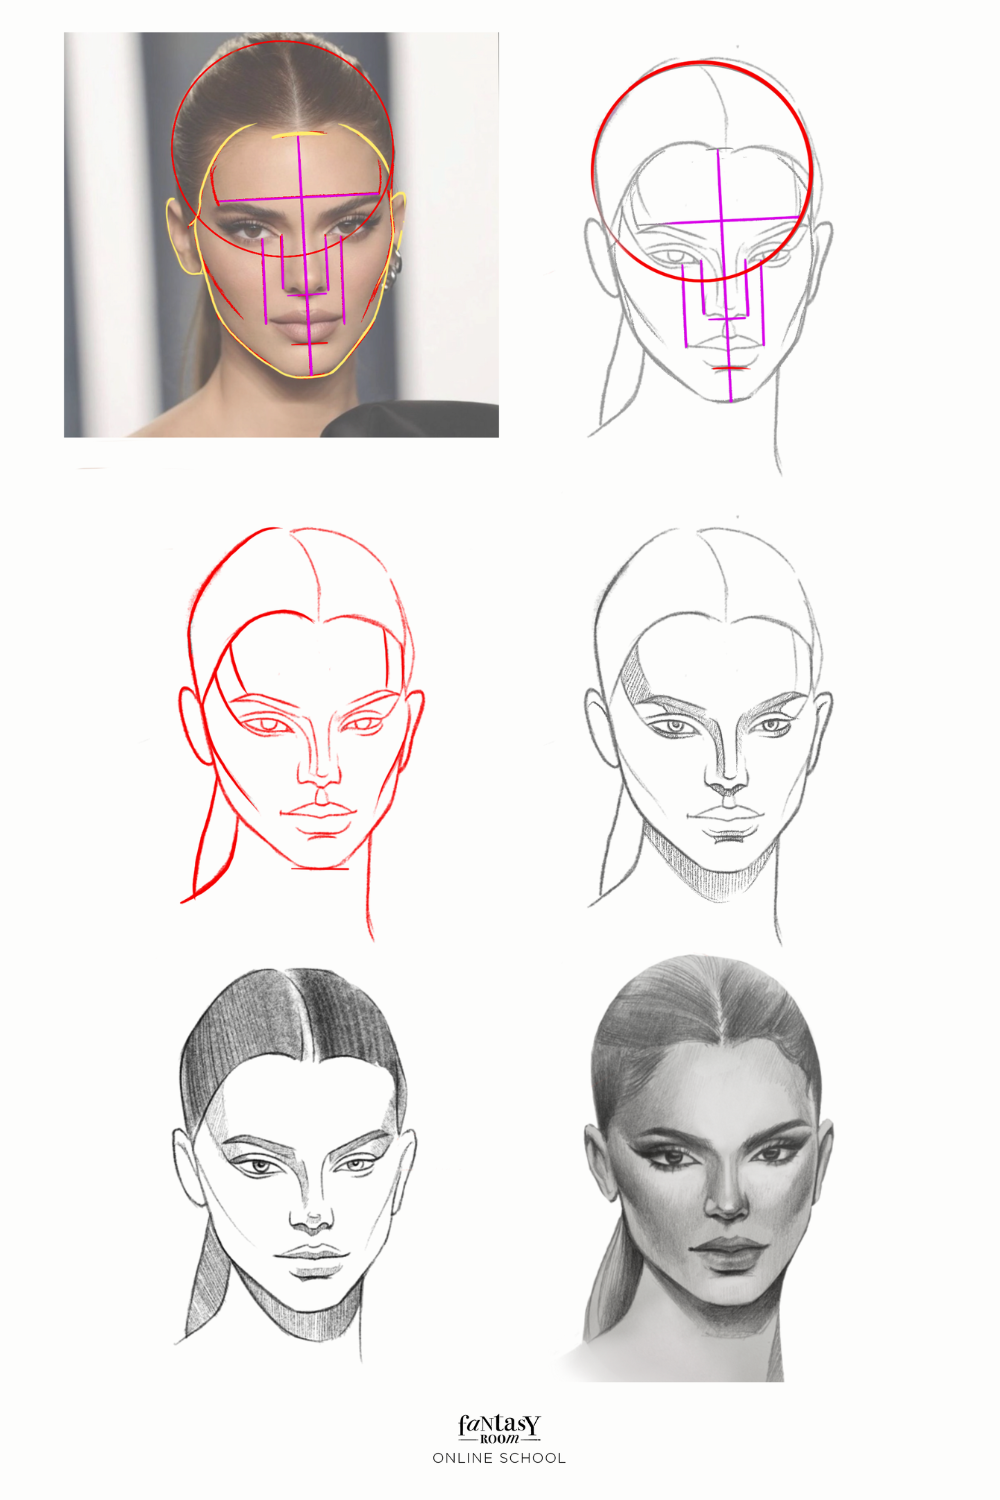
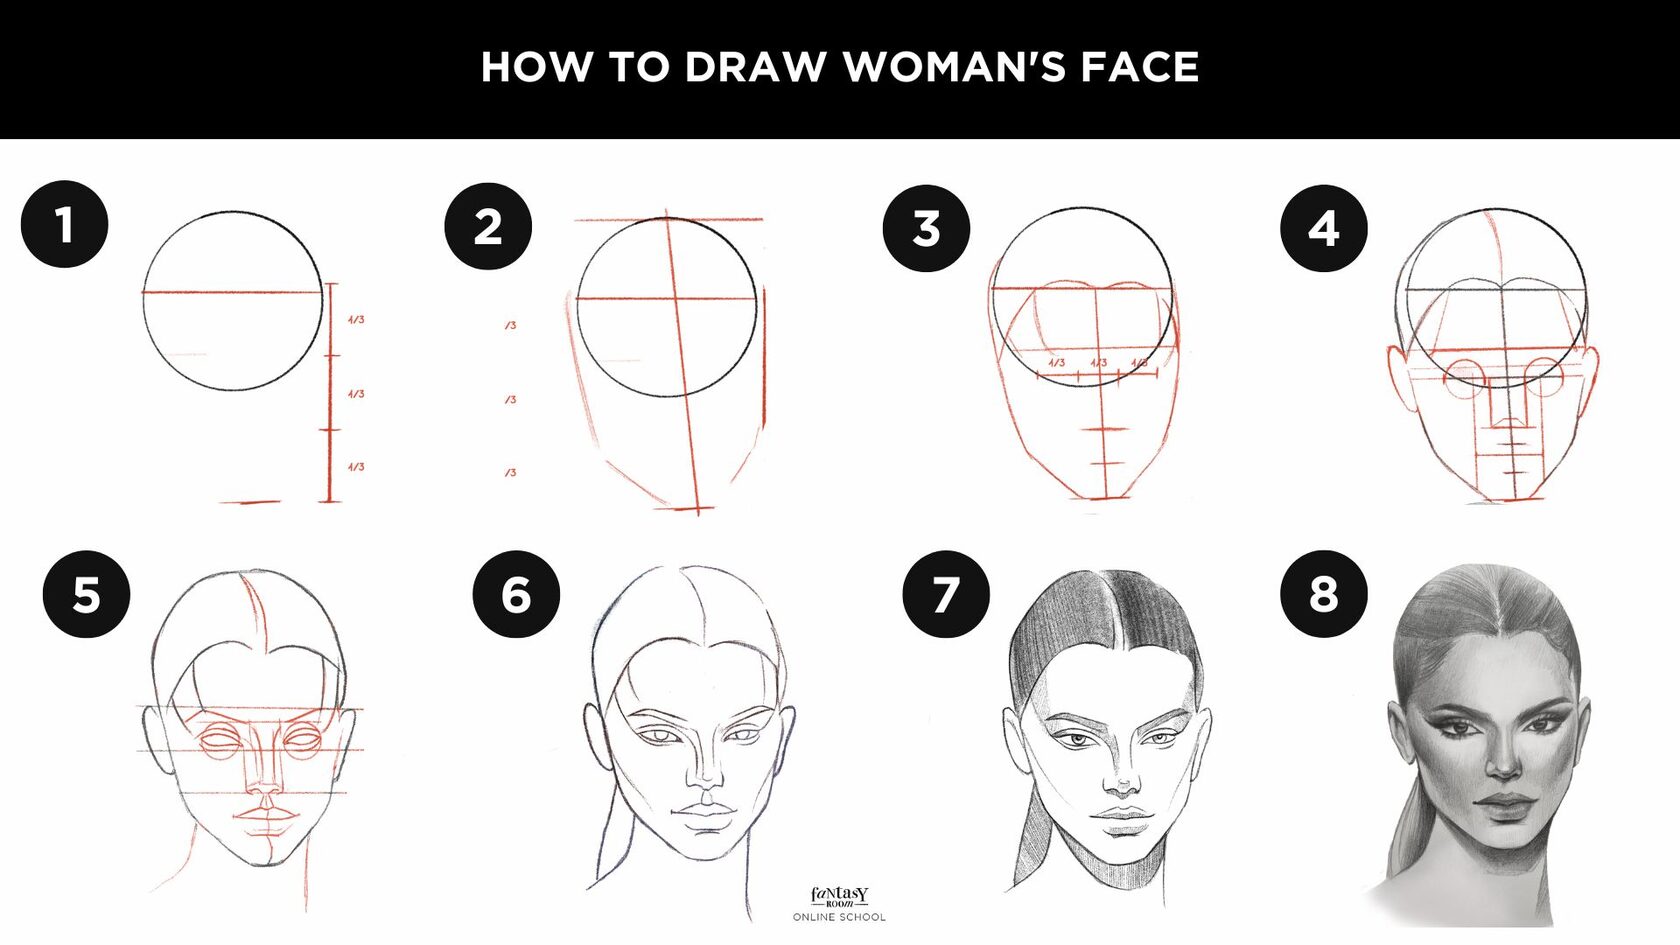
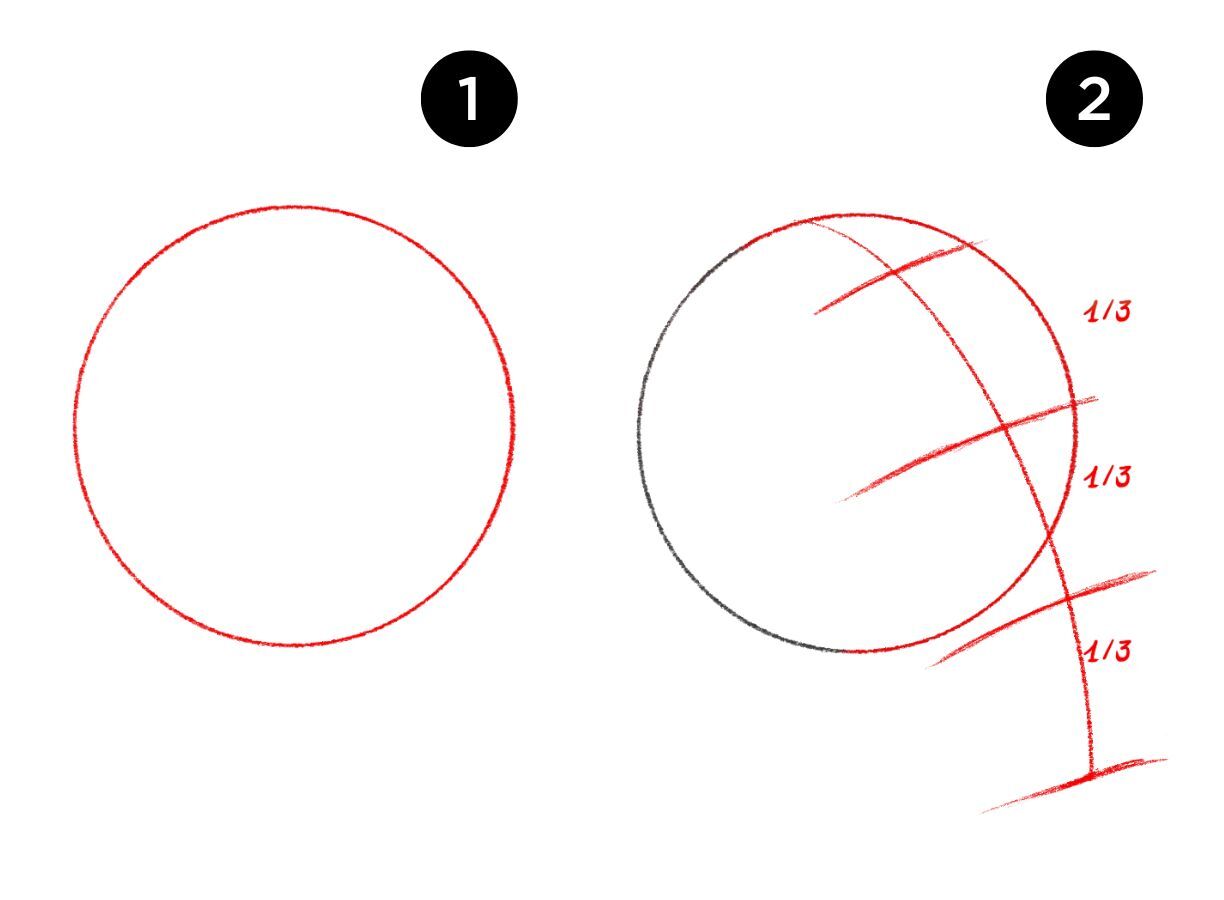
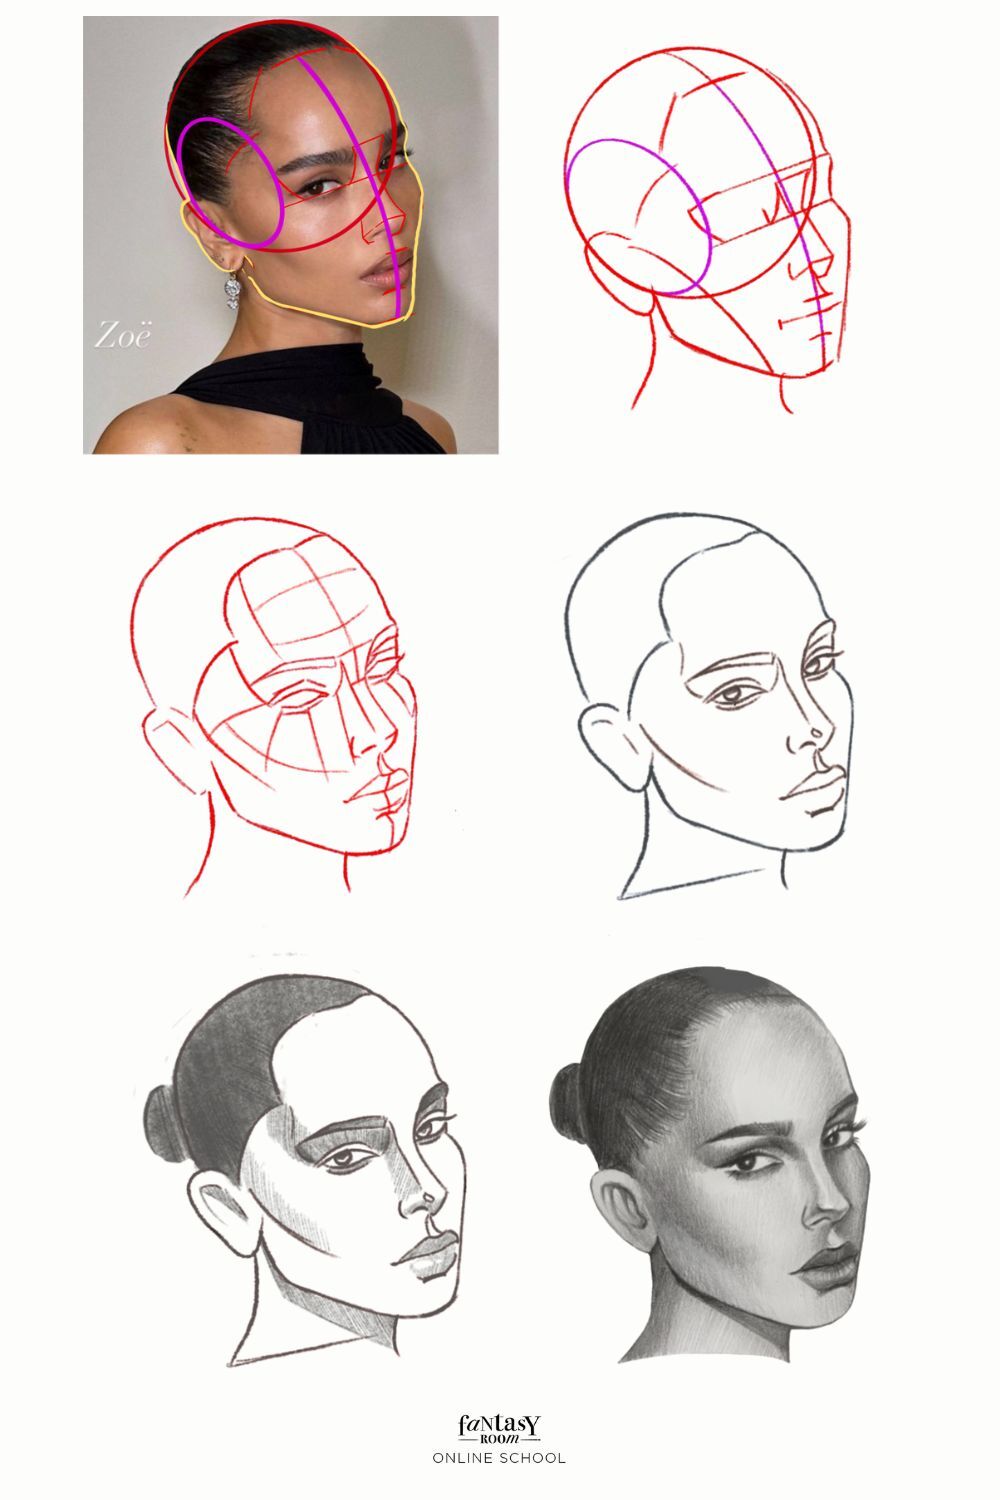
Let's begin by sketching a circle. To create a preliminary construction drawing, use basic shapes to position the head, eyes, nose, and mouth accurately.
Starting with a circle may seem simple, but it can be challenging. If your circle ends up looking more like a geometric potato, try adjusting your wrist movement and sketch the circle using rotation from your forearm. Alternatively, you can, like me, attempt to form the circle shape with several quick strokes. Don't be discouraged if your construction drawing appears rough—it won't be visible in the final result.
Starting with a circle may seem simple, but it can be challenging. If your circle ends up looking more like a geometric potato, try adjusting your wrist movement and sketch the circle using rotation from your forearm. Alternatively, you can, like me, attempt to form the circle shape with several quick strokes. Don't be discouraged if your construction drawing appears rough—it won't be visible in the final result.
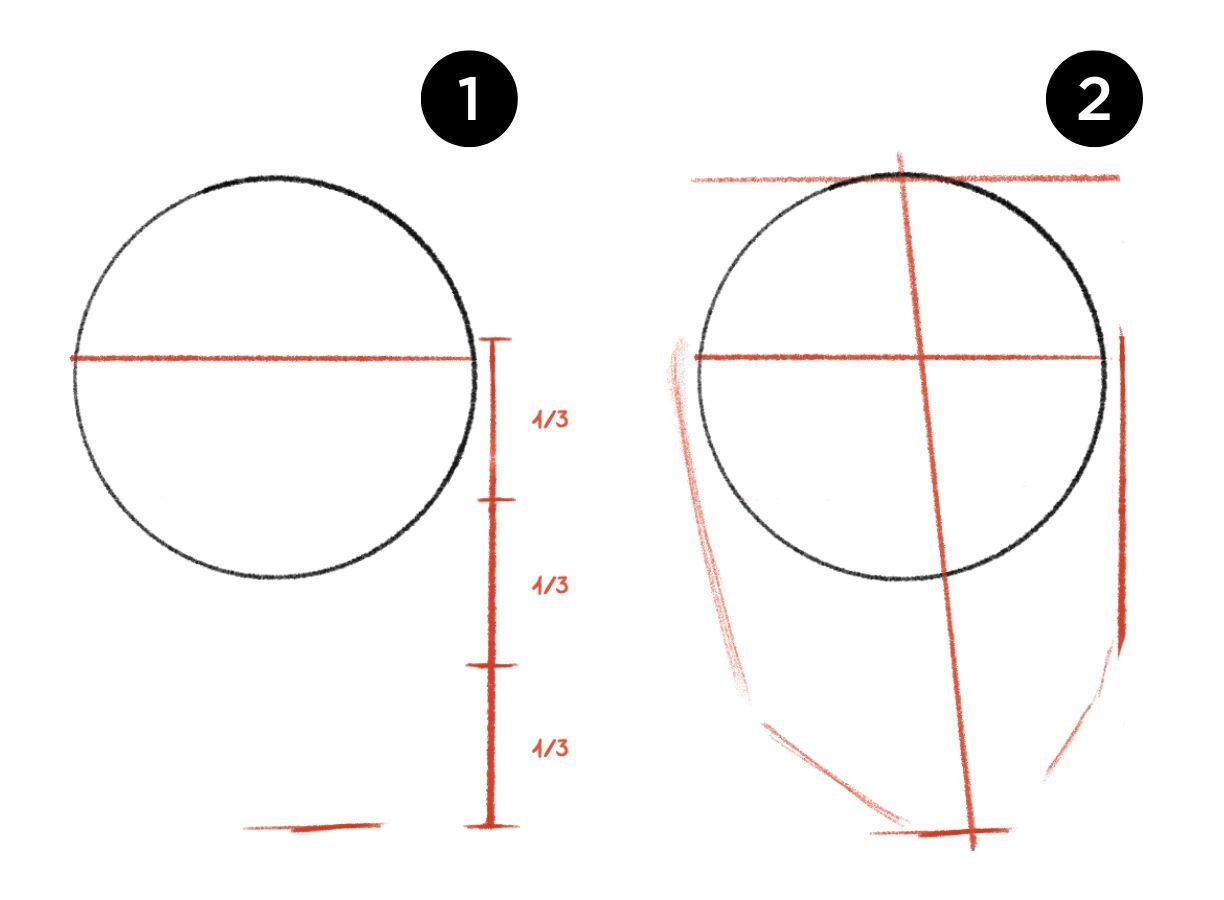
Next, draw a straight line through the center of the circle. This line serves as the "center axis," ensuring the left and right sides are approximately symmetrical, mimicking the symmetry found in faces. Then, bisect the circle horizontally with another line. Extend this line downwards along the central axis to match half the height of the circle.
Within the circle, divide each half into two equal parts using short lines. This divides the circle into four sections and extends another half-circle height downwards at the bottom.
Within the circle, divide each half into two equal parts using short lines. This divides the circle into four sections and extends another half-circle height downwards at the bottom.
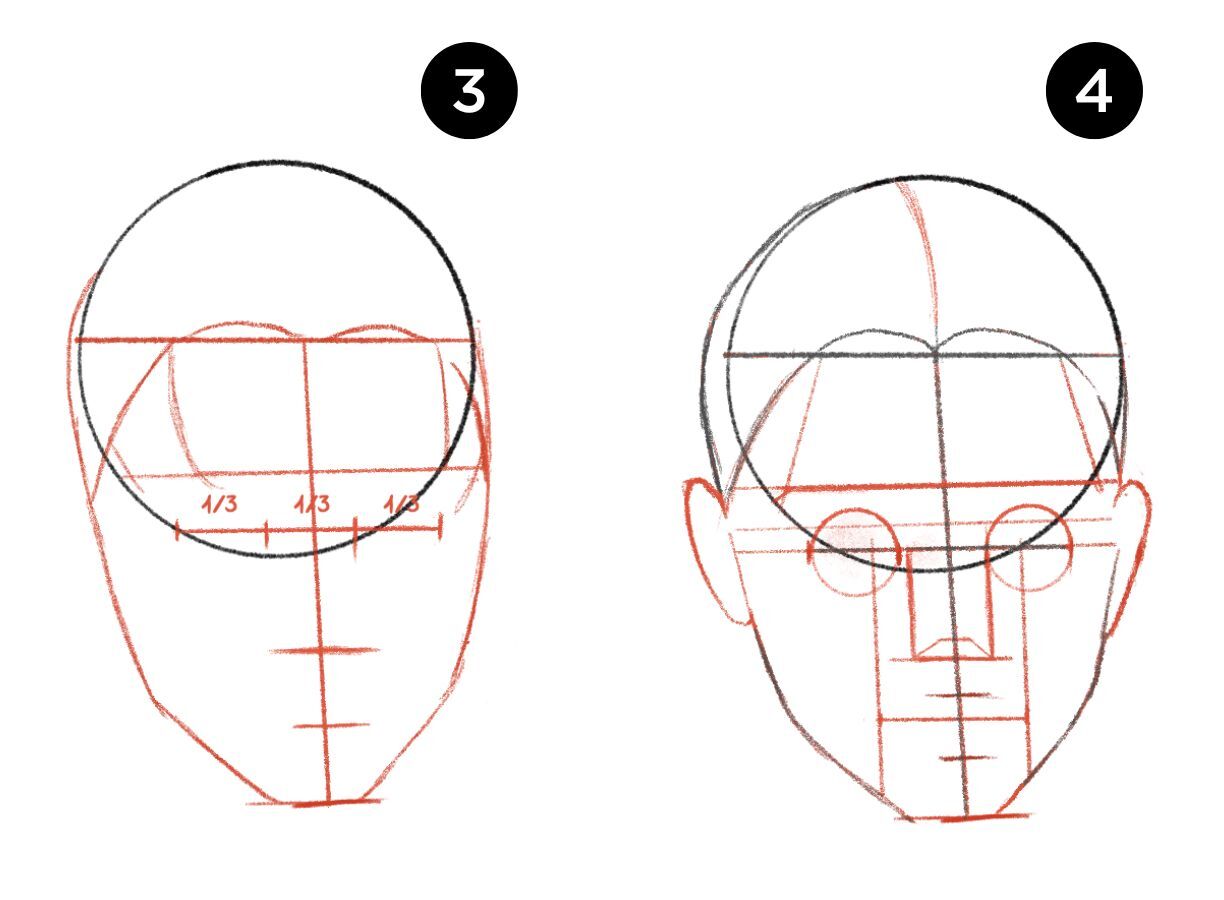
Construction completed. Now it's time to proceed with the drawing. Connect the two circles to form a unified shape. These connected circles will represent the skull and lower jaw. Since there are no protruding bones, this step should be relatively straightforward.
You can choose to make the connecting lines either straight or curved outward, depending on the desired appearance of the face. Additionally, consider whether you want the cheeks to appear fuller or more sunken in for a different effect.
You can choose to make the connecting lines either straight or curved outward, depending on the desired appearance of the face. Additionally, consider whether you want the cheeks to appear fuller or more sunken in for a different effect.

The eyes and mouth are proportionate and not overly wide or narrow, we further divide the face horizontally. We cut each side in half, then half again. This gives us a total of eight equally wide parts.
The left eye spans from the second to the fourth division line, with the right eye mirroring this placement on the opposite side. The pupils should align with the third subdivision line, precisely at the midpoint of each half.
The width of the mouth should approximately match the distance between the pupils. Sketch a pair of eyes, a mouth, and a small U-shaped line for the nose. While perfection isn't necessary, it's essential to define the corner points clearly.
Our initial sketch is complete. I've marked the areas for the eyebrows and lightly outlined the lips. However, fret not, as we'll delve into all the details shortly.
The top eye lid shape is not the same for all, and even small changes can make a big look change. Most times, the top lid, in girls, curves up fast then drops slow. The best start to get this curve is from the eye's wide end. But the bottom lid curves less than the top and goes a bit more to the side. Also, the low lid edges can tilt up, a lot when you laugh, since laugh muscles pull the outer eye corners up. The line on the top lid, often seen as the most love-like part of the face, is very key. Different looks come with lid lines on the top touching at many spots. Like, big high lid lines give the known "bedroom eyes" look. Playing with the top lid line can show many feels and thoughts.
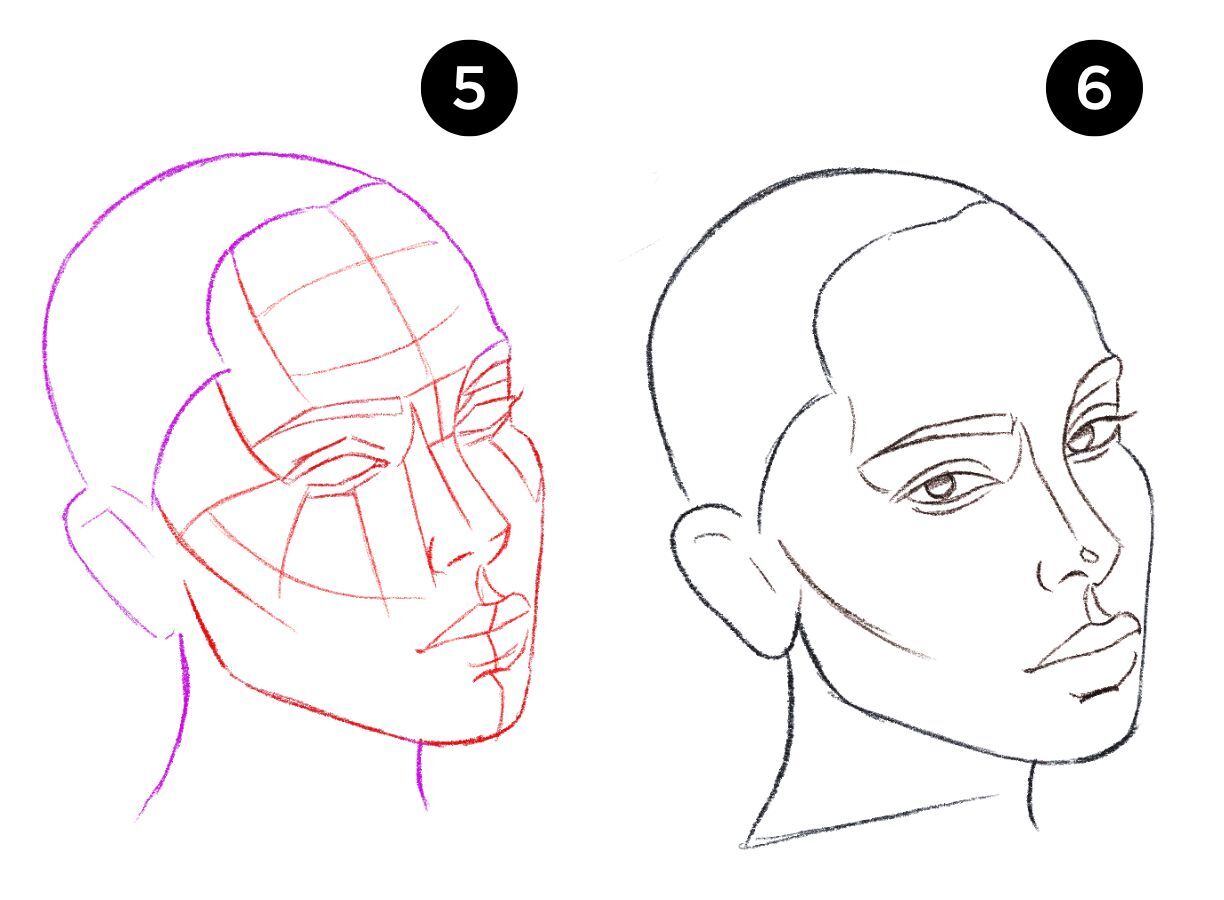
To sketch the eyebrow, outline an area to be filled with hair later. This area typically tapers towards the outer edge. Female eyebrows are often slightly narrower than those of men and may feature a more pronounced arch. However, caution should be exercised as this can give a stern appearance.
Eyebrow hair begins at a 45-degree angle on the inside and gradually becomes flatter towards the outer edge. It's recommended to draw the hair using quick, short strokes. Start from the inside and draw each hair at a slightly slanted angle for a natural look.
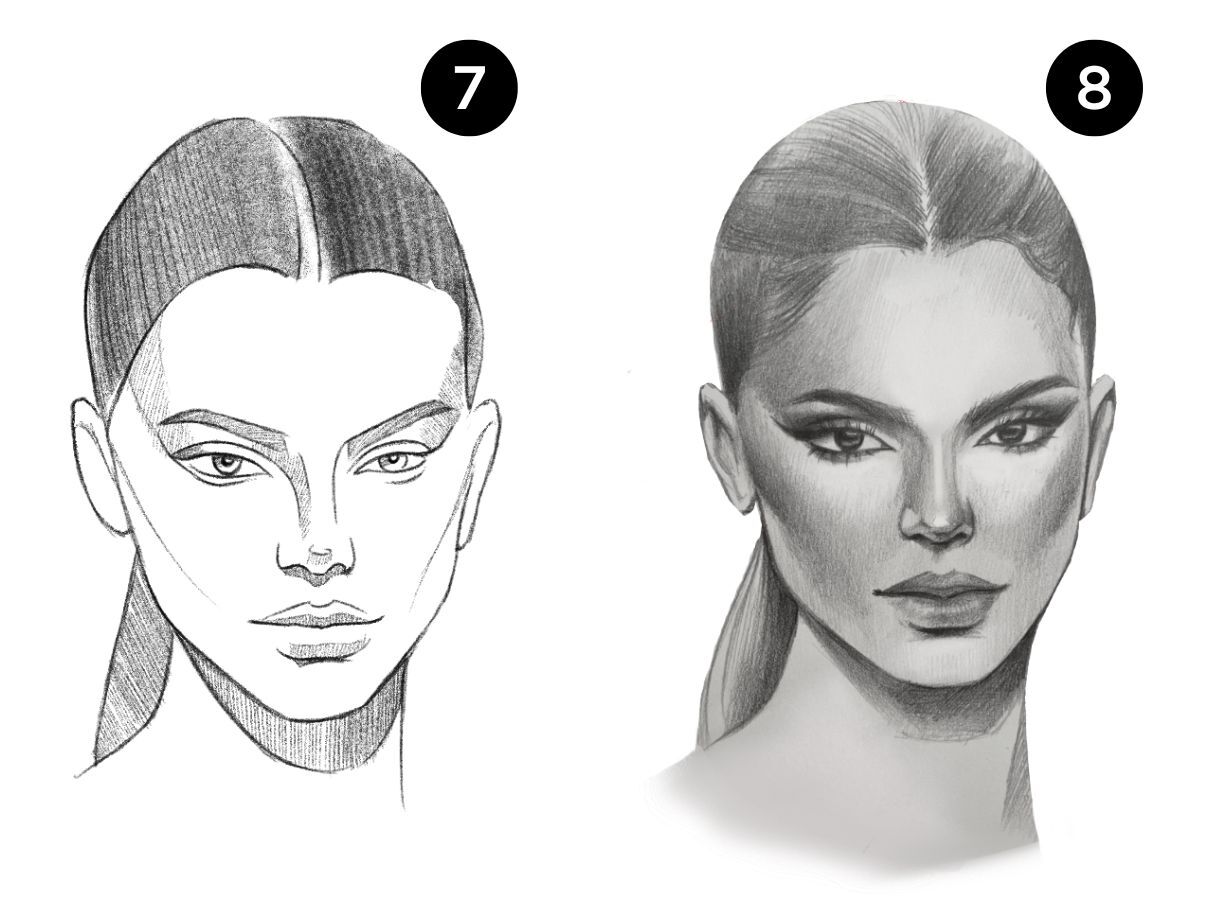
We begin by sketching a rough outline of the crown and outer edges of the hairstyle. It's advisable to create this sketch on a separate layer, allowing us to easily conceal the preliminary hair drawing later. The parting line extends from the hairline auxiliary line—slightly right of center—sweeping upward with elegance. From the crown, the hair cascades towards both ears. Depending on the desired looseness of the hairstyle, multiple lines can define its boundaries. Below the ears, the hair reemerges, flowing freely in brisk strokes, with an opportunity to indicate the neck as well. While drawing the hairlines, you may notice certain curves, curls, or areas you wish to enhance.
In portrait drawing, there are noticeable differences between male and female faces, although they share similar proportions: Women typically have a more rounded face shape. Bones, muscles, and facial planes are usually more prominent in men. Women often have larger eyes and higher eyebrows compared to men. Feminine faces tend to exhibit a smoother texture. While overall proportions may vary only slightly between genders, it's the specific shaping and alignment of facial elements that contribute to a face's masculine or feminine quality. For further exploration, readers can delve into drawing men's faces in a separate article titled "HOW TO DRAW A MAN'S FACE | STEP BY STEP GUIDES OF DRAWING PORTRAIT FROM THE FRONT, SIDE AND A 3/4 VIEW".
As your hand becomes accustomed to the swift movements, lines, and curves of the hair strokes, defining a clear, sweeping hairstyle becomes much easier. For the final hair drawing, it's advisable to use a separate layer once again. Here, we can refer to the pre-drawn hairstyle and easily conceal it later, as mentioned. If needed, we can also erase excess hair protruding into the face without affecting the facial features. Experimenting with different line widths and opacities is worthwhile when drawing the hairstyle. In our illustration, individual strands are accentuated with darker lines, while subdivision lines within the strands are lighter and less prominent. However, the most crucial aspect when drawing hair remains line speed.
If you want to dig deep into how to draw faces, come join our full online class, "Fashion Portrait." Made for those who want to get really good at making face art, this class gives a clear way to learn, with a big focus on color stick work.
Our class teaches you all about various facial positions, ranging from full-face renderings to 3/4 views. As you learn, you will find out how to show off what makes people look different from each other and how to draw men's faces well. Our teachers know a lot about this stuff and will lead you step by step. They make sure you use color sticks to the max to make art that looks real, full of what makes a person who they are. Don't let this chance go by to make your face drawing way better. Come sign up now!
Our class teaches you all about various facial positions, ranging from full-face renderings to 3/4 views. As you learn, you will find out how to show off what makes people look different from each other and how to draw men's faces well. Our teachers know a lot about this stuff and will lead you step by step. They make sure you use color sticks to the max to make art that looks real, full of what makes a person who they are. Don't let this chance go by to make your face drawing way better. Come sign up now!
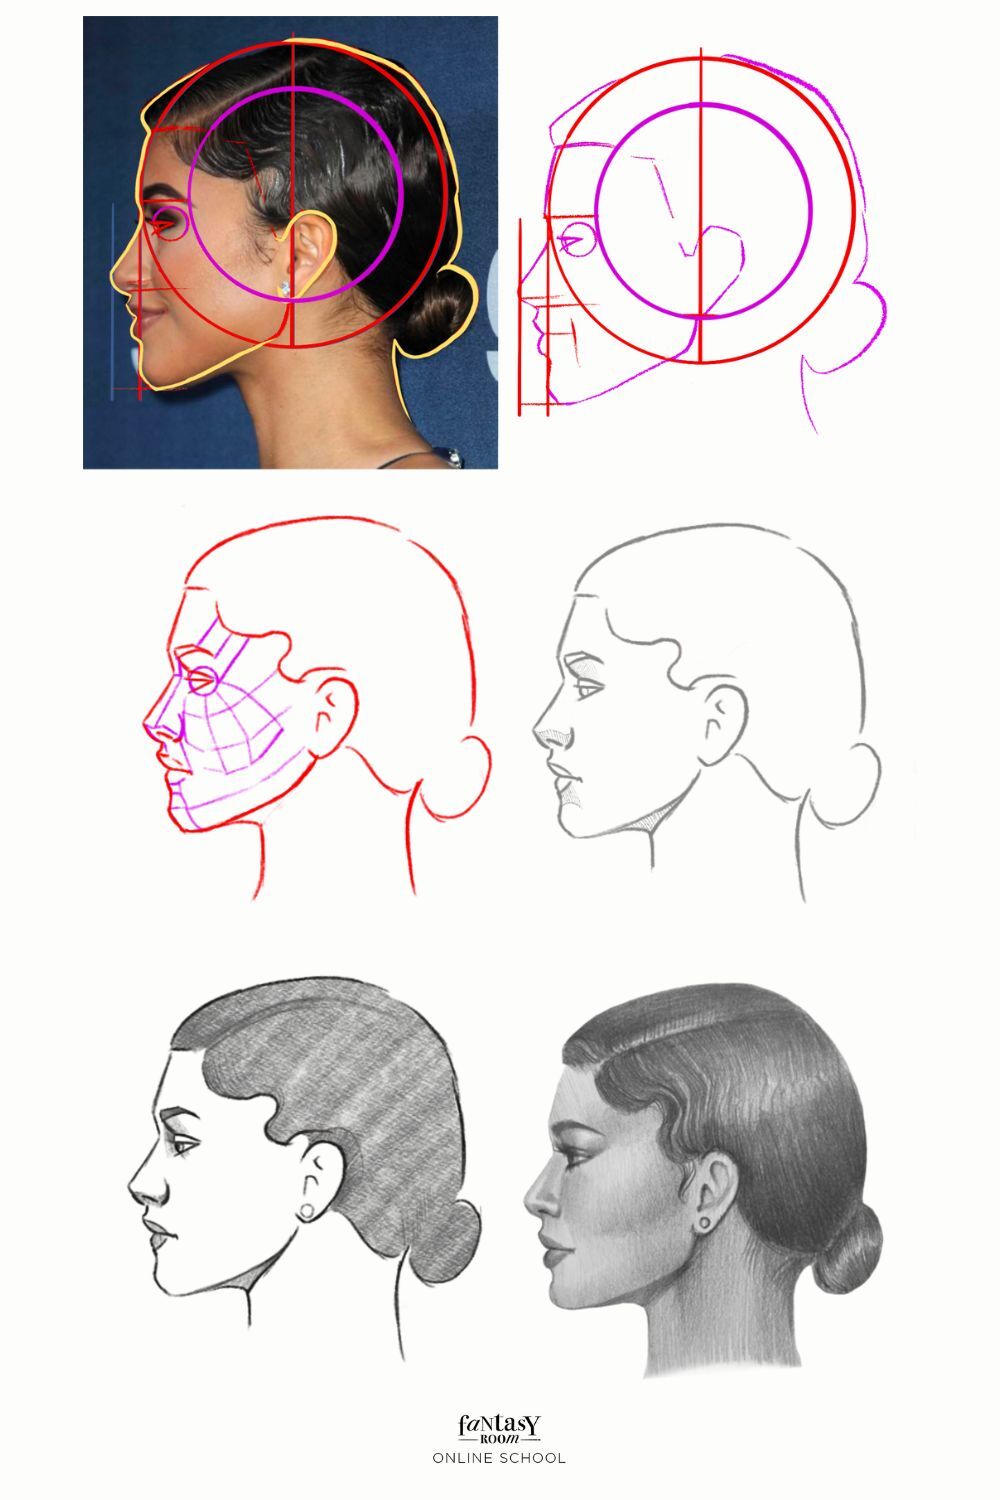
How to draw a female face in profile
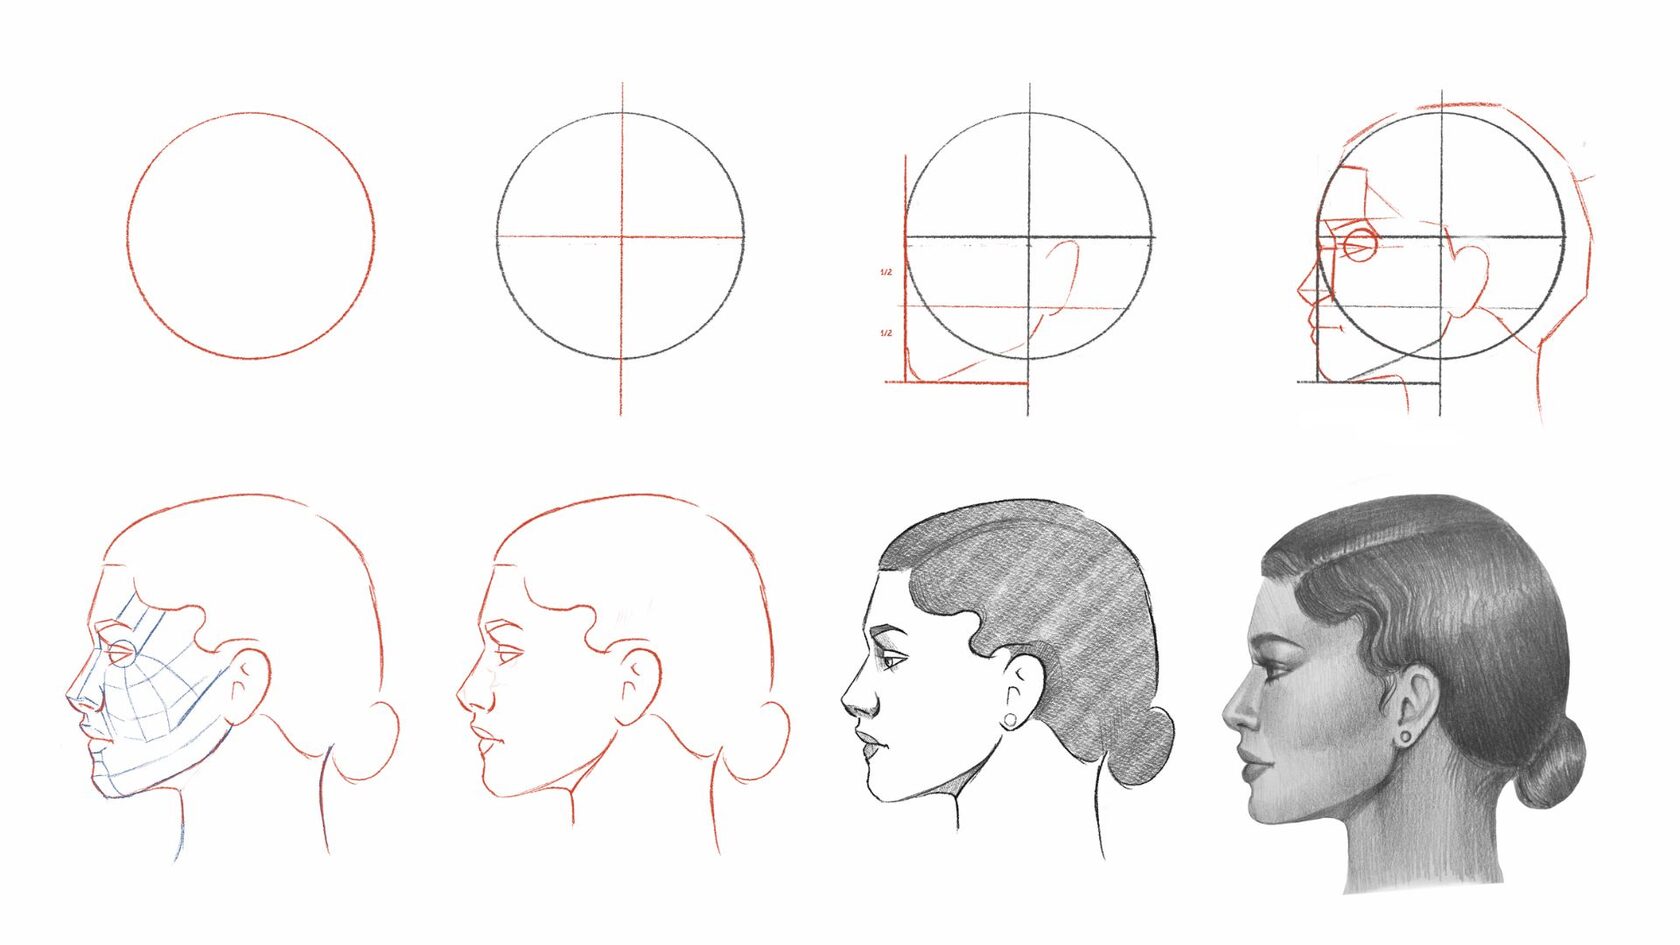
Sketch an oval shape and draw a line at the bottom, slightly distanced from the oval by a little more than half of the oval’s vertical diameter, or slightly more than the oval’s vertical radius. Connect the oval to the horizontal line to form the outline of the head. Next, draw a long straight line down the center of the oval. Don't concern yourself with shaping the jaw or chin at this stage; these are merely rough guidelines!

Make a head-size stick next to your face sketch. Be sure it's far enough from the face so there's space for the nose. Cut the stick into three even parts and draw soft lines across the head with a flat tool. Keep the lines easy to rub out later.
Now with the lines set, let's sketch the top part of the head. At the spot where the main line cuts the face, make a small, smooth arch – try not to make it too sharp to stop drawing too much look to the brow spot. We want it to look easy and not too strong. Then, put in a small rise for the brow and use the egg shape to guide you as you sketch the forehead and the rest of the head above.
Now with the lines set, let's sketch the top part of the head. At the spot where the main line cuts the face, make a small, smooth arch – try not to make it too sharp to stop drawing too much look to the brow spot. We want it to look easy and not too strong. Then, put in a small rise for the brow and use the egg shape to guide you as you sketch the forehead and the rest of the head above.
Now that you have the front part of your lady's side face drawn, it's the right time to put in some details of her face. Start with a bent line to make her shut eye and tall eyelashes close to her face's front. Next, draw her ear with lots of bent and round lines right near the middle of her head. Also, you can add round lines for the big ring that hangs from her ear. Finish this by making the front and back of her neck, and then we can go on.
After completing this outline, we'll proceed to add inner details to the hair.
You can use numerous slightly curved lines placed close to one another to form the hairline on her head, extending from above her ear to her forehead.
After completing this outline, we'll proceed to add inner details to the hair.
You can use numerous slightly curved lines placed close to one another to form the hairline on her head, extending from above her ear to her forehead.
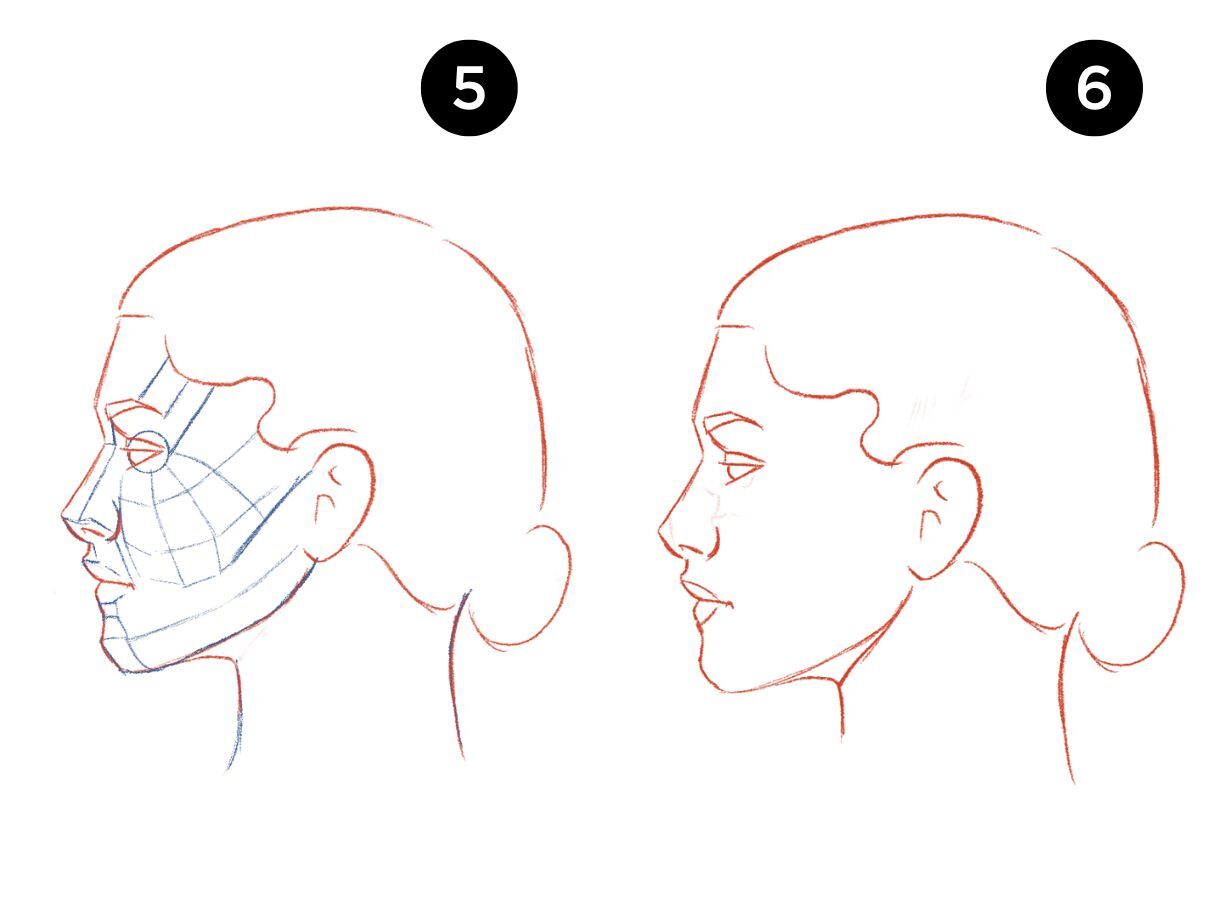
Let's keep going with the side face art of the woman. Now, put in more small rough lines at the bottom part of her hair, like the picture we're using shows. After all these parts are on the paper, we can get ready to add the last bits in our next step.
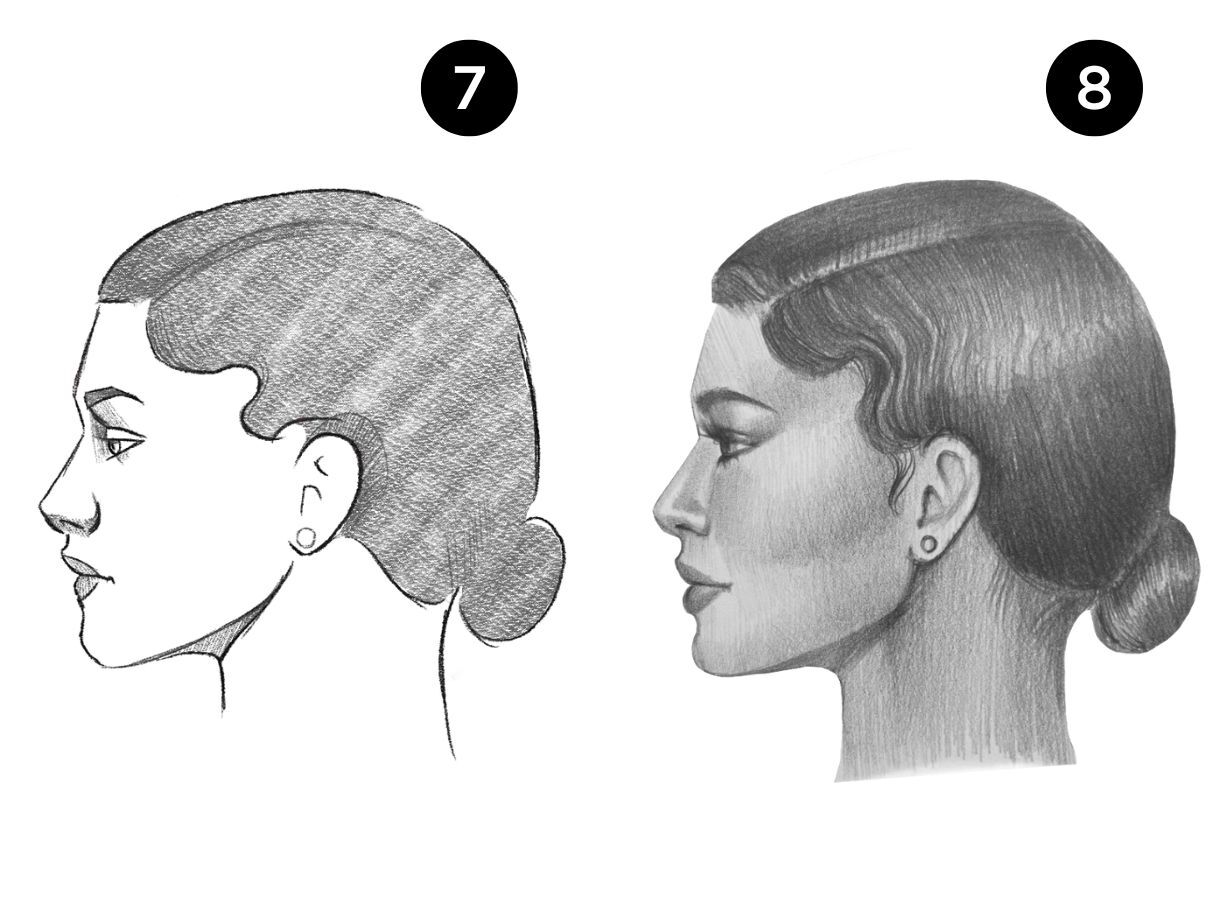
Now, it's time to put on the final touches and parts to finish the side look of of the woman's side profile. Start by drawing many tiny curved lines in her hair. This will make her hair look more real and give the art depth.
Then, color the gap between her hair and where her hair starts with full black, and go on to fill in her brows.
End the art by drawing lines for her neck bone, and then sketch the top part of her dress at the bottom of the art.
Once these bits are done, you can go on by putting in a back scene or more stuff if you want.
Making this drawing of a woman's side profile of the face might have been hard, as drawing real people in an even somewhat realistic fashion is always difficult.
The point of this guide was to make it easier by cutting it into small, easy steps. But, you might still hit snags when you try to get it just right, and this can make you mad.
The point of this guide was to make it easier by cutting it into small, easy steps. But, you might still hit snags when you try to get it just right, and this can make you mad.
If you found this drawing hard to do, think about using extra paper and pencils to get better. Look closely at the pictures in the guide and cut them into easy blocks. Use these block forms to draw the round part of the head, long part of the neck, and the top bit of the body. They don't have to be on point or the same, but they should make up the base.
When you've got a basic shape down, slowly put in more bits with care. With each new part, you'll watch the picture get more clear.
Another way is to look at a real face. If you can, ask someone who looks like the one in your picture to let you draw them. Even if they don't match up, having a real face from the side helps a lot. Also, you can look up many side face pics on the web for more to work with and look at.
Another way is to look at a real face. If you can, ask someone who looks like the one in your picture to let you draw them. Even if they don't match up, having a real face from the side helps a lot. Also, you can look up many side face pics on the web for more to work with and look at.
Getting better at drawing is just like getting better at any skill, kind of like keeping a kitchen knife sharp. If you draw often, it's like using a stone to keep your skills in good shape. Make sure to draw every day, even if it's just for a little bit, because doing it a lot is the key to getting better bit by bit. Use real things to copy from and also try making things up. Test yourself by trying out new views and ways, and push what you can do with drawing. Look to learn new ways to draw by checking out Fantasy Room Online Courses. Keeping up with this steady work will really help you get better at art.
Learn the basics of drawing for beginners in our course, where we'll help you unleash your creative potential. Gain confidence in using pencils, learn the basic principles of composition and perspective, and learn how to create impressive works of art. Join today and start your creative journey!
How to draw a face 3/4 view
This guide helps you learn how to: Drawing faces in the 3/4 view with accuracy and proportions.
Get better at making "face pictures" with true lines and see clear wrongs in what you made before. Make real looking faces with no need to look at other photos.
If it's hard for you to draw faces from your head, this guide is key to beat that.
Get better at making "face pictures" with true lines and see clear wrongs in what you made before. Make real looking faces with no need to look at other photos.
If it's hard for you to draw faces from your head, this guide is key to beat that.
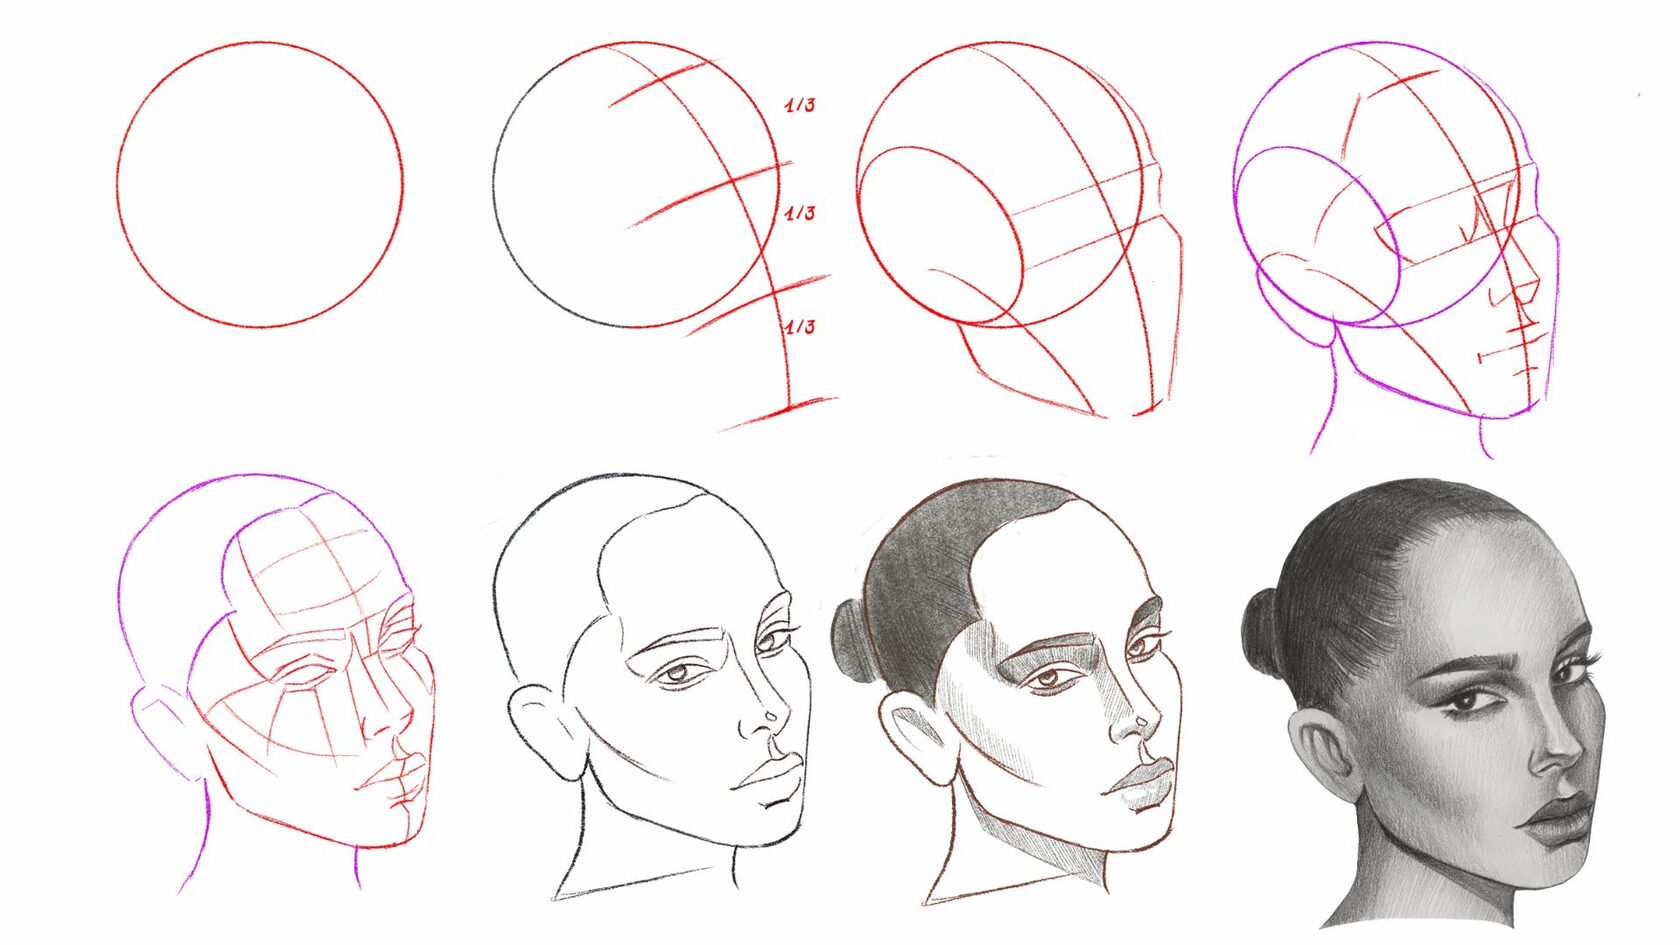
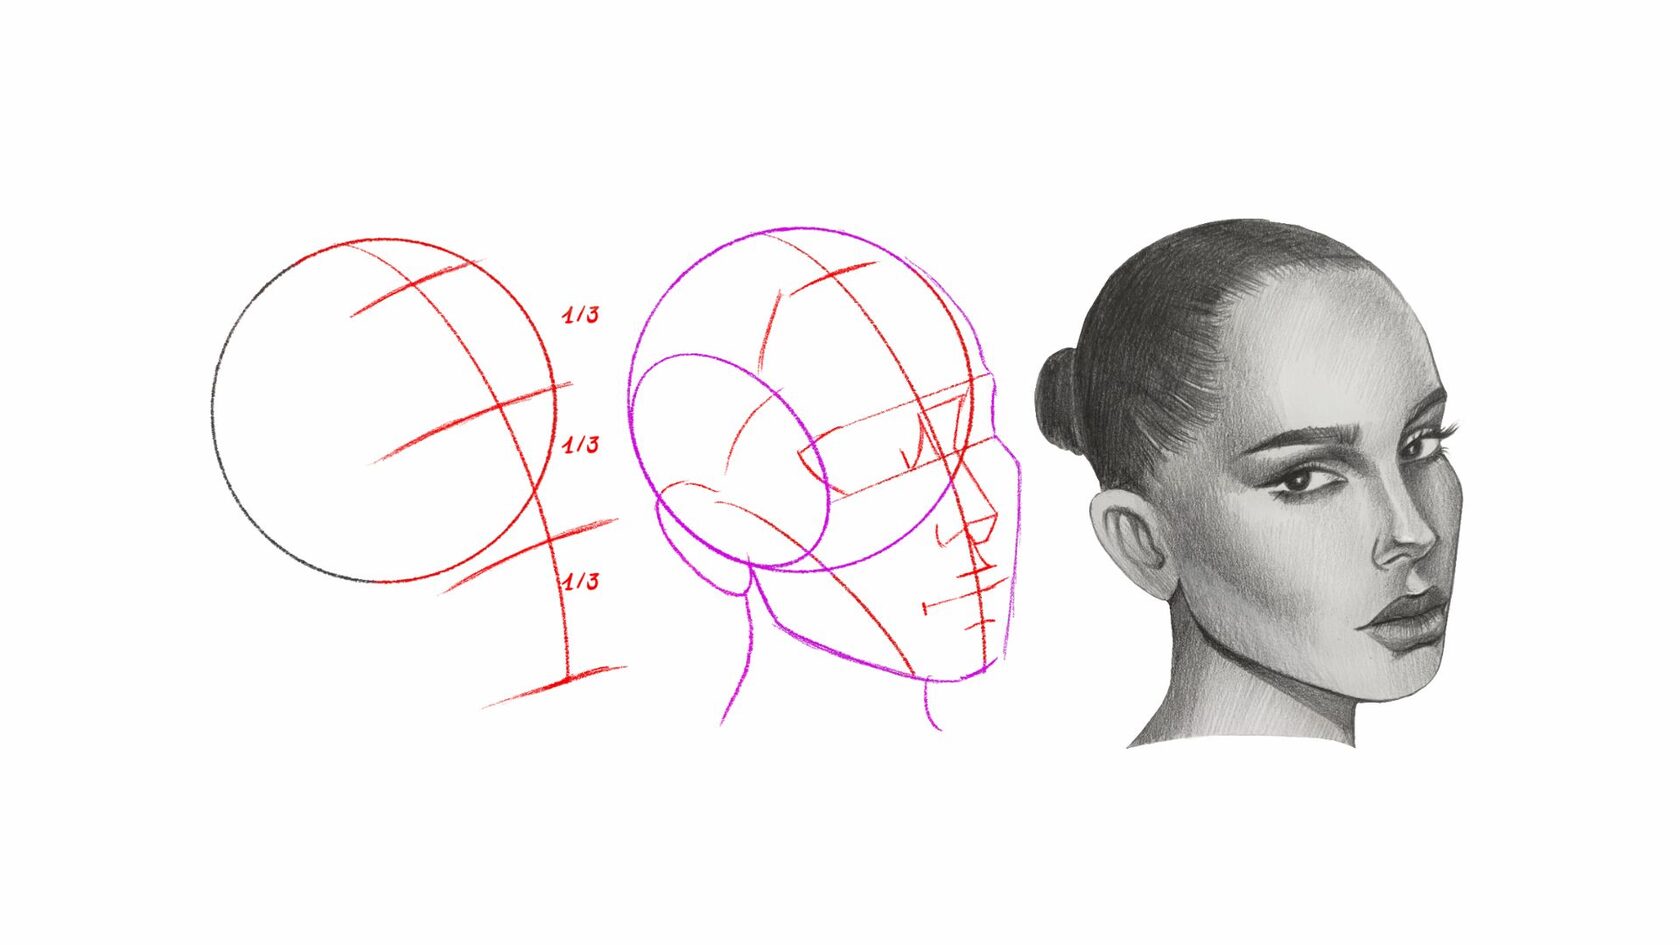
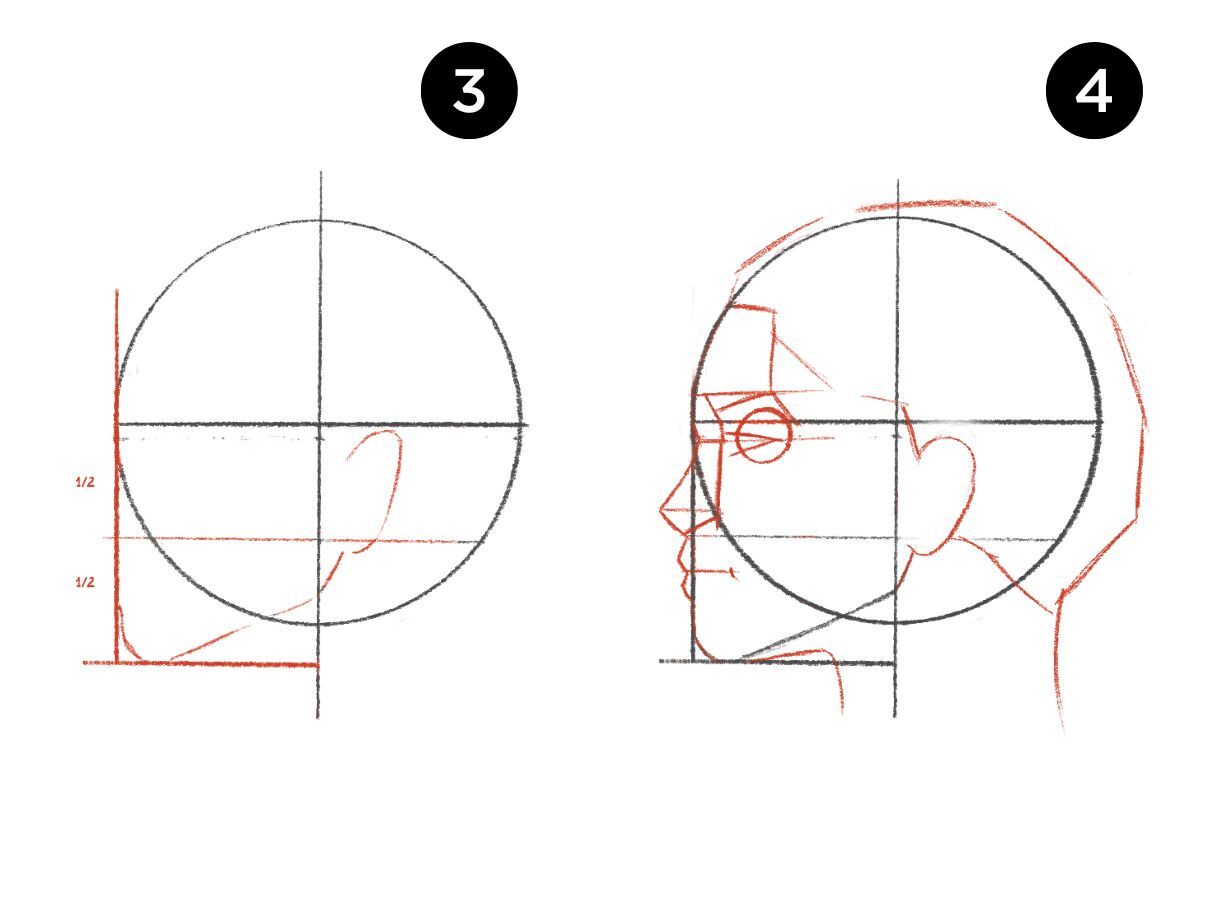
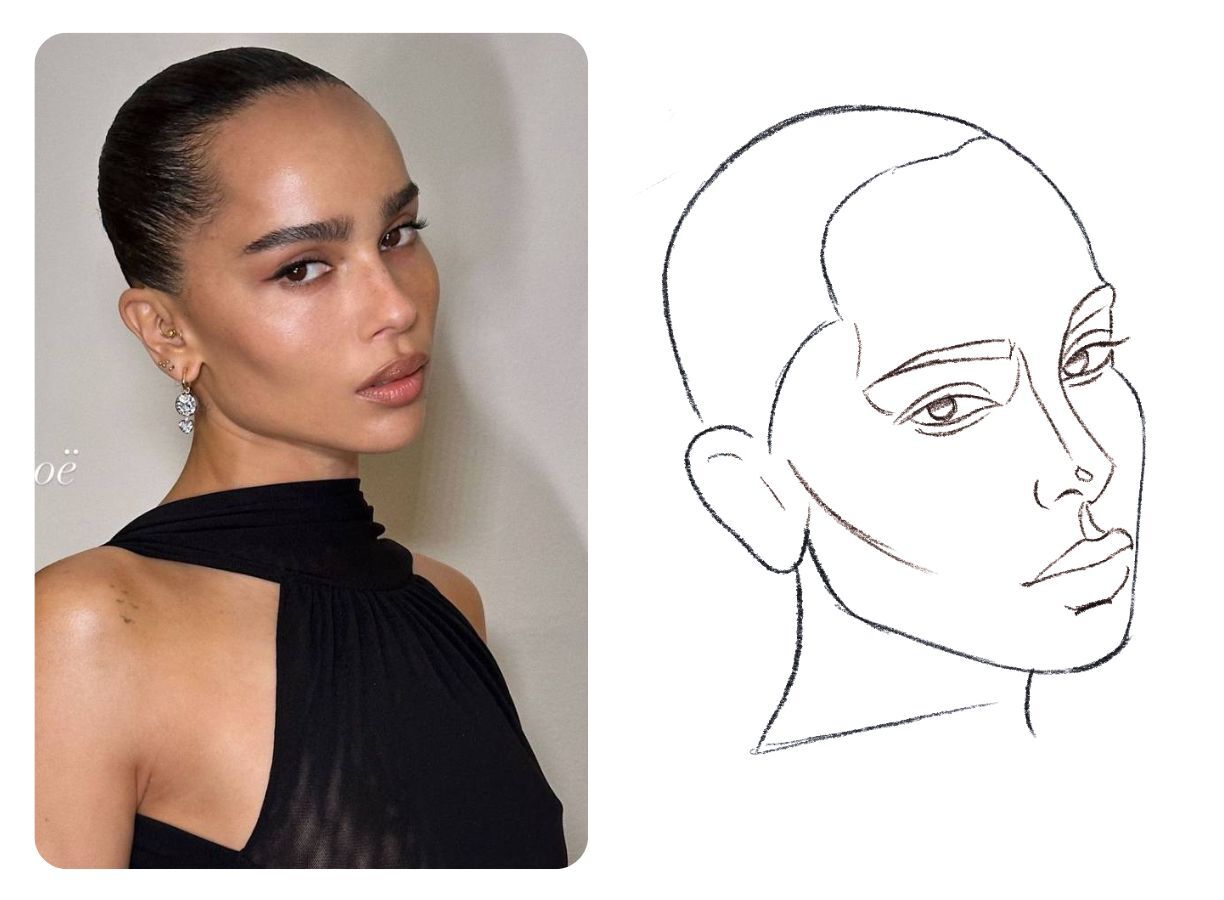
Using an HB pencil, draw a circle. Then draw a small line at the bottom to mark the bottom of the chin. This line should be roughly 1/2 the diameter of the sphere. With a 2B pencil, gently sketch a simple curve connecting the left side of the circle to the chin. Keep the line light as it will serve as a basic guideline, and finer details will be added in subsequent steps. Using an HB and then 2B, draw a raindrop shaped loop that starts at the chin and wraps around the right side of the circle and ends back at the chin.
Let's think about the parts we can't see, even if we can't see them right now. It's key to picture these out-of-sight spots when you make a face look 3/4 turned. Pull the center line down to show the low middle of the face, all the way to where the chin is, and put your face parts there. Next, find out where the hair starts on their head, as this is not the same for all. Cut the space from the start of the hair to the chin into three same bits. The first spot is for the start of the hair, next comes the line for the brows, then the spot for the end of the nose, and last, the point for the end of the chin.

Start at the head's top and go down to the chin end, now cut the face into two and note that spot. This middle is the spot for the eyes, real good for making a side face look right. Look at how the person's brow bends, then make a line that goes like that. The thin end of the right brow lines up with the edge of the small round shape on the head's side, but the left brow might look short and part of it may hide under the nose's top, just like the left eye might.
To assist with eye placement, mark the bridge of the nose at the corners of the eyebrows. Determine the width and angle of the nose bridge, connecting it to the eyebrows, keeping in mind variations between individuals.
Identifying the inner corner of the eyebrows aids in drawing the eyes accurately. Ensure both eyes are drawn on the same horizontal line established earlier to maintain consistency. Both eyes should have similar curvature.
Avoid placing the corner of the right eye too close to the nose. Begin by determining the eye's corner before outlining the entire eye shape, allowing for easy adjustments as needed. Due to the angle, the left eye may be partially obscured by the nose.
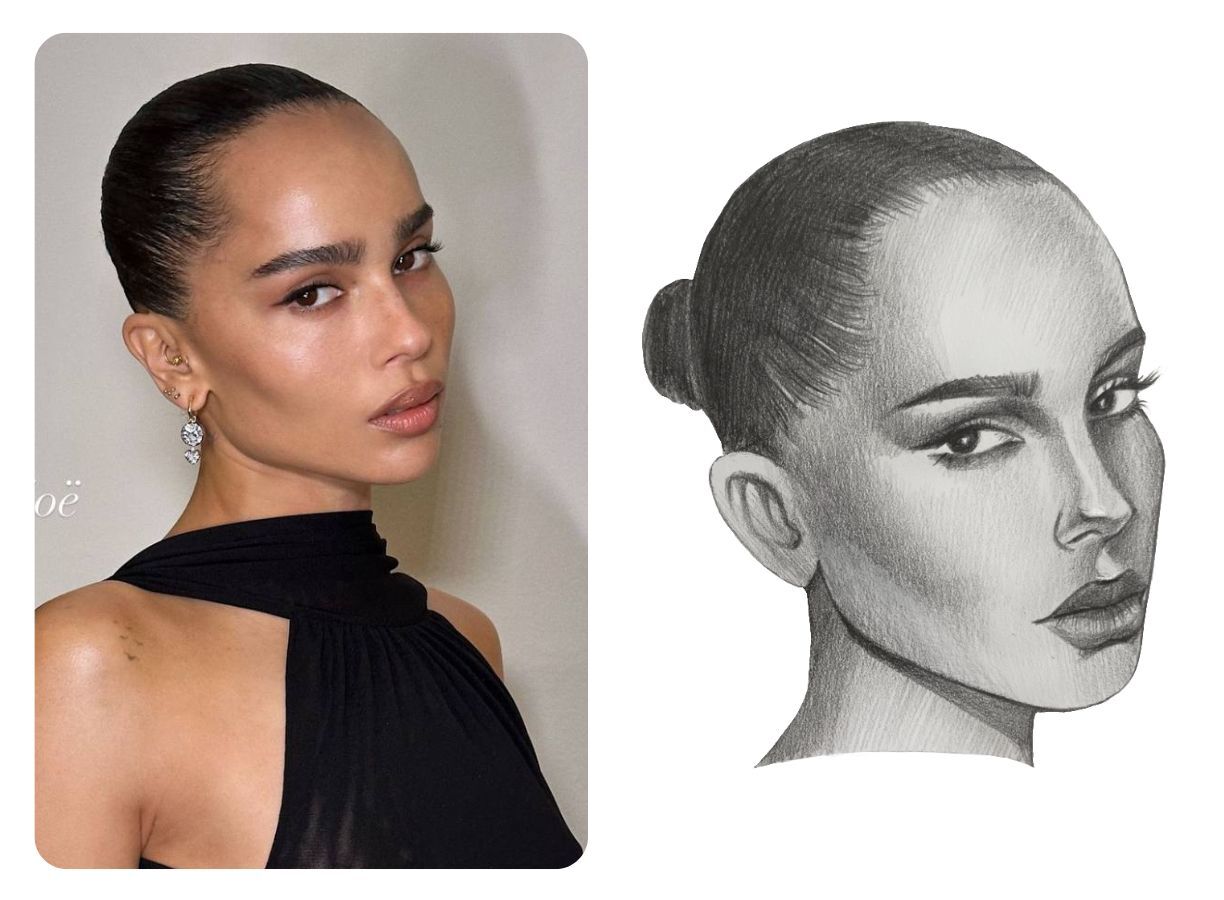
Drawing eyes in a 3/4 view can be challenging, but practice will improve your skills over time. Draw irises and pupils according to the subject's gaze direction, whether towards the viewer or elsewhere. Eyelid curvature should align with that of the eyes, with thickness varying based on individual measurements.

For the neck, envision a cylinder connecting to the skull, resembling how a doll's head fits into place when attached to the neck. Use the same line as the bottom of the chin as a starting point for the sloping back part of the neck that connects to the shoulders. The neck lines shouldn't be entirely flat but slope gently downward, although this varies among individuals based on shoulder structure. You can choose to draw collarbones if desired, although their visibility depends on the clothing worn by your reference or model. Regardless, knowing how to draw them can be useful for different poses or outfits.
Be patient, gentle with yourself, and have faith in the process. With continued effort and practice, you'll notice significant improvement over time.
Draw your proportion lines and guiding lines lightly; this will make it easier to erase any unwanted lines later on.
Observe how the face and each feature change with the tilt and angle of the head. A single face can exhibit countless variations, presenting the challenge of drawing angled faces. However, it also offers a wide range of options to explore.
Dedicate time to practicing drawing each facial feature separately, exploring different angles. This allows for a focused study of each part and how it varies with angle. I recall my initial reluctance when our teacher assigned the task of drawing 30 ears from various angles and individuals. However, looking back, I'm immensely grateful for those exercises; they ingrained the skill of drawing ears into my memory permanently!


