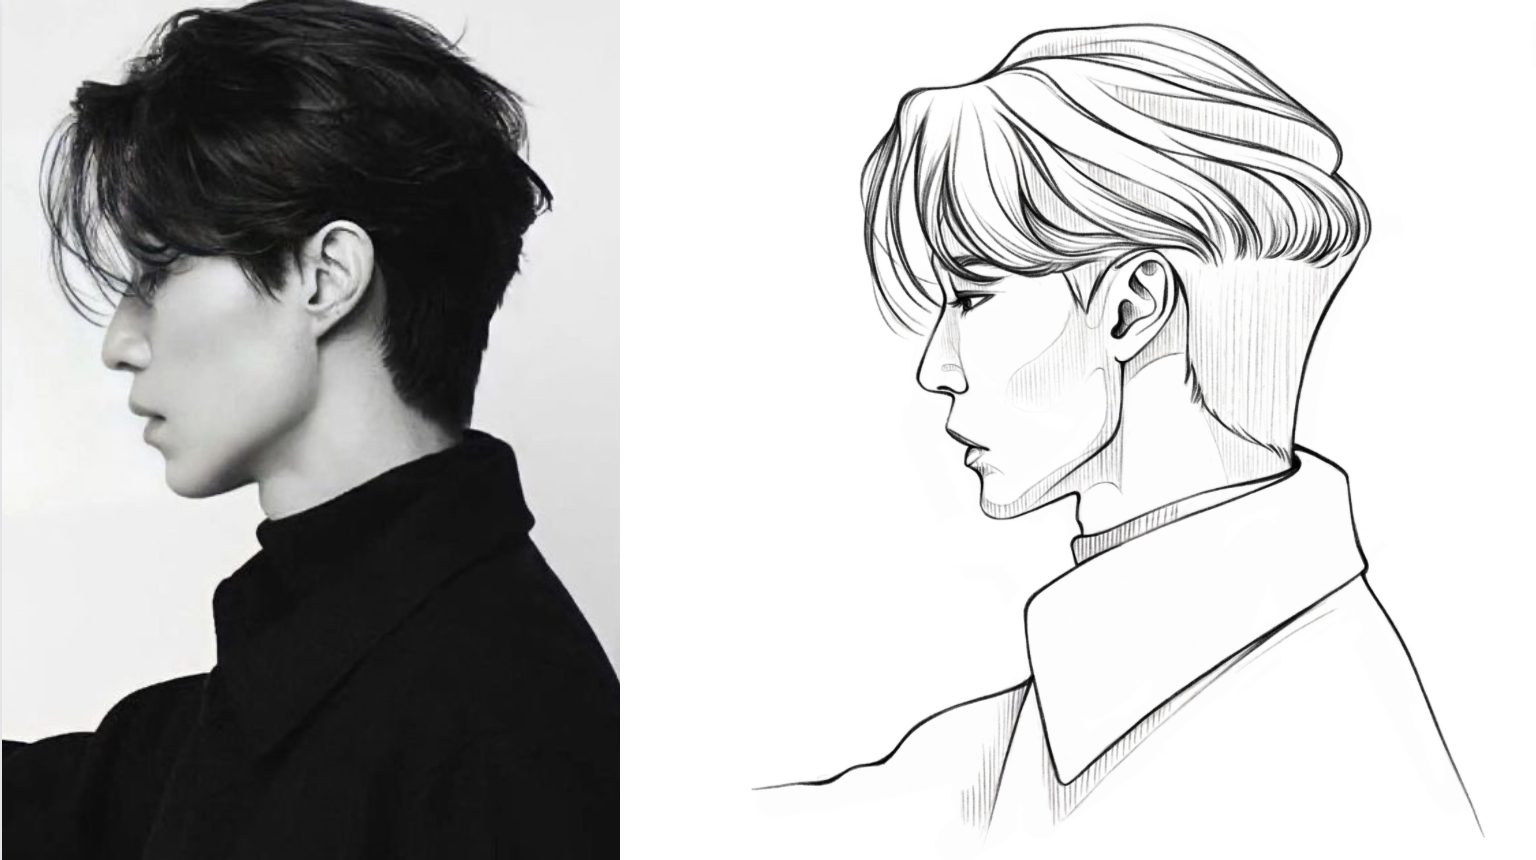
Embarking on the artistic journey of drawing a man's face is an exciting endeavor that allows one to delve into the intricacies of human expression and anatomy. Mastering this skill opens up a world of possibilities for artists, whether they are beginners seeking to develop their foundational skills or seasoned creators looking to refine their techniques. In this comprehensive guide, we will explore step-by-step instructions and valuable insights to help you capture the nuances of a man's face with accuracy and expressiveness. For simplicity, we have divided the tutorial into three segments: drawing a face from the front, side, and a 3/4 view. Let's embark on this artistic exploration together and bring a male visage to life on the canvas or paper.
What are the features of a male face
Distinguishing characteristics of a male face, when contrasted with a female countenance, often include more prominent features and a rugged overall structure characterized by sharper angles. Additionally, males typically exhibit elongated facial proportions and possess larger, broader jaws.
Prior to commencing your drawing, it's beneficial to have a general understanding of the typical locations of different facial features, although each step will elaborate on this aspect. Heads and faces come in diverse shapes and sizes, and their individual features exhibit varying shapes and dimensions. There isn't a one-size-fits-all proportions guide that seamlessly accommodates every face.
However, this guide establishes a solid foundation, assisting you in steering clear of significant errors when depicting a face. Keep in mind its flexibility, allowing for adjustments in the proportions and placement of facial features based on different face types.
Most Common Mistakes While Drawing a Portrait
Creating a lifelike portrait can be challenging, and several common mistakes often arise during the process:
- Misplaced Facial Features: One prevalent error involves misplacing facial features, such as placing the eyes too high or low, skewing the symmetry of the face. Accurate positioning of features is crucial for achieving a realistic likeness.
- Incorrect Proportions: Failing to adhere to proper proportions can lead to distortions in the facial structure. For instance, inaccuracies in the size of the eyes, nose, or mouth relative to the rest of the face can result in an unnatural appearance.
- Wrong Perspective: Neglecting the impact of perspective can lead to a flat and two-dimensional portrayal. Understanding how facial features change in size and shape as they recede or come forward is essential for capturing depth and realism.
- Lack of Facial Expressions: Overlooking the nuances of facial expressions can result in a static and lifeless portrayal. Facial muscles and features change with different emotions, and capturing these variations adds depth to the artwork.
- Inconsistent Lighting: Inconsistent lighting sources or inaccurately rendering shadows can disrupt the three-dimensional quality of the portrait. Attention to light and shadow is crucial for creating a convincing sense of form.
- Unnatural Skin Tones: Difficulty in achieving natural skin tones is a common issue. Overly saturated or monotonous colors can make the portrait appear artificial. Variations in hue and tone contribute to a more lifelike representation.
- Poor Planning and Sketching: Skipping the initial planning and sketching stages may lead to a lack of structure in the portrait. A well-thought-out sketch helps establish proportions and ensures a more accurate rendering of facial features.
- Overlooking Facial Anatomy: Neglecting to study and understand facial anatomy can result in inaccuracies. Knowledge of underlying structures, such as muscles and bones, contributes to a more informed and precise portrayal.
- Rushed Details: Focusing too quickly on intricate details before establishing the foundational elements can lead to a disjointed and unbalanced composition. Gradual layering of details over a well-constructed base is essential for a cohesive portrait.
Being aware of these common mistakes and actively addressing them in the artistic process can significantly enhance the quality and realism of portrait drawings.
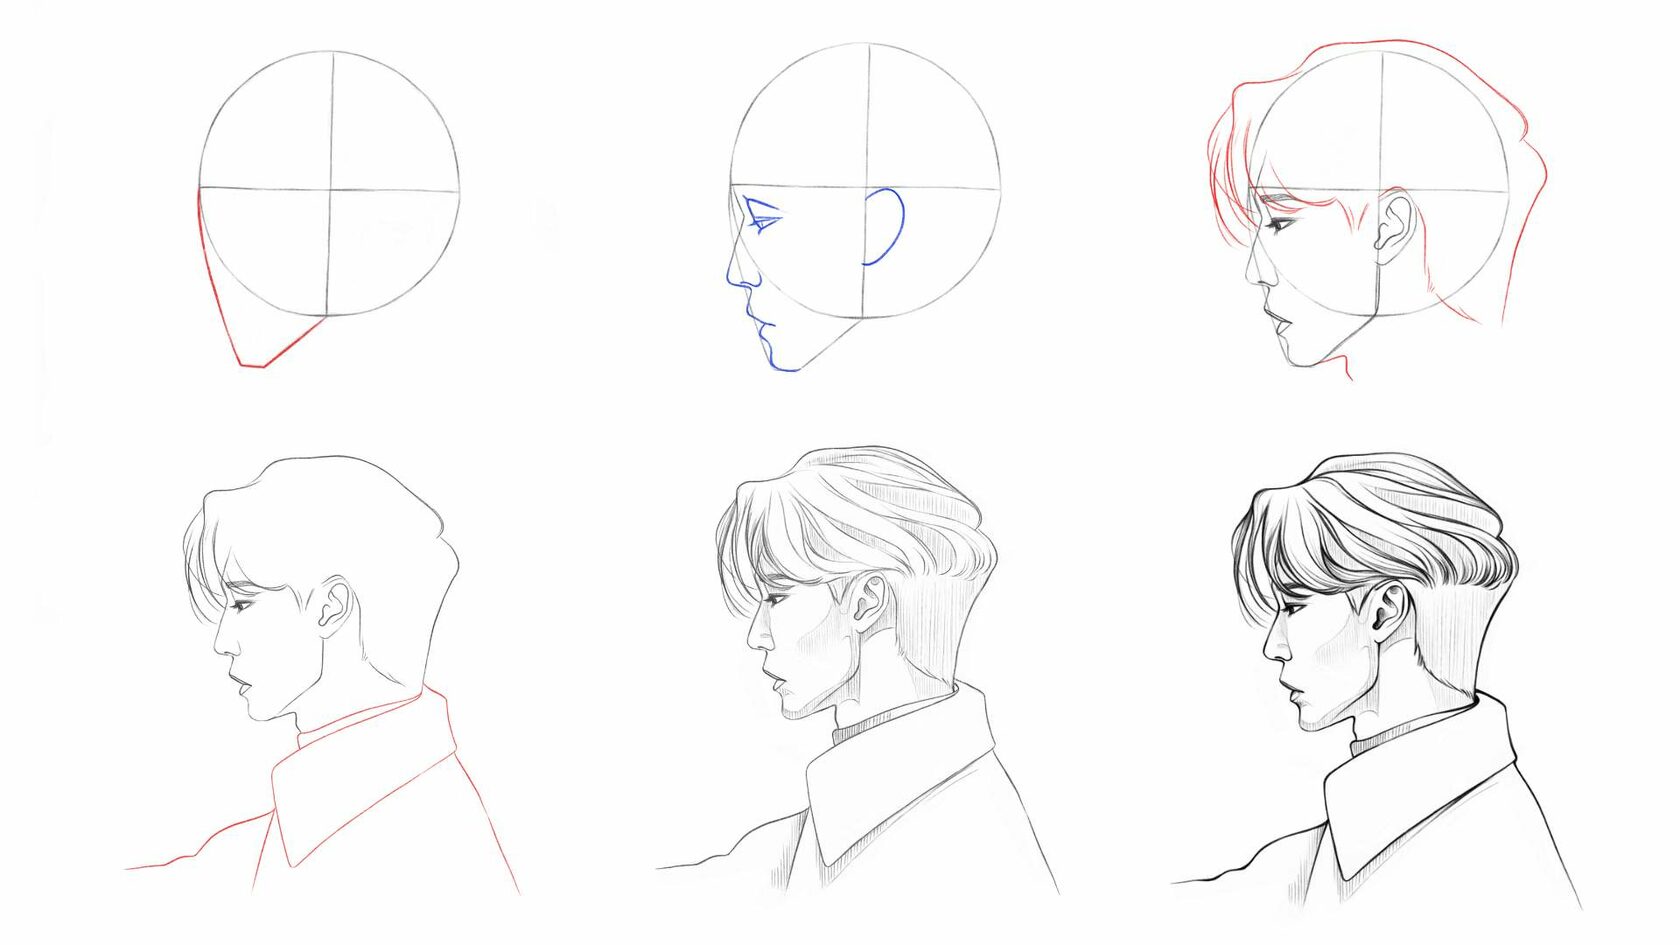
How to Draw a Man's Face From the Side View
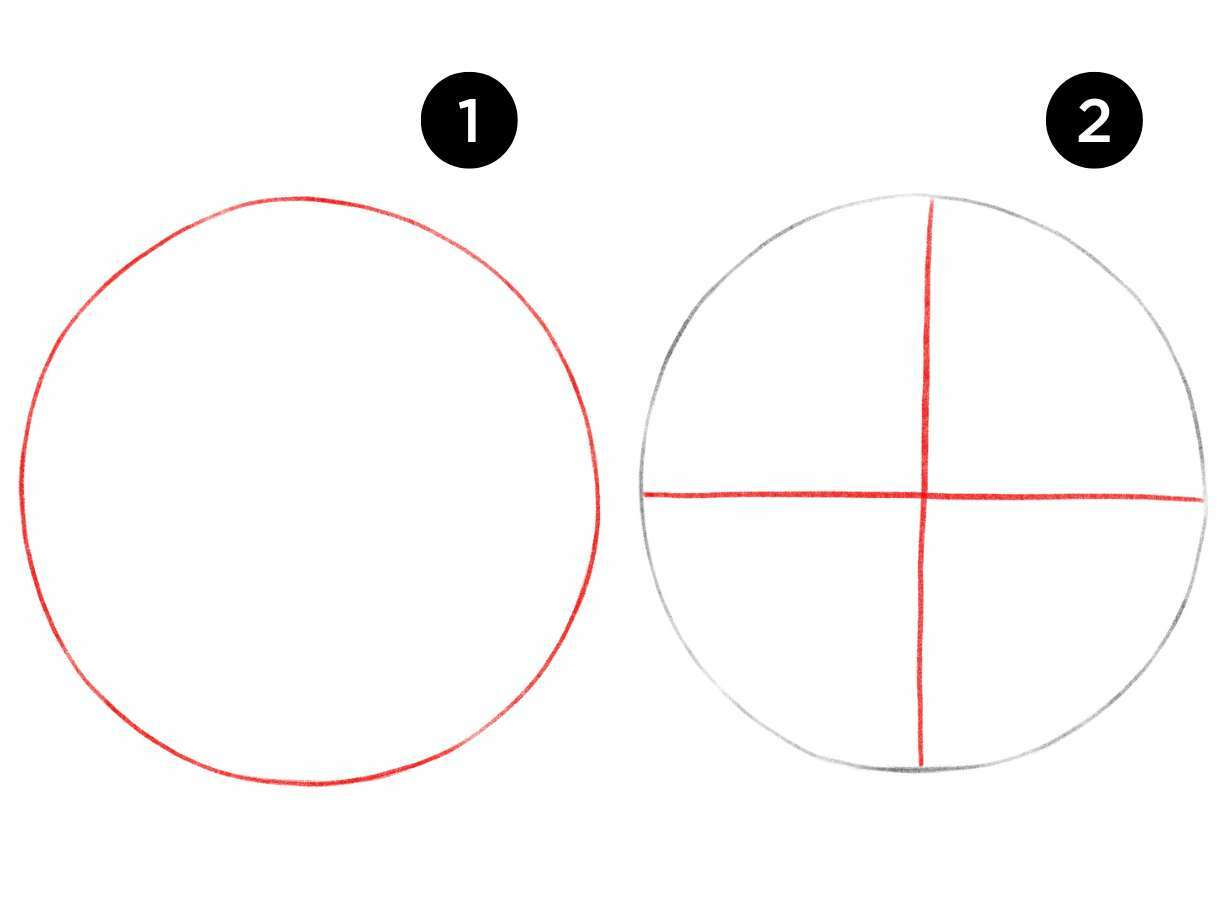
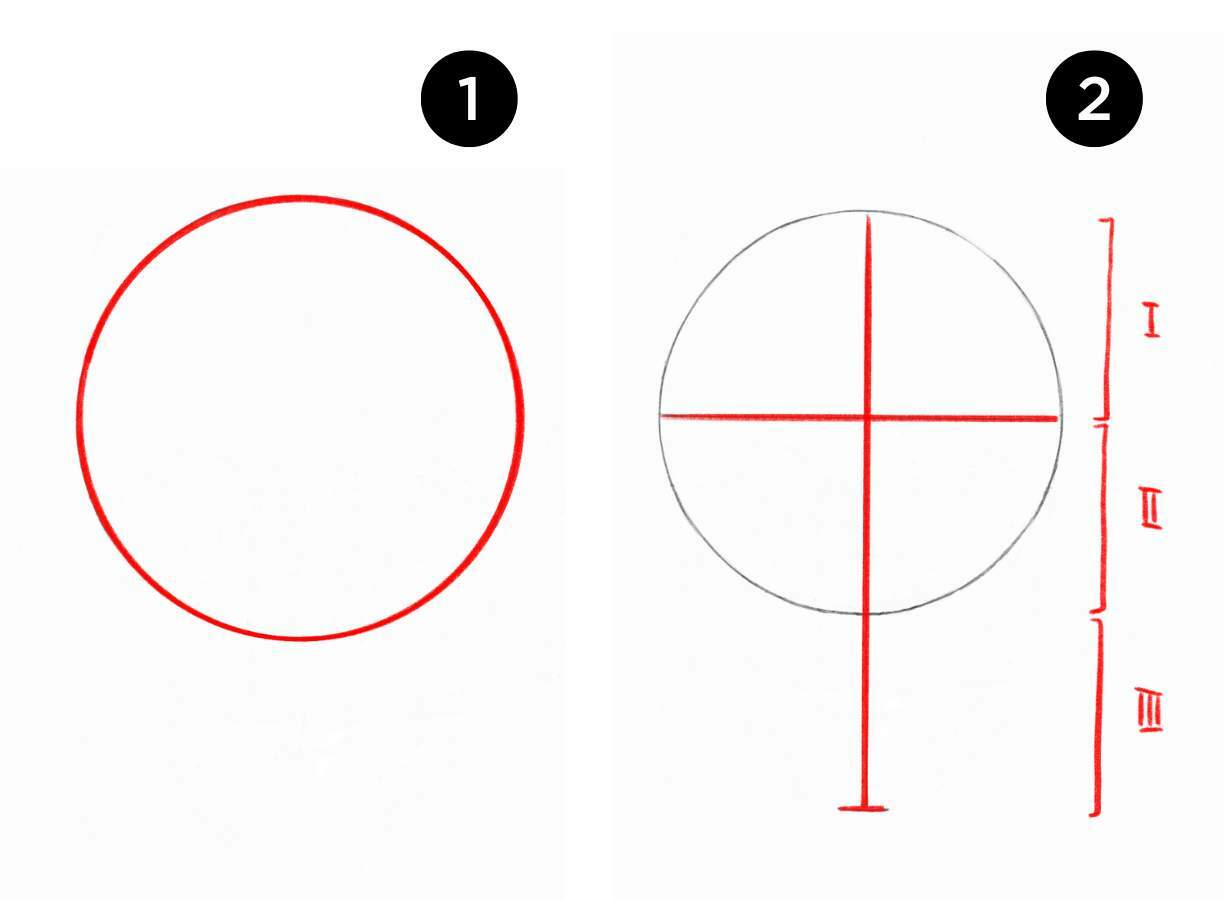
Step 1: Begin by outlining the foundational shape of the head, which is represented by a precisely drawn circle. This circular form establishes the primary volume and framework of the face, laying the groundwork for subsequent detailing. It is advisable to employ a light pencil or thin strokes during this stage to ensure the lines are gentle and adjustable in later steps. Pay close attention to centering the circle on the canvas and ensuring its proportions are accurate. As the entire construction of the face hinges on this initial step, invest ample time and care in its execution.
Step 2: Proceed to bisect the circle by adding both a horizontal and a vertical line.
Step 3: Starting from the far-left end of the circle's horizontal line, sketch a slightly convex line downward to establish the portrait's orientation. Create the chin and jawline, ensuring the jaw connects seamlessly with the far end of the circle's vertical line.
Step 3: Starting from the far-left end of the circle's horizontal line, sketch a slightly convex line downward to establish the portrait's orientation. Create the chin and jawline, ensuring the jaw connects seamlessly with the far end of the circle's vertical line.
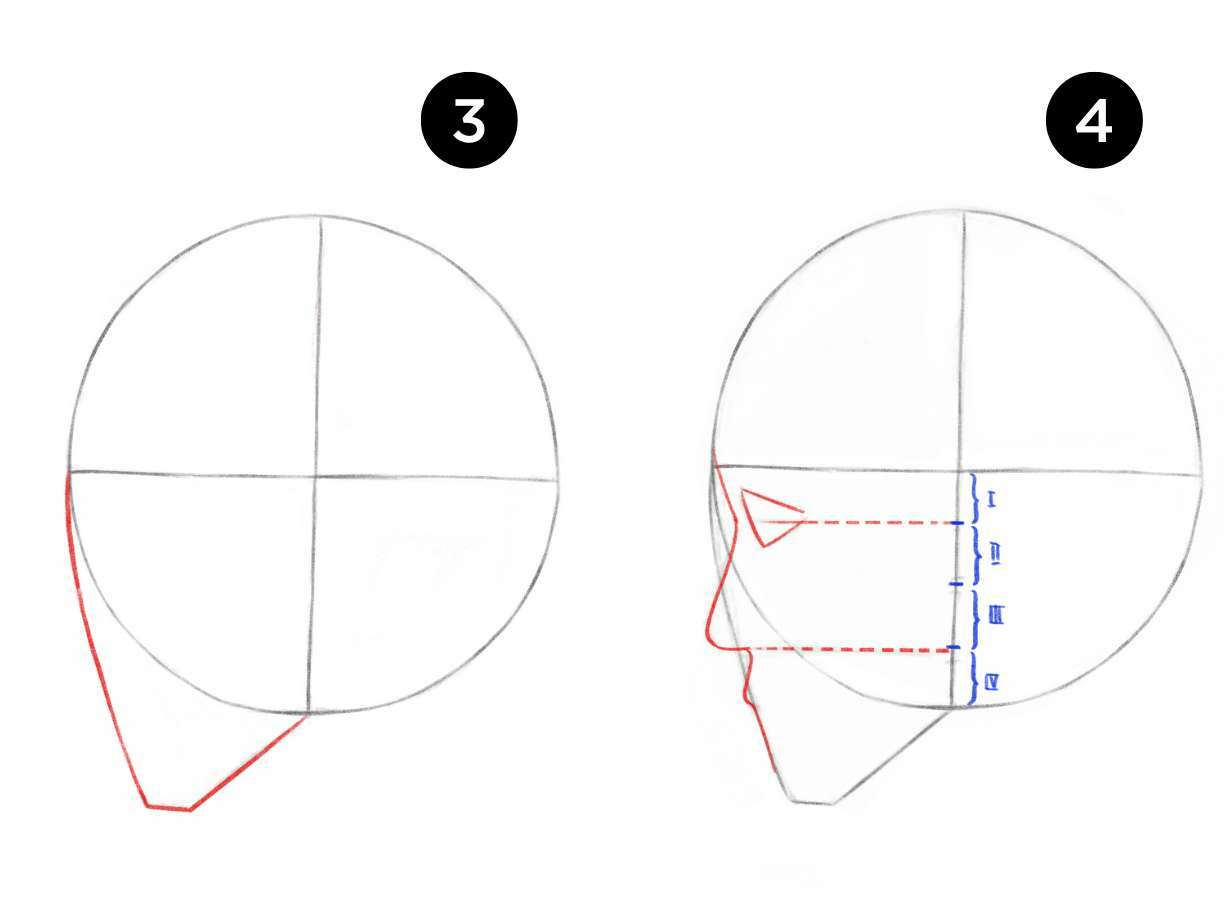
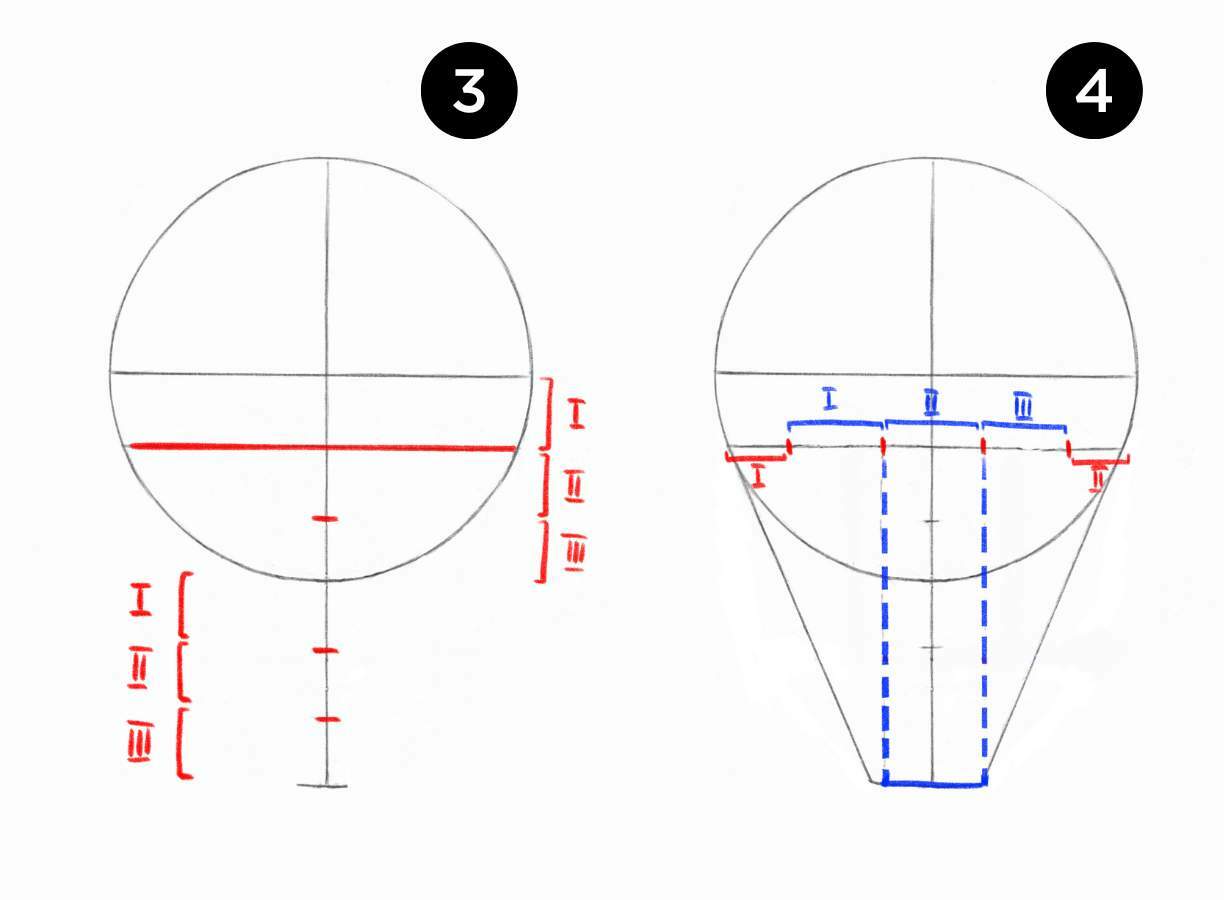
Step 4: Add reference points.
- We divide the lower half of the circle into three equal segments. We separate the first one from above along the horizontal axis. On this axis, we draw the depression of the bridge of the nose and the eye in the form of an inclined triangle.
- The second segment is the line of the nose. We draw the nose without a hump with a slightly raised tip. We deepen the nose, and from this deepening we continue to draw a line to the lips, setting the volume
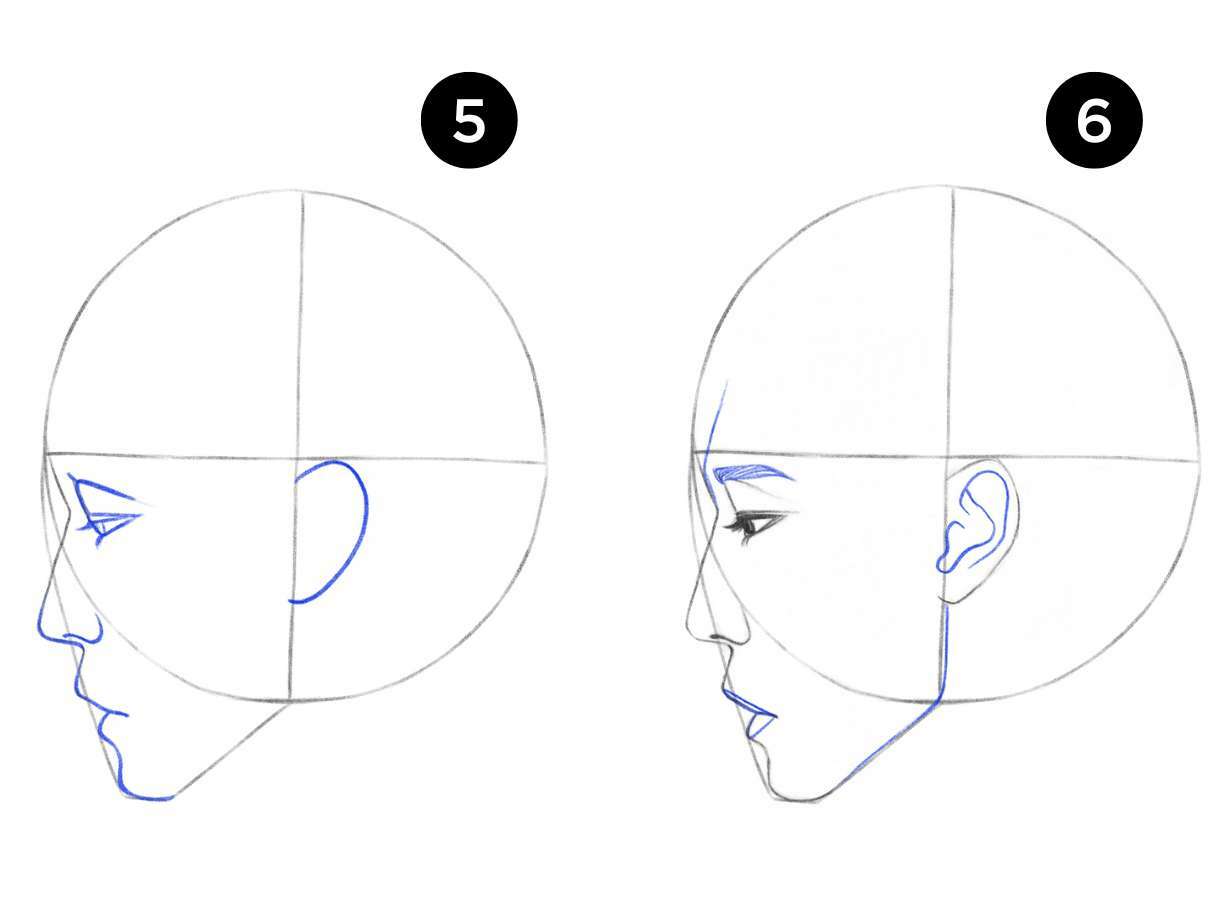
Step 5: Delve into more detailed features by sketching the eyes, nose, lips, and chin. Introduce the ear, positioning it along the circle's vertical line, with its height falling between the eye and nose lines.
Step 6: Enhance the ear's details, incorporating an eyebrow and refining the upper and lower lips.
At this juncture, your portrait starts to exhibit more personality and depth as you concentrate on refining crucial components. Begin by defining the ear's shape and adding intricate contours, paying attention to light and shadow for a natural appearance.
Shift your focus to the eyebrow, sketching it in alignment with the hair's growth pattern to introduce texture and definition. Eyebrows play a pivotal role in conveying emotions and shaping facial features.
Proceed to the lips, carefully delineating the upper lip with considerations for contours, shadows, and highlights. Move to the lower lip, aiming to capture its shape and volume.
Maintain a balanced approach to details, avoiding excessive intricacies at this stage. Each line contributes to the overall composition, and the key is to sustain equilibrium while preserving the natural essence of the face. Gradually layer details, ensuring each element harmonizes for a well-rounded and expressive portrayal.

Step 7: Illustrate the hair's volume by outlining its contours, following the natural framing of the face and the direction of hair growth.
Proceed to incorporate individual strands of hair with swift, light pencil strokes. Avoid overly sharp lines to maintain a cohesive appearance. Aim to capture the texture and fluidity of the hair through subtle lines and contours.
Step 8: Integrate clothing details.
During this phase, shift focus to introducing clothing elements to finalize the overall look. Emphasize that the aim here is not to inundate with intricate details but rather to suggest the presence of clothing, offering context to the facial portrayal.
Initiate by outlining the shirt collar. Define its shape and positioning, considering how it contributes to the overall style and character of the image.
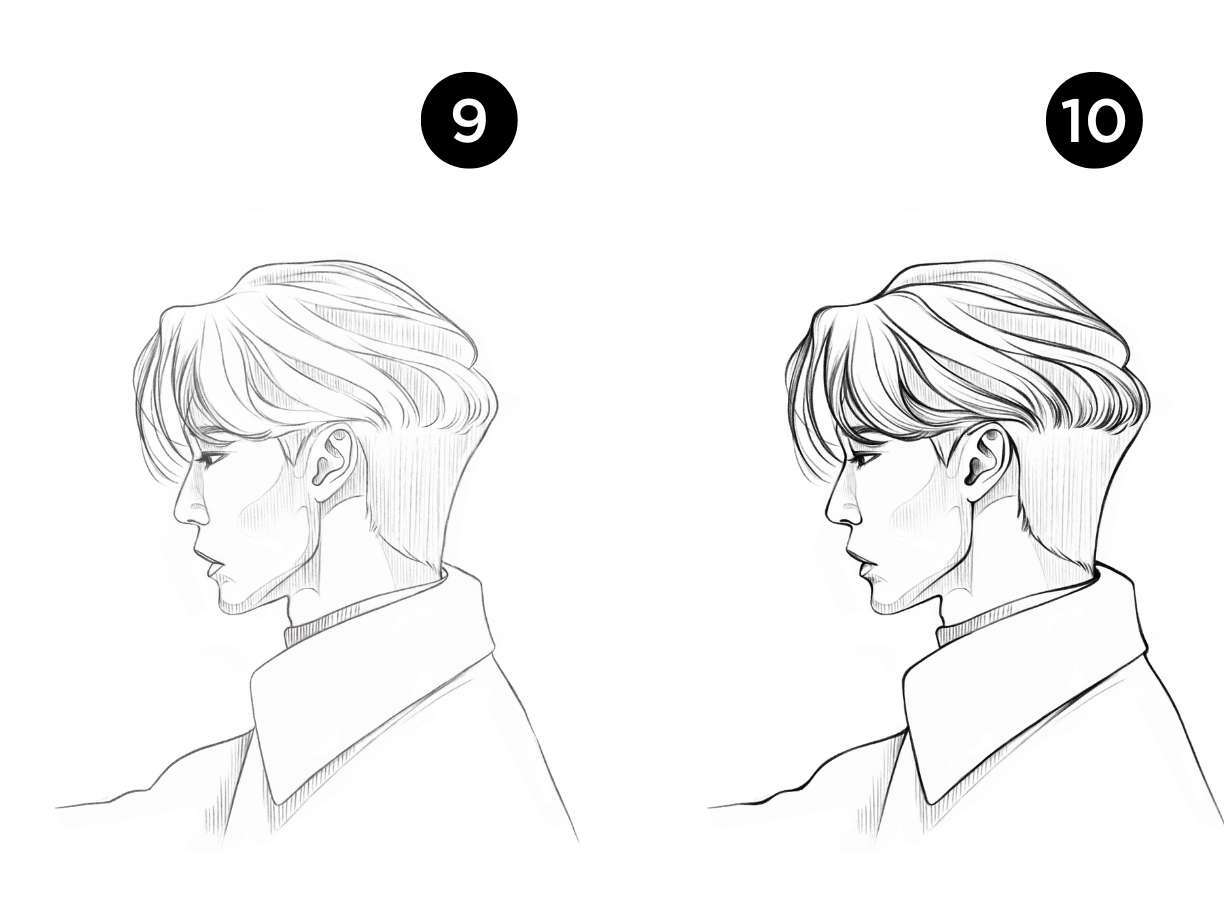
Step 9: We complement the portrait with light shadows on the face, hair and clothes using hatching.
Step 10: Place accents using a liner/black pen. The main accents are the eye, nose, lips, ear and hair.
Step 10: Place accents using a liner/black pen. The main accents are the eye, nose, lips, ear and hair.

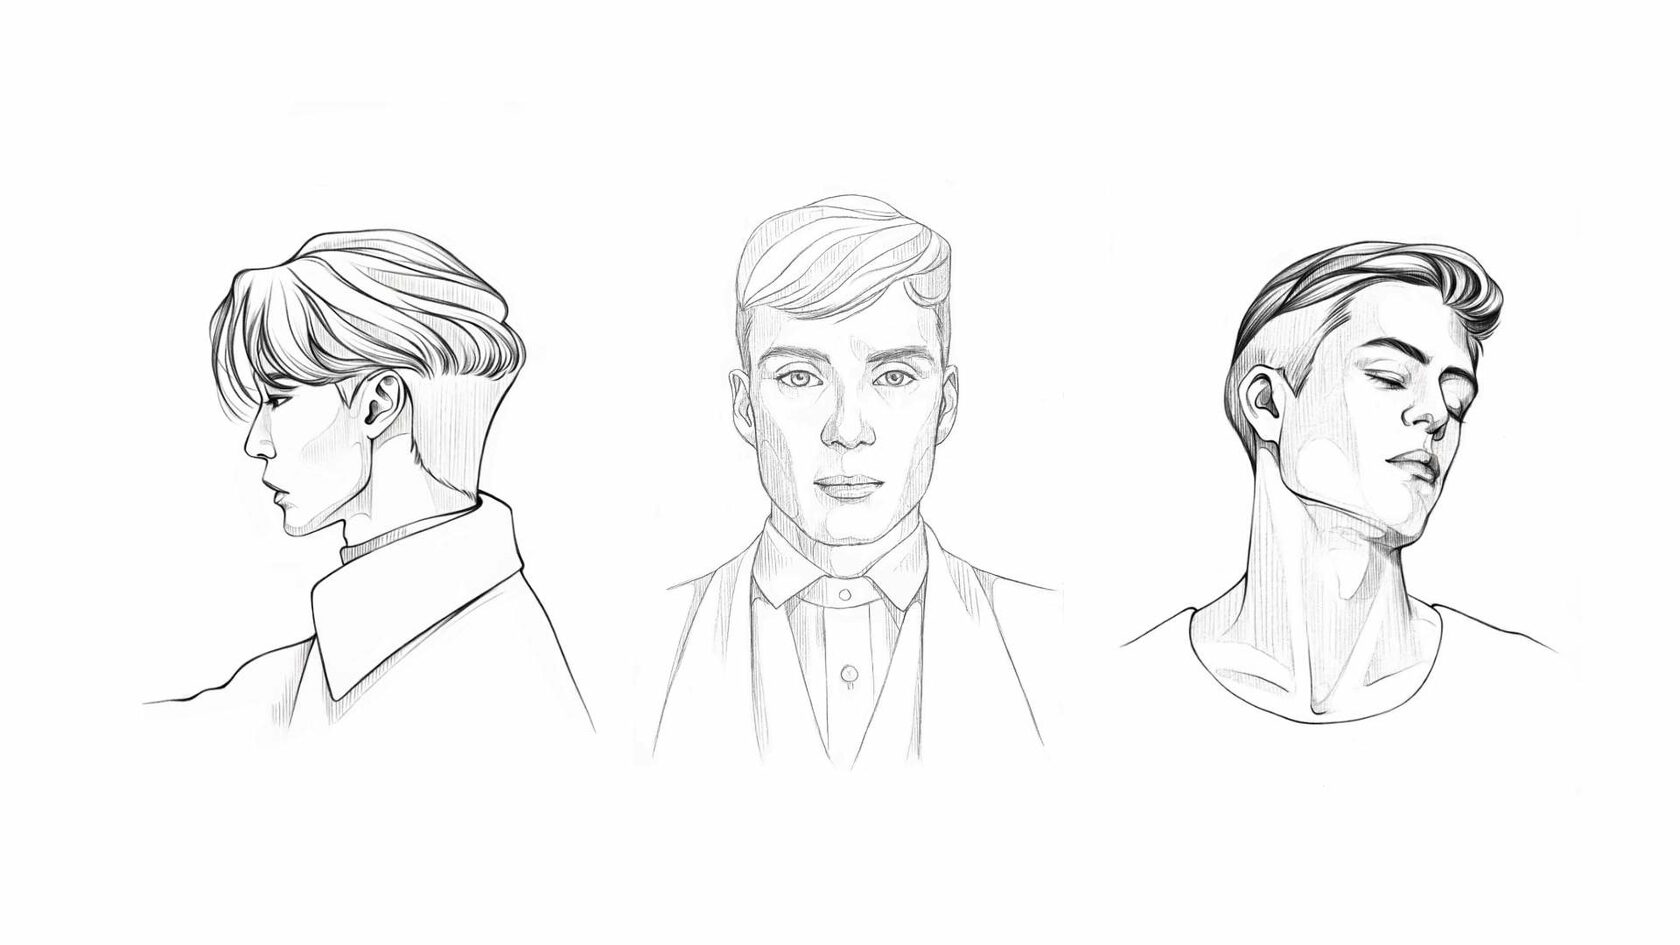
If you are eager to delve deeper into the intricacies of portrait drawing, we invite you to enroll in our comprehensive online course, "Fashion Portrait." Tailored for those aspiring to master the art of portrait drawing, this course, specifically focusing on colored pencils, offers an ideal learning journey.
Our course extensively covers various facial positions, ranging from full-face renderings to 3/4 views. Through this exploration, you'll uncover the secrets of accurately conveying racial features and capturing the nuances of male portraiture. Our seasoned instructors, experts in the field, will skillfully guide you through the process, ensuring you harness the full potential of colored pencils to create portraits that are not just drawings but lifelike representations, capturing the very essence of your subject. Don't miss this opportunity to refine your craft and take your portrait drawing to new heights. Enroll now!
Our course extensively covers various facial positions, ranging from full-face renderings to 3/4 views. Through this exploration, you'll uncover the secrets of accurately conveying racial features and capturing the nuances of male portraiture. Our seasoned instructors, experts in the field, will skillfully guide you through the process, ensuring you harness the full potential of colored pencils to create portraits that are not just drawings but lifelike representations, capturing the very essence of your subject. Don't miss this opportunity to refine your craft and take your portrait drawing to new heights. Enroll now!
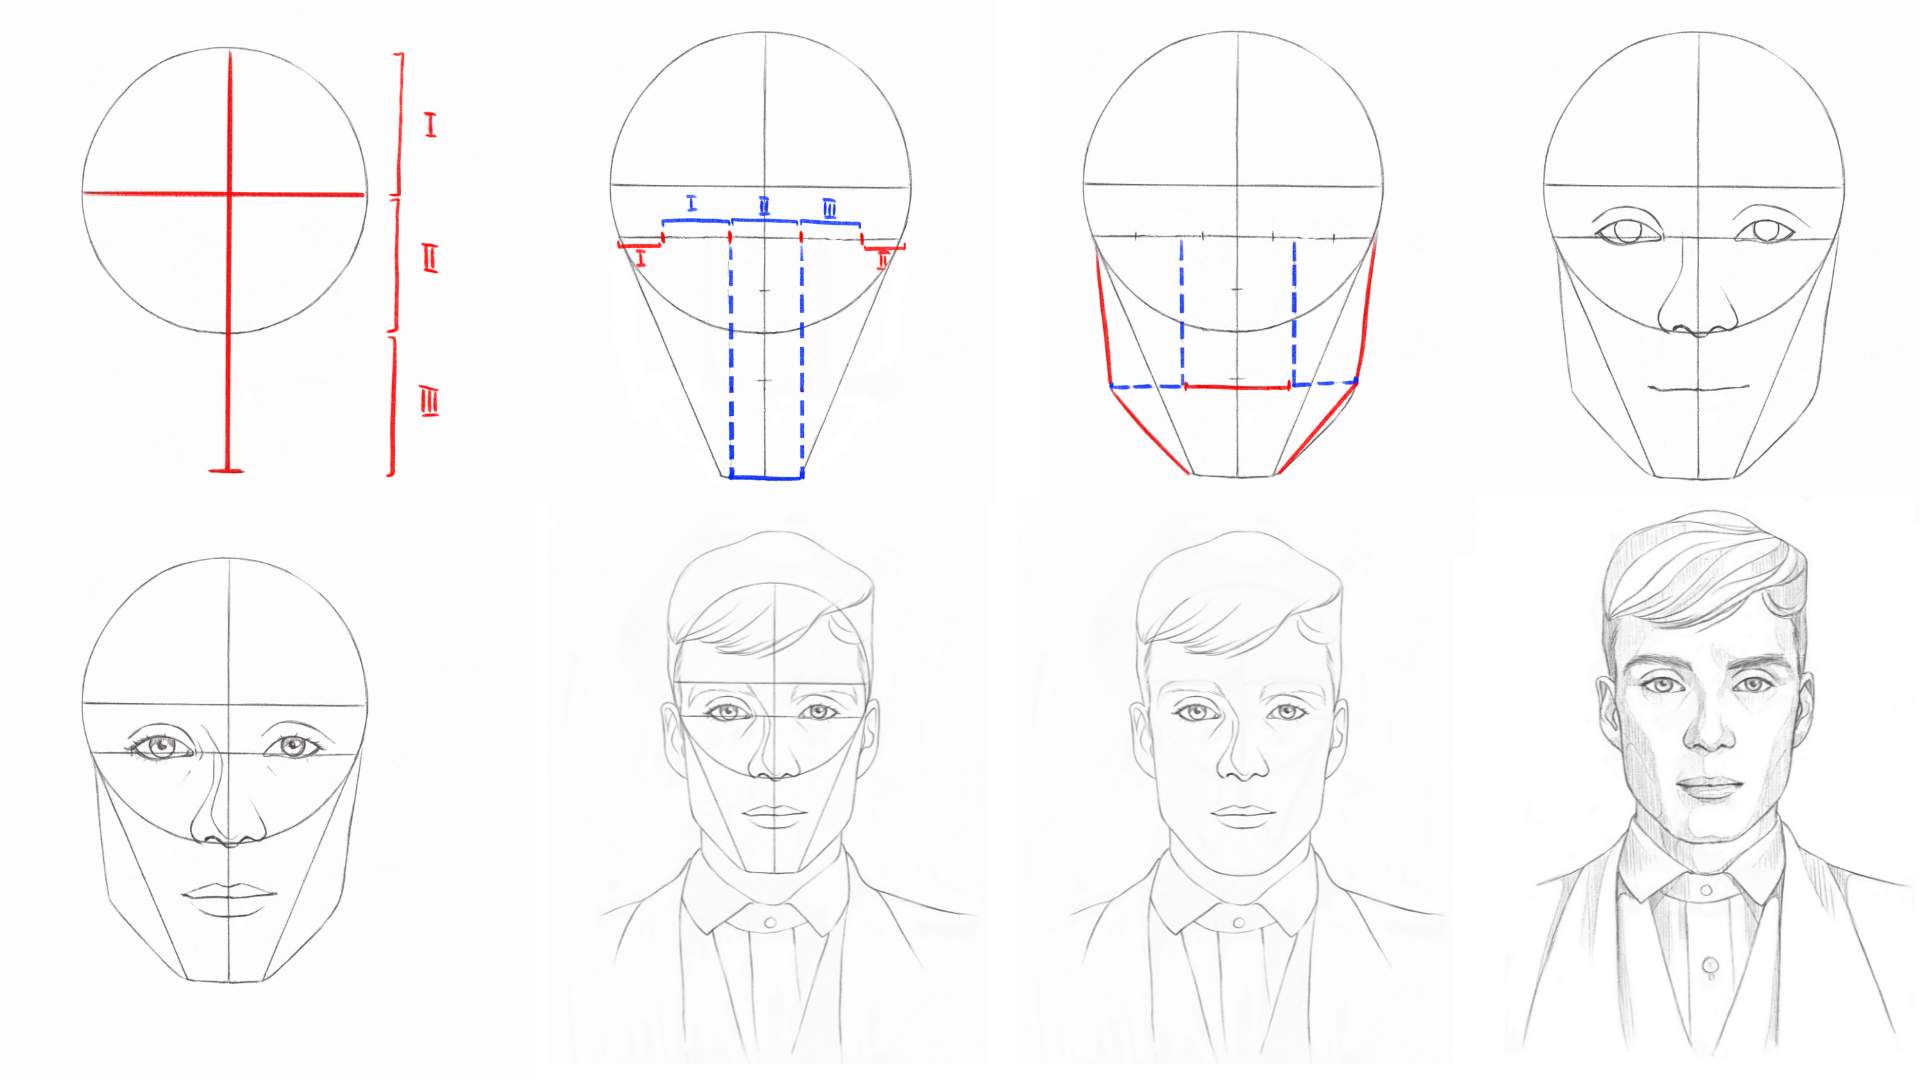
How to Draw a Man's Face From the Front View
Step 1: Draw a circle
Initiate by drawing a circle and position a horizontal line beneath it to outline the chin. Proceed to sketch the jawline, ensuring symmetry on both sides of the face. Introduce a vertical line down the center of the face to maintain proportionate alignment.
Step 2: Add guidelines
We split the circle in half using both horizontal and vertical lines. Next, extend a vertical line to a length equivalent to half of the circle. This creates three identical segments, constituting the height of the head.
Step 3: Add reference points.
Subdivide the lower half of the circle into three equal segments. The uppermost segment, divided by a horizontal axis, serves as the location for the eyes. Similarly, the additional (third) segment beneath the circle is further divided into three equal parts, with the uppermost part functioning as the central reference line for the lips.
Step 4: Divide the Constructed Horizontal Axis.
Within the circle's interior, divide the constructed horizontal axis into distinct segments: moving two identical segments from the left and right into the circle. The resulting segment inside (highlighted in blue) is further divided into three identical sections. Segments I and III represent the eyes, while Section II corresponds to the bridge of the nose.
Reduce the width of the nose bridge using vertical dotted lines, extending them to the utmost point of the head's height. This establishes the width of both the chin and the nose. Position the tip of the nose at the circle's boundary. Connect the extreme points of the eye line with those of the chin line.
Step 5: Subdivide segments I and III into roughly three equal parts.
Starting from one-third of the eyes, extend dotted lines downwards to the lip line positioned beneath the circle. This process establishes the width of the lips. Continue the lip line with dotted extensions to the left and right, using the points formed to indicate the corners of the jaw.
Step 6: Illustrate the eyes within segments I and III, rounding the inner corners while keeping the outer corners sharp. Add irises and upper eyelids. Draw the nose, considering the width of the nose bridge. Craft a gentle lip line with elevated corners.
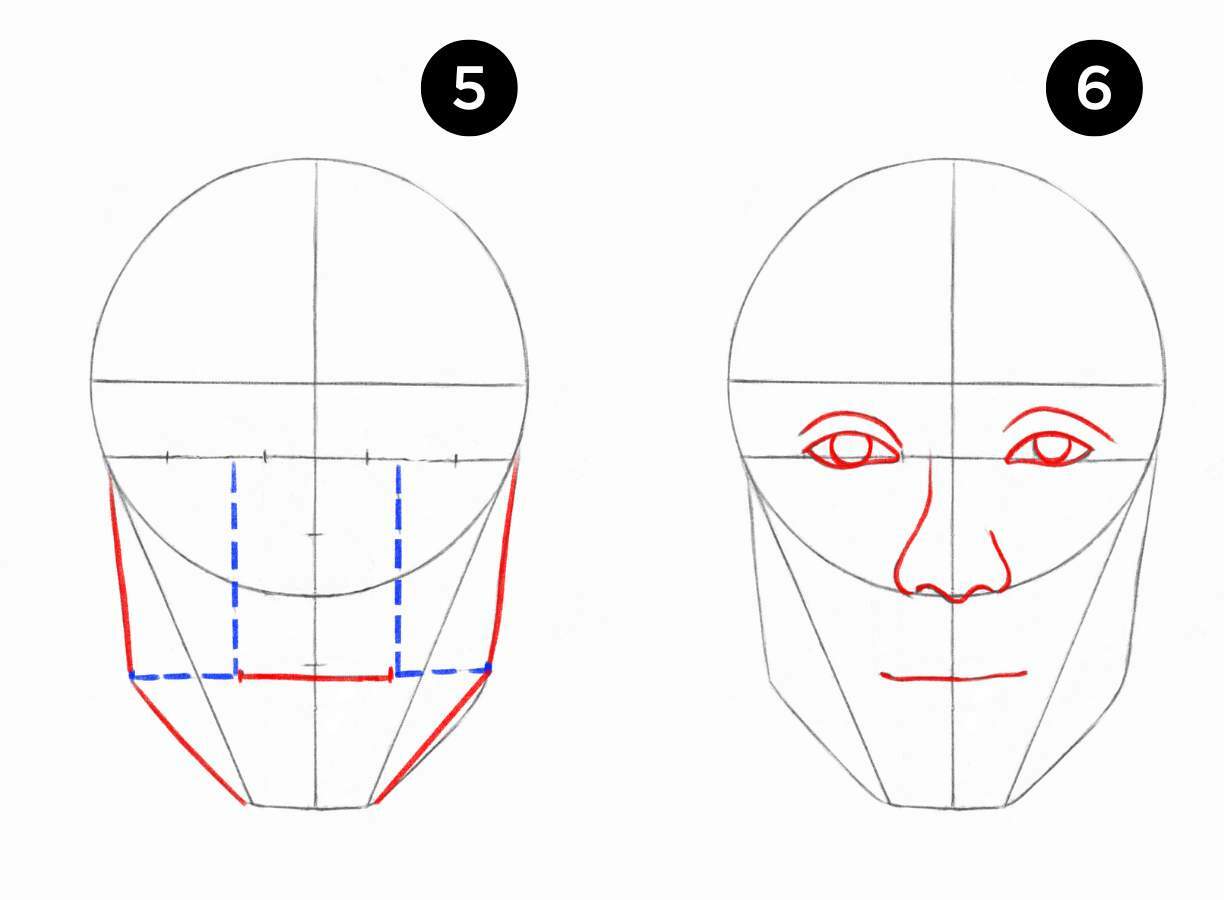
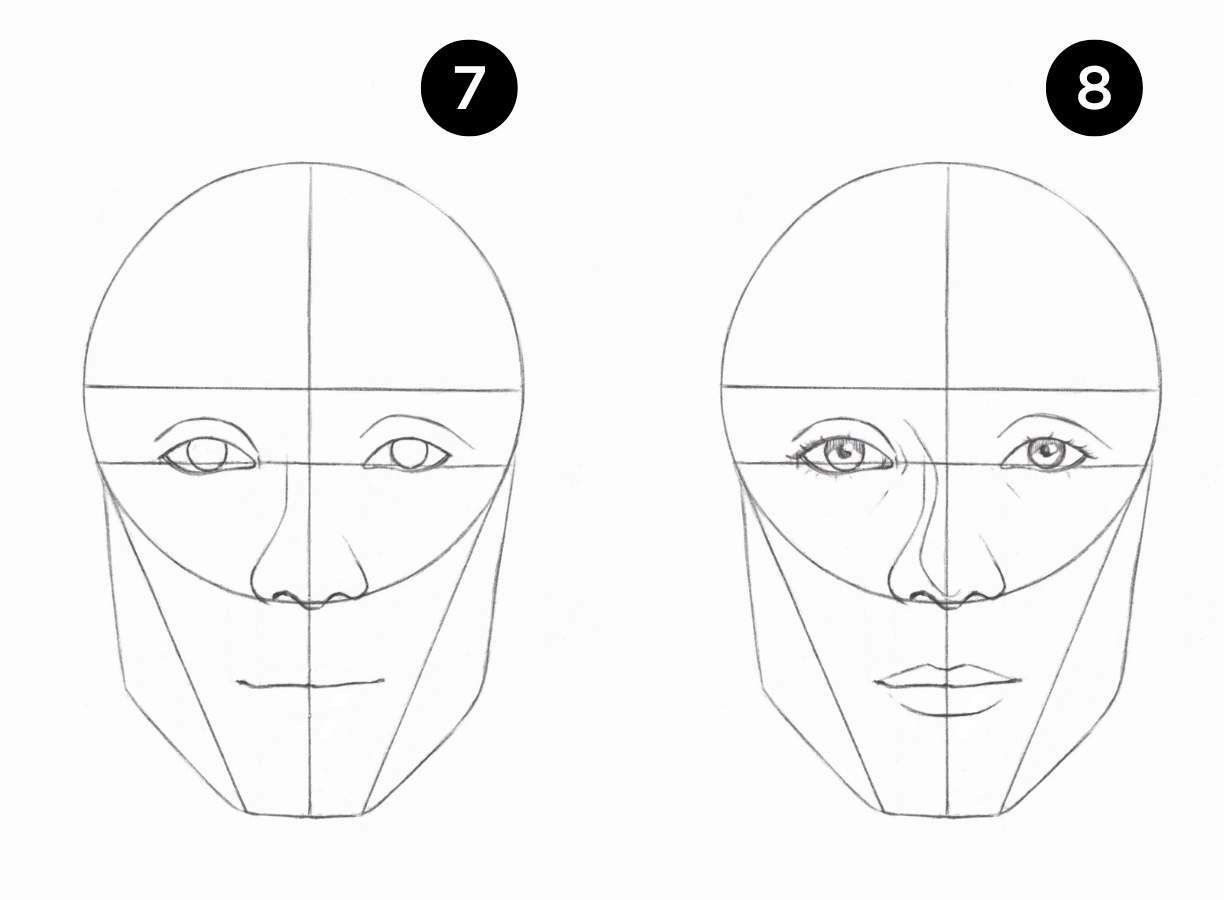
Step 7: Remove all excess construction lines and begin refining the details of the eyes, lips, and nose.
Step 8: Introduce pupils, eyelashes, shadows, and highlights on the irises, along with a slight thickening on the upper contour of the eye. Illustrate the back of the nose, adding the upper lip adjacent to the lower lip (without connecting the lower lip to the corners).
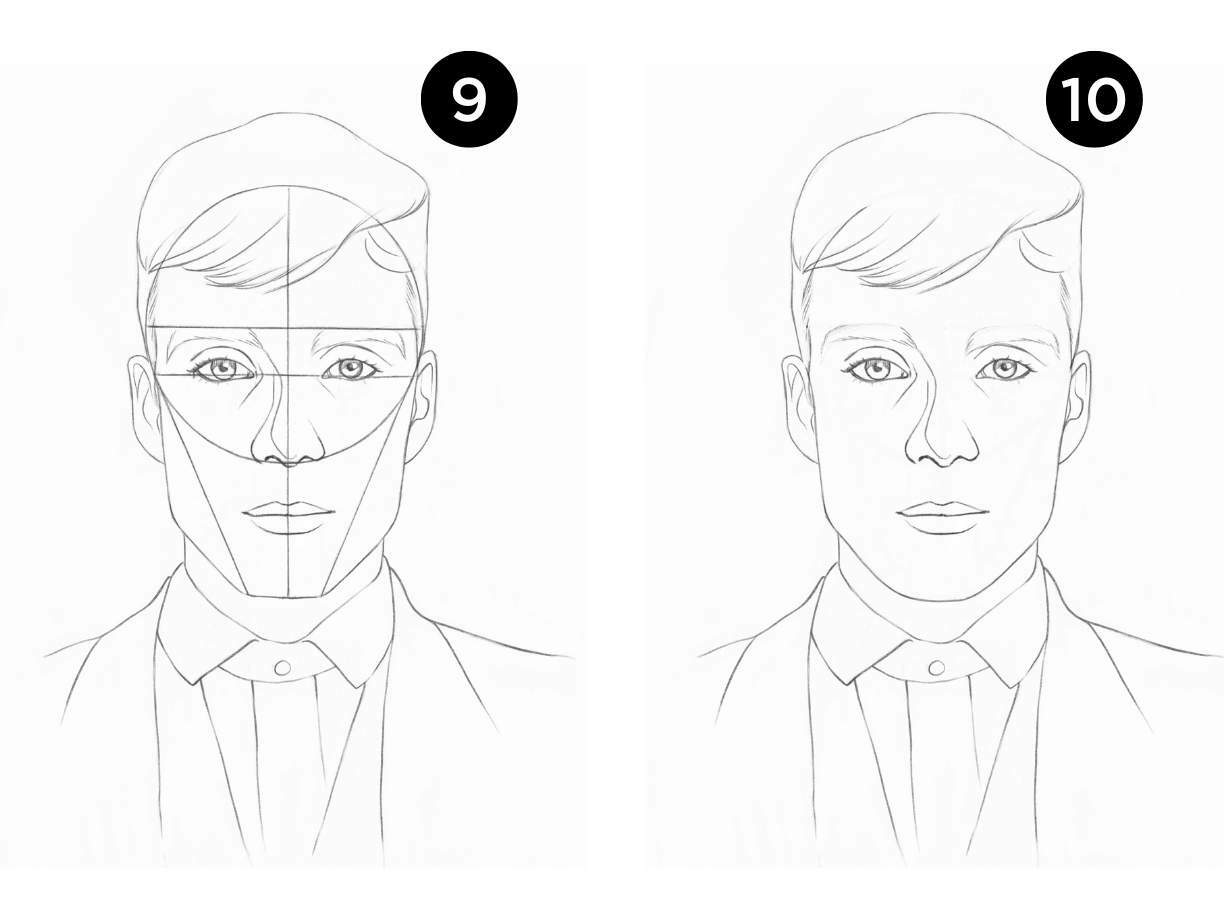
Step 9: Soften the facial outline, incorporate eyebrows, ears, hair, neck, and clothing.
Step 8: Introduce pupils, eyelashes, shadows, and highlights on the irises, along with a slight thickening on the upper contour of the eye. Illustrate the back of the nose, adding the upper lip adjacent to the lower lip (without connecting the lower lip to the corners).
Step 9: Soften the facial outline, incorporate eyebrows, ears, hair, neck, and clothing.
Step 9: Soften the facial outline, incorporate eyebrows, ears, hair, neck, and clothing.
Step 10: Eliminate all construction reference lines, retaining the soft contours of the portrait.
Step 10: Eliminate all construction reference lines, retaining the soft contours of the portrait.
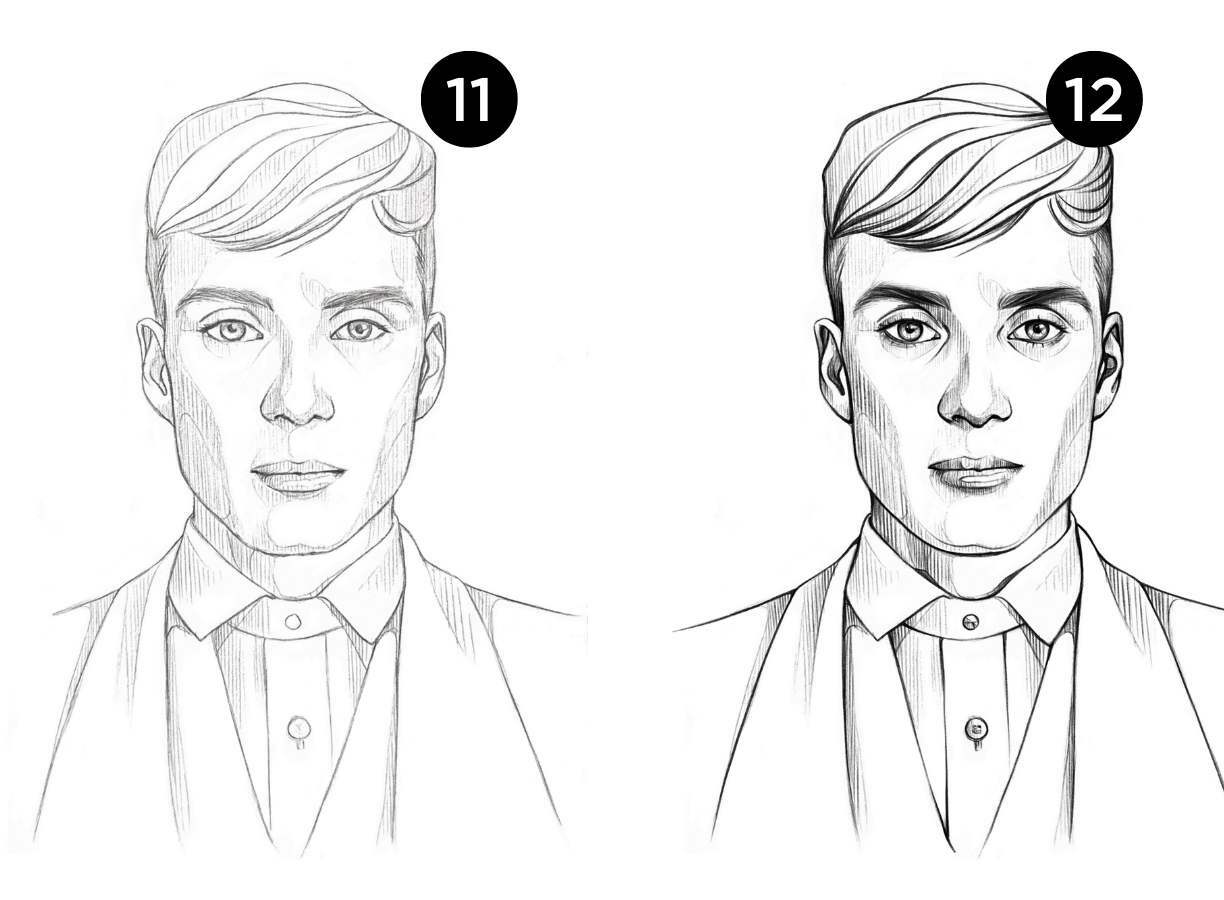
Step 11: Introduce subtle shadows on the face, hair, and clothes using hatching techniques.
Step 12: Apply accents using a liner or black pen. Focus on emphasizing key features such as the eyes, eyebrows, nose, lips, ears, and hair.
Step 12: Apply accents using a liner or black pen. Focus on emphasizing key features such as the eyes, eyebrows, nose, lips, ears, and hair.
Mastering the art of drawing is akin to honing a skill, much like maintaining the sharpness of a kitchen knife. Regular practice is the whetstone that keeps your abilities finely tuned. Dedicate time each day to sketching, even if only for a short while, as consistent practice is key to gradual improvement. Embrace a mix of drawing from references and venturing into the realm of imagination. Challenge yourself by exploring different angles and perspectives, pushing the boundaries of your drawing capabilities. Try to learn new techniques using Fantasy Room Online Courses. This continuous commitment to practice will undoubtedly contribute to your artistic growth.
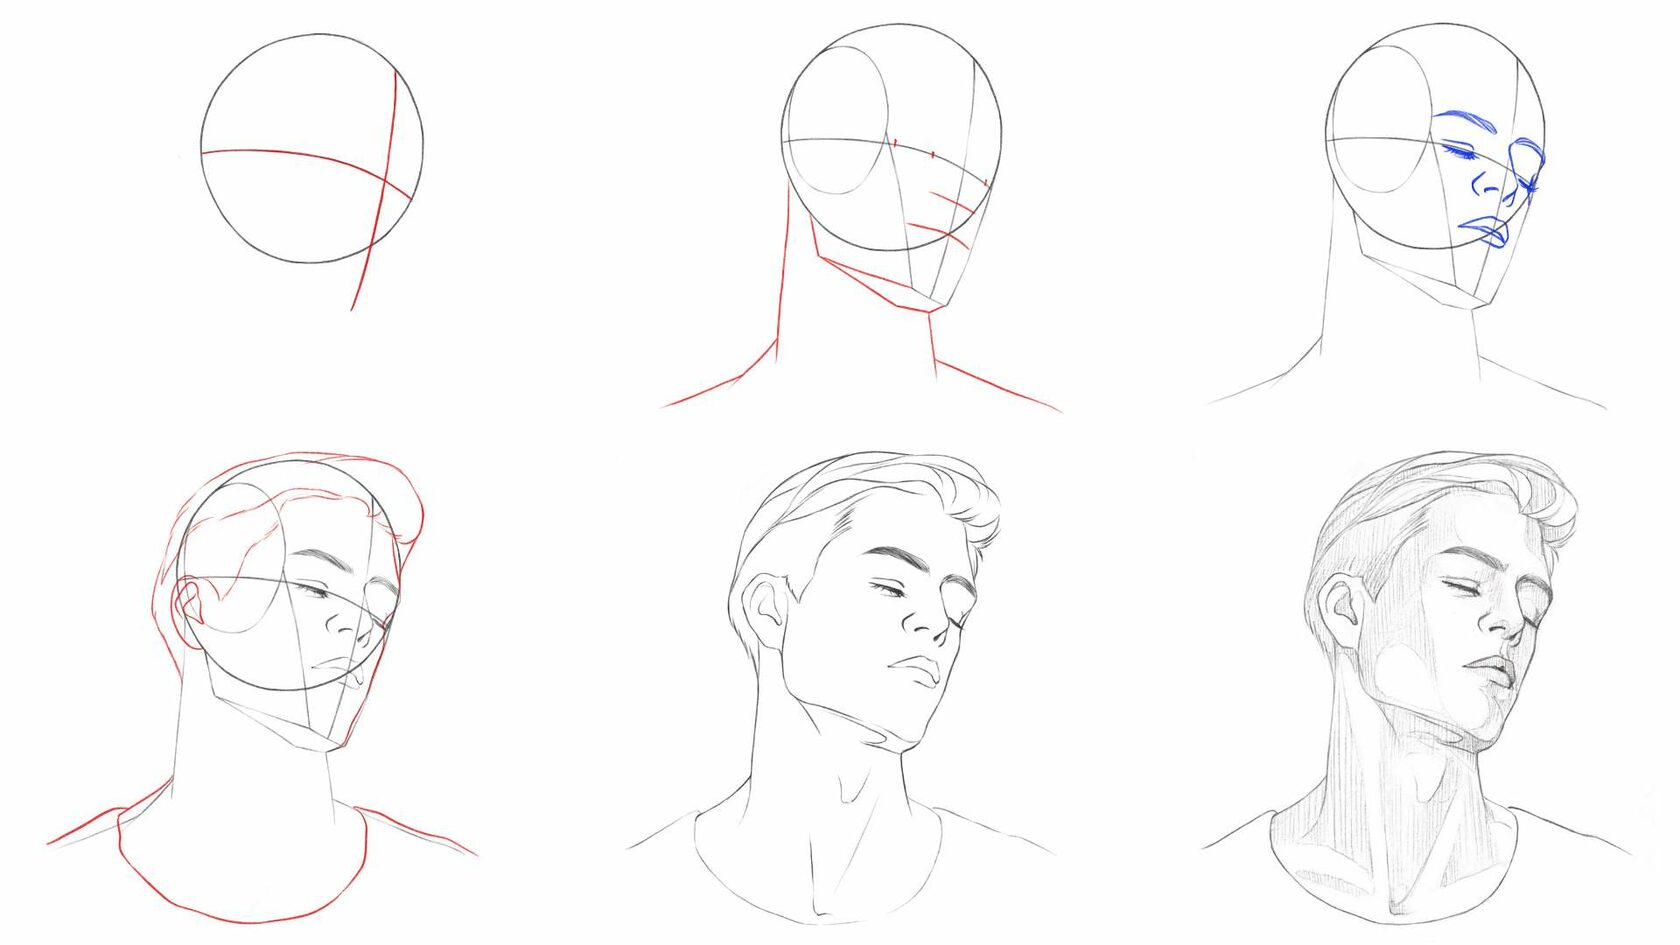
How to Draw a Portrait in the Three Quarters View

In a three-quarter view, the nose presents both its top and side aspects, creating the illusion of increased width. The two sides of the face exhibit asymmetry, with one side appearing narrow and the other wide. The eye on the turned side takes on a distinct, narrower shape compared to its counterpart. Similarly, the mouth, from its center to the corner, is shorter on the turned side and exhibits a different shape than the mouth on the opposite side of the centerline. These variations in nonmatching features can pose a challenge, as they deviate from the typically memorized symbols associated with more symmetrical features.
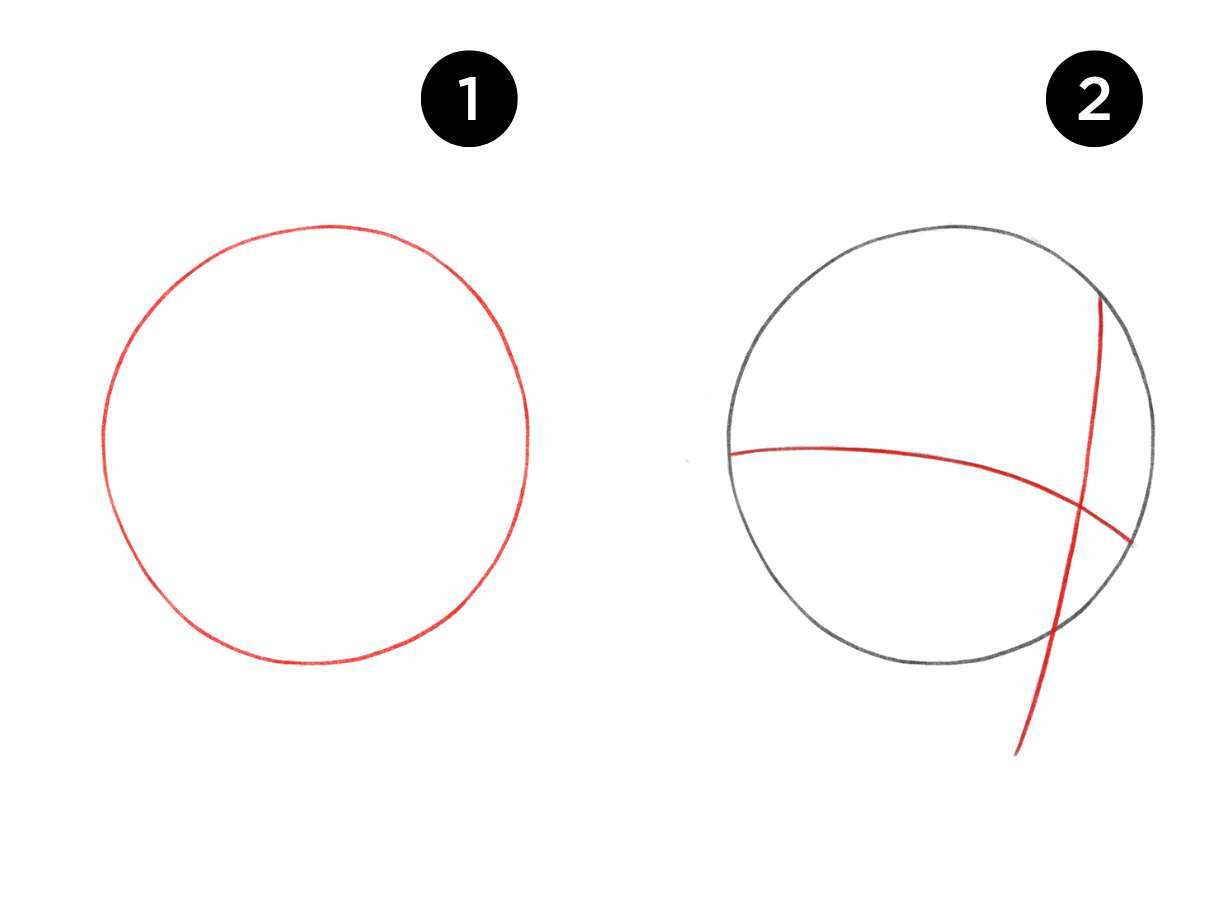
Step 1: Create a circle as the foundation for the head.
Step 2: Include a horizontal-to-vertical guideline with a slight convexity, simultaneously determining the direction in which the portrait is facing.
Step 3: Define the temple by constructing an oval that extends slightly over half of the left side of the head. Introduce the width of the chin and connect the resulting outer points of the chin with a horizontal line.
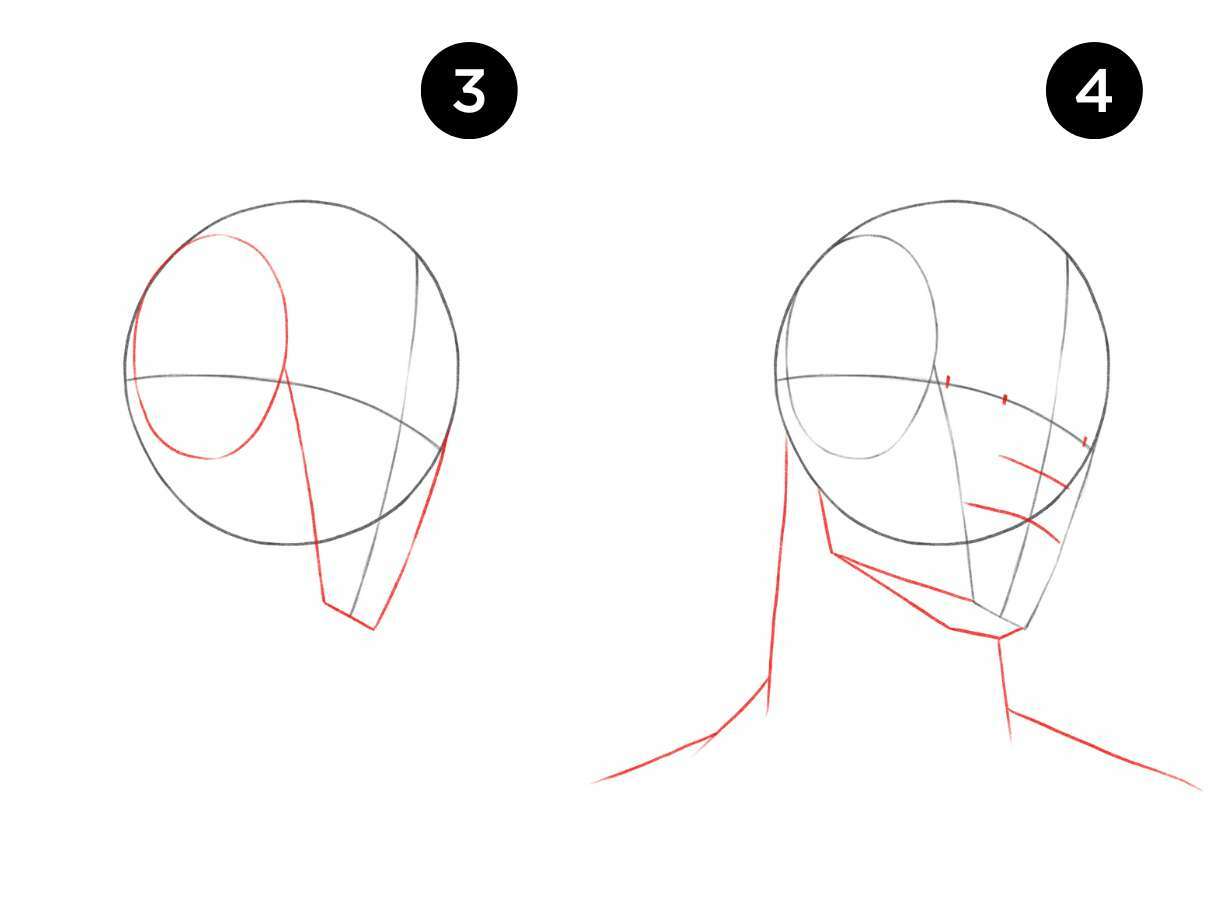
Step 4: Subdivide the horizontal line pointing to the right into three equal segments. The two outer segments represent the eyes, while the central one has shifted. Introduce the jawline and the neck. In this step, we'll employ a crucial method to precisely mark the key facial points and establish their relationships. Begin with a horizontal line directed to the right of the central axis, dividing it into three equal segments. The initial two-thirds of this line will indicate the eye locations, symmetrically placed around the central vertical line. This phase is pivotal, as the eyes determine facial proportions and expression. Mark the center segment as an indicator of facial orientation on the central vertical line. Proceed to delineate the jawline and neck, ensuring balance and accurate facial proportions. This foundational step sets the stage for further detailing and expression. Maintain precision and symmetry to craft a harmonious profile of the male face.
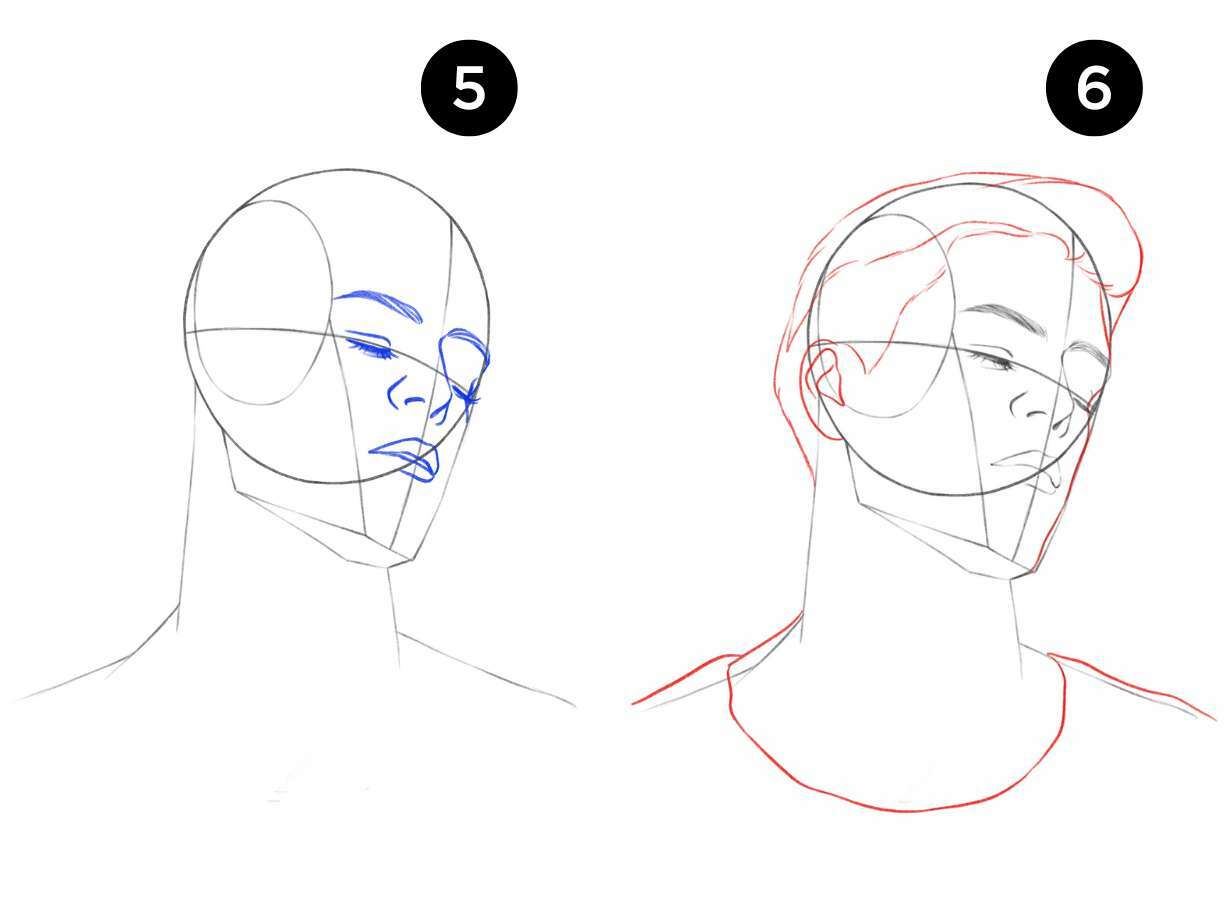
Step 5: Illustrate the eyes, eyebrows, nose, and lips, shifting their center to the right. Enhance the detailing of eyelashes and eyebrows with subtle touches.
At this juncture, our portrayal starts to take on distinct features. Initiate with the eyes, positioned one-third from the left edge of the face. Adjust the center lines of the eyes to the right, capturing the essence of the man's personality.
Proceed to sketch the eyebrows, nose, and lips, considering their placement in relation to the previously drawn elements. Observe the muscular structure of the man's face. Adding subtle details to eyelashes and eyebrows contributes additional naturalness to the image. Pay attention to the direction of hair growth and the intricacies of the eyebrows, applying light and precise pencil strokes.
Step 6: Infuse volume into the hair, ears, and clothing.
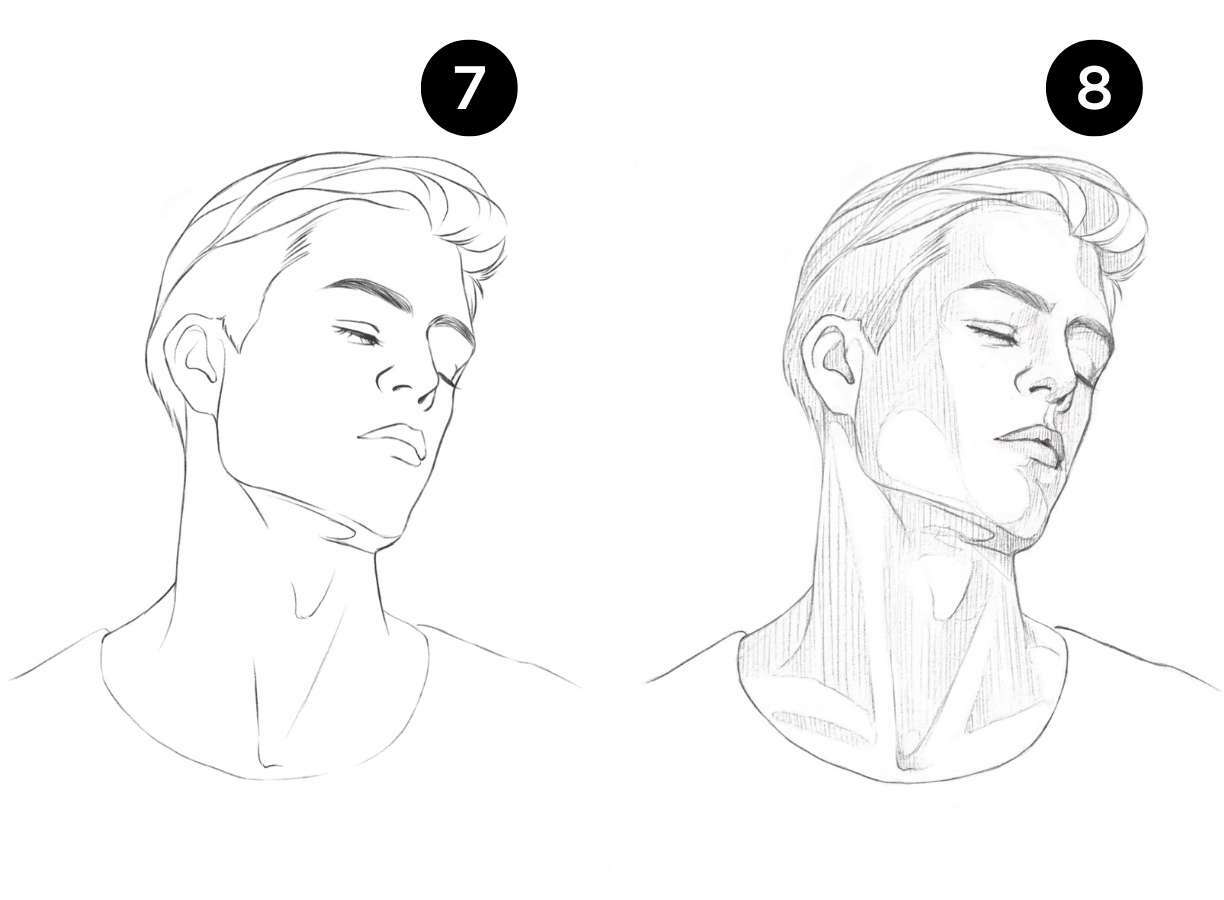
Step 7: Eliminate all surplus construction lines and refine the depiction of hair and neck. Remove the preceding construction lines, retaining only the expressive and crucial contours of the face and neck. This enhances the purity and clarity of your drawing. Begin detailing the hair, considering its texture and growth direction. Employ light, fluid pencil strokes to convey the naturalness of the hair and avoid excessive sharpness. Strive to evoke volume and movement in the hair, mindful of highlights and shadows.
Step 8: Introduce subtle shadows to the face, hair, and neck using hatching. Employ the hatching technique to craft gentle shadows. Maintain a consistent direction of light and shade, accounting for the light source and anatomical features of the face. Execute light and smooth strokes to establish seamless transitions between the illuminated and shaded areas.
Step 9: Accentuate key features with a liner or black pen. Emphasize the eyes, eyebrows, nose, lips, ears, and hair to bring prominence to the vital elements of your illustration.

To sum up
In conclusion, mastering the art of drawing a man's face involves a careful and deliberate process, as outlined in this step-by-step guide. Each stage, from the initial construction of the circle to the detailed rendering of facial features and hair, contributes to the creation of a lifelike and expressive portrait. Through this guide, artists can gain a deeper understanding of proportions, symmetry, and the intricacies of facial anatomy. Remember, practice is key, and as you embark on your artistic journey, allow each stroke of the pencil to refine your skills. Whether you're a beginner honing your craft or an experienced artist seeking to enhance your technique, this guide serves as a valuable resource to elevate your abilities in drawing a man's face. Embrace the creative process, experiment with different styles, and enjoy the rewarding experience of bringing faces to life on paper. Happy drawing!