Get the first 30 pages of our book "The Art of Fashion Illustration"
We want to share with you the first 30 pages of our book so you can dive into the world of art. This Fashion Illustration book is a must-have for anyone interested in fashion design or illustration...
FASHION Figure
Fundamentals and principles of drawing
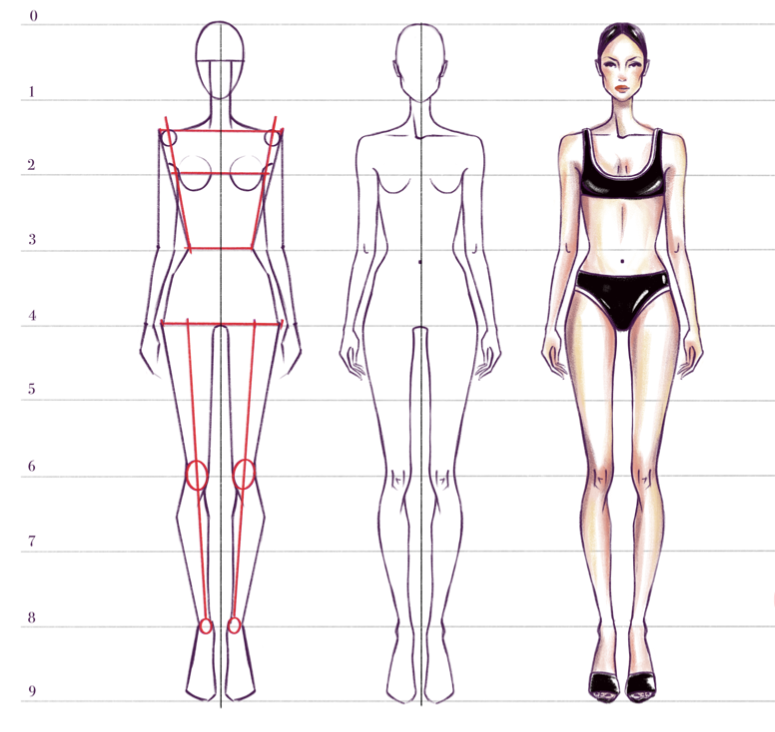
There are no hard and fast rules in fashion illustration. Each illustrator sets his own rules based on personal preferences. But classical fashion illustration is considered to be the one where the proportions of the figure are determined by the size of 9 heads. Let's found out more about it.
Proportions of the figure
It is generally accepted that the human figure is measured by heads, and more specifically by head height. An average person is generally 7.5 to 8 heads tall, while models often have elongated proportions, 9–12 heads tall. Sometimes, this can reach 16 heads. It’s all about style!
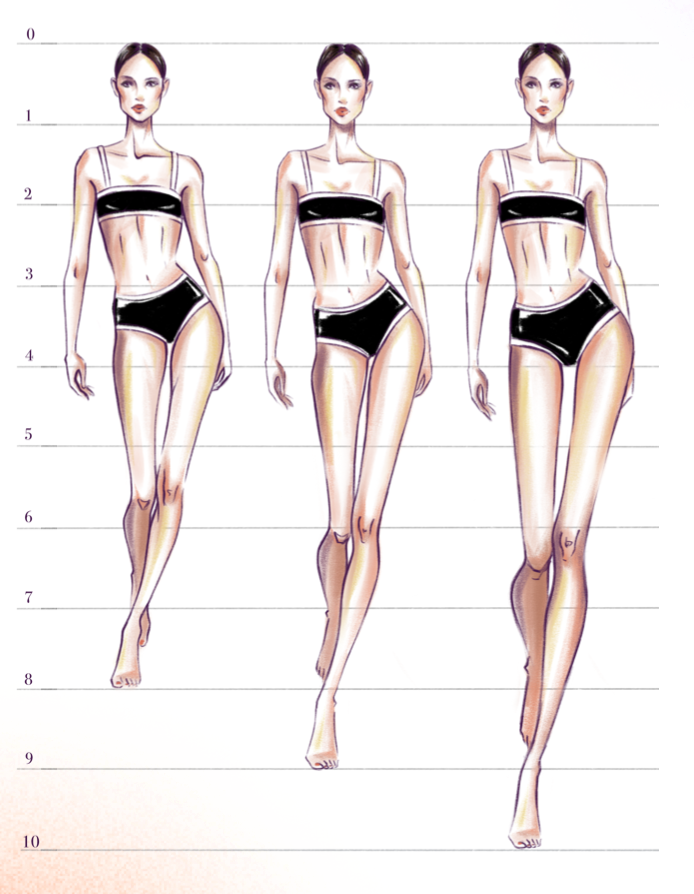
The main thing is to observe the harmony and balance of volumes. In most cases, when you stretch a figure, it means stretching the legs, namely the lower legs and feet.
You can also stretch the neck. If you lengthen the legs, then the arms also need to be made a little longer than the standard length, but the torso remains within human proportions.
Sometimes the torso is deliberately shortened. It is also important to remember that the torso together with the head should be shorter than the legs, and the femur of the leg should be shorter than the lower leg with the feet. Long torsos and short lower legs rarely look good, except in a grotesque style, but even here, you need to maintain harmony! In any case, it is important to experiment and look for a style that appeals to you.
Drawing is as much a skill as learning languages, rollerblading, or playing the guitar. Everyone can learn to draw! One has only to want, to show willpower, perseverance, diligence - and everything will work out. Someone tries to master all the secrets on their own, someone chooses a proven ready-made course.
The choice is yours, the main thing is not to give up.
The choice is yours, the main thing is not to give up.
[11 video classes]
SECTION 6. MEN'S FIGURET
VIEW DETAILS

[2 video classes]
SECTION 7. ABOUT THE PROFESSION OF FASHION ILLUSTRATOR
[5 video classes]
SECTION 5. MIXED TECHNIQUES
VIEW DETAILS

VIEW DETAILS

[36+ video classes]
[21+ video classes]

Download program
Figure en face on two legs
We will now explore step by step how to build a figure en face for 9–10 heads.
Before you start drawing, it is important to place the figure correctly on the sheet. This is called composition, or layout. In this case, you are learning to build shapes, so use a simple composition, in which the spacing from the bottom of the sheet is slightly greater than from the top. In this segment, draw a vertical line. This is the central axis, relative to which the figure will be built.
1
3
Segment 0–1 is the head (draw an egg with the sharp edge down).
Divide the central axis into 9 equal parts. It is easier to divide it into 3 equal parts first, and then divide each resulting segment into another 3 parts.
Number the segments from 0 to 9–10.
Number the segments from 0 to 9–10.
2
4
The shoulder line is equal to 1/3 of segment 1–2, but since you can lengthen the neck in the illustration, the shoulder line can be marked just above the middle of this segment. Set the shoulder width taking into account the arms (usually, the shoulder width is equal to the height of 1.5 heads). Next, set the neck width (as you like, but the proportions must remain harmonious).
Mark 3 indicates the waist line. Set the waist width. The waist width is equal to the head height, but in a fashion illustration, it can be made narrower. Mark 3 is the crease of the elbow.
6
5
The middle of the chest is at mark 2.
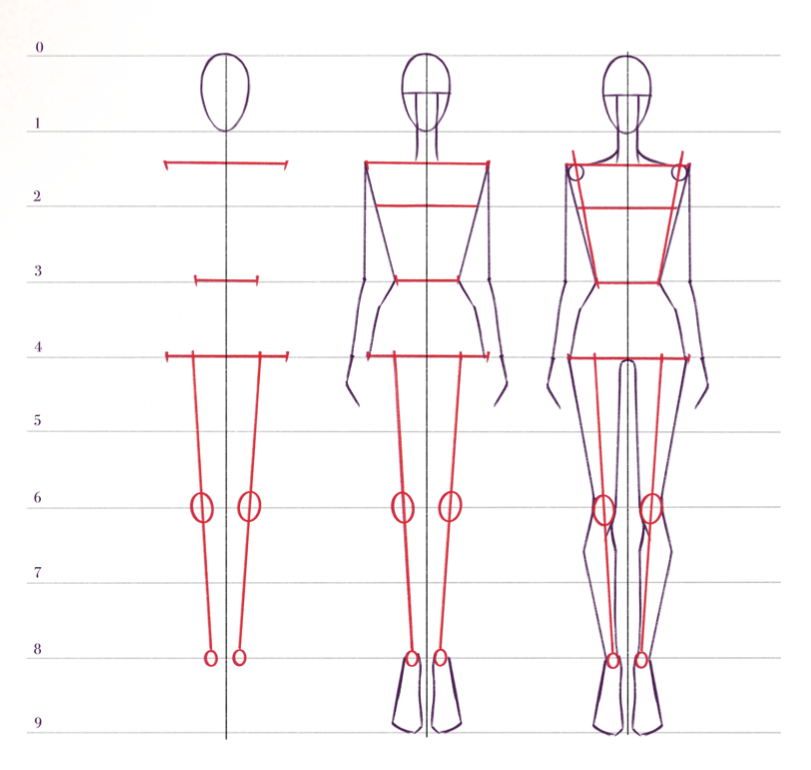
Hands occupy 2/3 of segment 4–5.
7
Mark 4 is the hip line. The middle of the thigh is equal to half of segment 3–4. Set the hip width. The main thing to remember is that the width of the shoulders, waist and hips should be in harmony with each other. One of the points marking the hip width can be the shoulder width.
8
Mark 6 is the knee line. If you want to draw a figure containing 10 or more heads, the knee line will shift to mark 6.5. The knee joint is the largest in the body.
10
9
Connect the given parameters with lines.
Mark 8 is the ankle joint line. Draw little circles denoting the joints.
11
Connect the hips, knees and feet with arcuate lines. From the hip to the knee, the leg narrows, the expansion of the lower leg goes to mark 6.5 if you are drawing on 9 heads, or mark 7 if you are drawing on 10 heads.
12
The feet occupy segment 8–9 or 9–10, etc. The feet can be slightly elongated.
13
To draw the chest, draw the conditional shoulder joints inside the chest, which you divide with vertical lines directed to the waist. From these new lines, just above mark 2, add serifs – these will be the armpits. From the armpits, draw the breast.
14
Next, draw the arms. Knowing the main arm parameters (segment 3 is the elbow crease, segment 3–4 is the forearm, 2⁄3 of segment 4–5 is the hand), draw their contour.
15
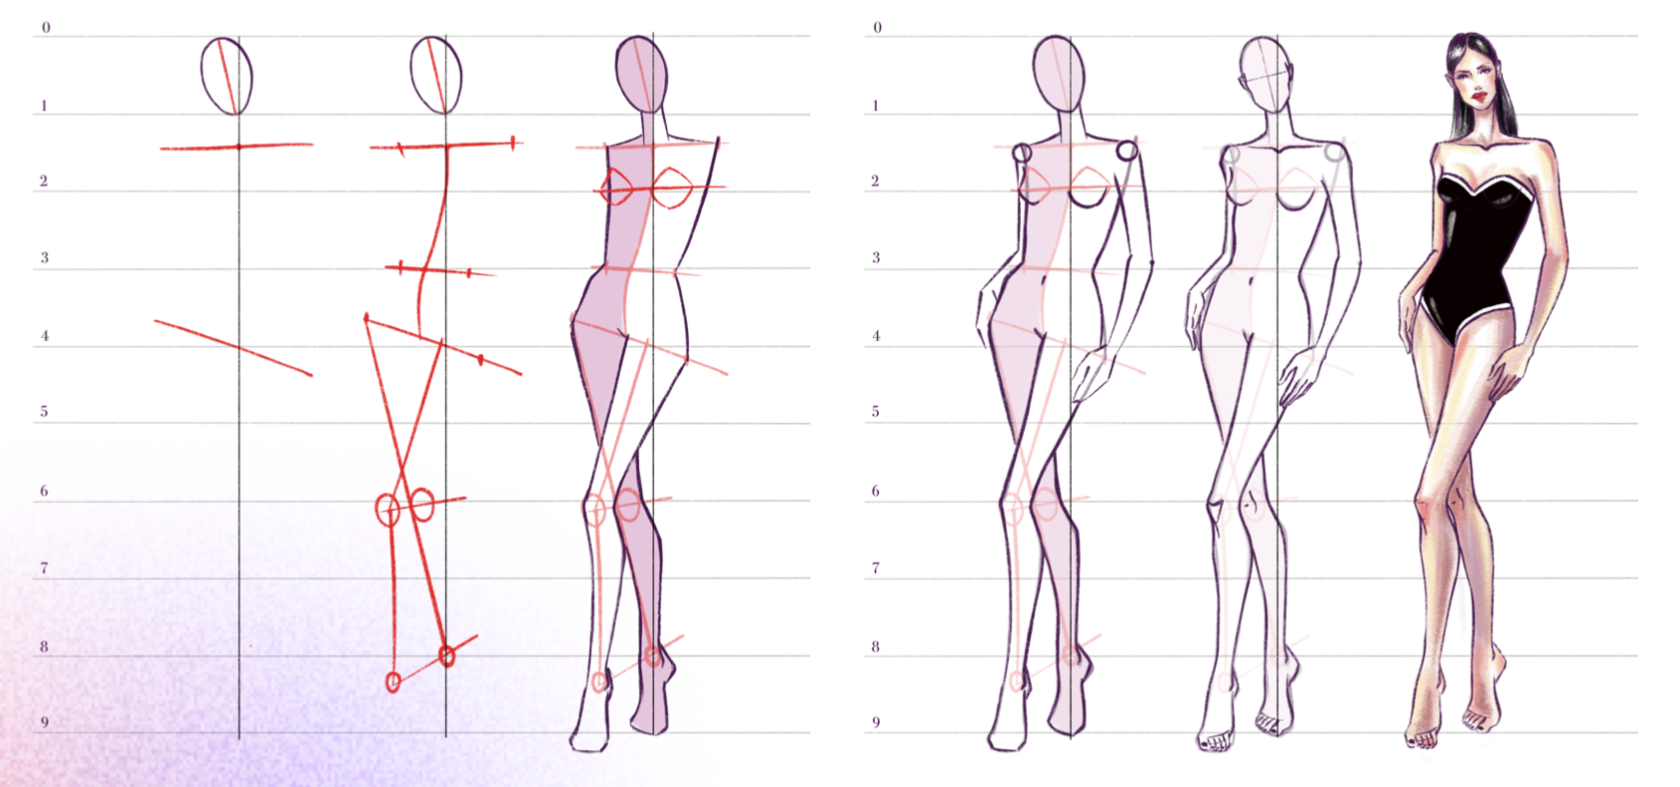
Figure leaning
on one leg. Dynamics
on one leg. Dynamics
Divide the segment into 9–10 equal parts and draw the vertical axis of symmetry relative to which you will build the figure.
2
1
Start building the figure with a layout on a sheet.
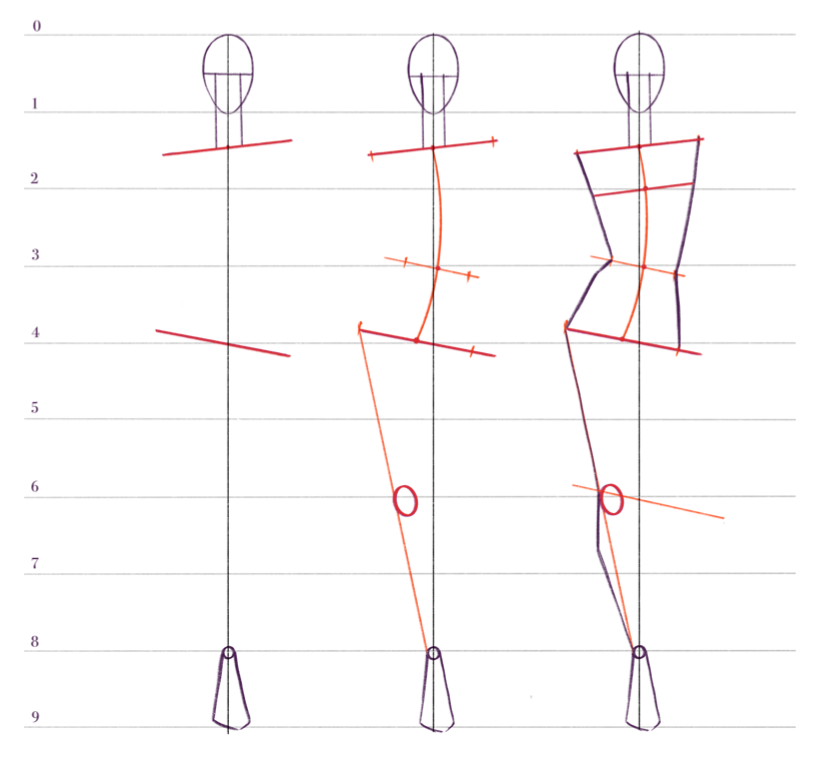
Segment 0–1 is the head (draw an egg with the sharp edge down).
3
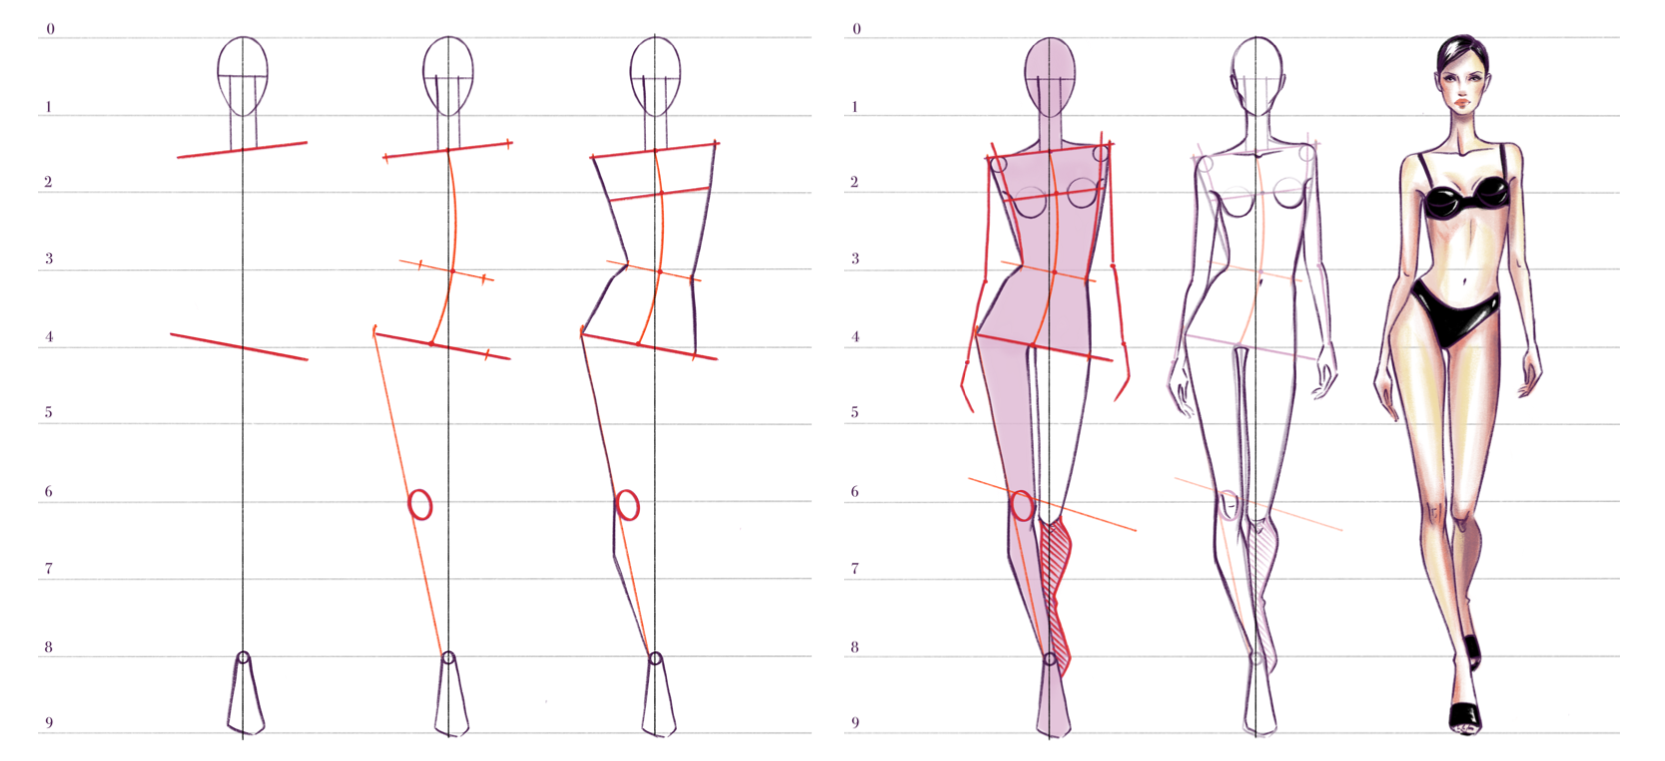
When building a figure leaning on one leg, you must take into account that the shoulder and pelvis lines will be directed in the opposite directions (the lines of the shoulders, chest and the creases of elbows are parallel, and the waist and hip lines are directed in the opposite direction, as shown in the diagram). The pelvis is shifted away from the central axis.
4
The shoulder line is equal to 1/3 of segment 1–2, but since you can lengthen the neck in the illustration, the shoulder line can be marked just above the middle of this segment. Set the shoulder width taking into account the arms (usually, the shoulder width is equal to the height of 1.5 heads). Next, set the neck width (as you like, but the proportions must remain harmonious).
5
Draw the dynamics axis (the convex edge always looks towards the shoulder
above – see the diagram). The dynamics axis is actually the centre of our body. Since the pelvis has shifted to the side, then, accordingly, the torso has taken an arched shape. The intersection of the dynamics axis and the lines of the chest, waist and hips is the new centre of the body. Now set the width of the shoulders, waist and hips from this axis.
above – see the diagram). The dynamics axis is actually the centre of our body. Since the pelvis has shifted to the side, then, accordingly, the torso has taken an arched shape. The intersection of the dynamics axis and the lines of the chest, waist and hips is the new centre of the body. Now set the width of the shoulders, waist and hips from this axis.
6
From the dynamics axis, set the hip width and connect the ready parameters with smooth lines.
8
7
From the dynamics axis, set the waist width at mark 3. The waist width is equal to the head height, but you can make it narrower.
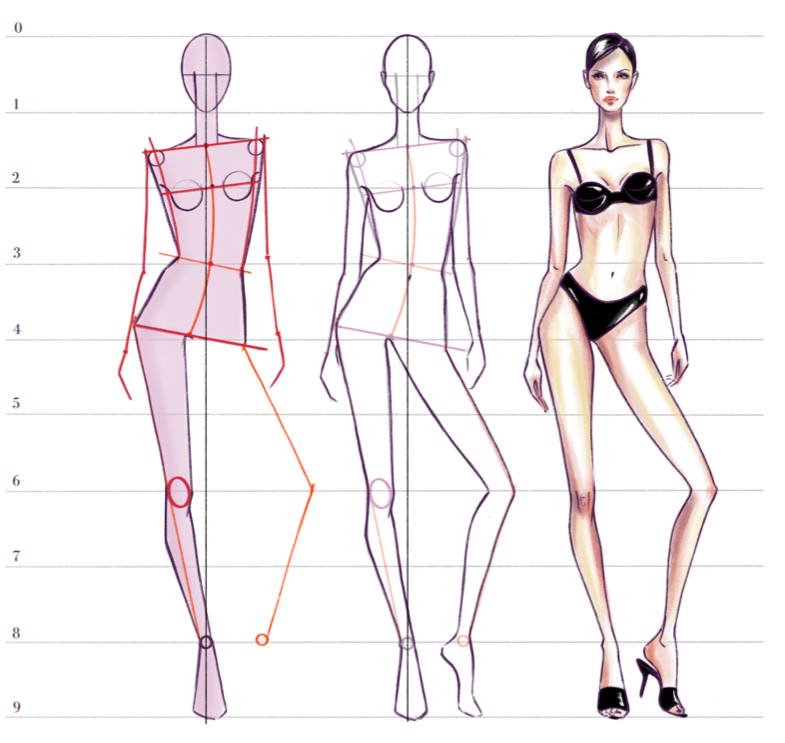
For our figure to be stable, shift the foot of the supporting leg to the central axis and connect the thigh and ankle joint with a diagonal. The result is the edge of the supporting leg. The knee joint is in segment 6–6.5 and rests against the diagonal. Next, give shape to the leg. The same technique works when building a walking figure.
9
11
To draw a leg bent at the knee, first set the leg direction. To do this, draw an inclined straight line from the hip. Next, look for the position of the knee on this line. To do this, measure the distance from the edge of the hip to the knee on the supporting leg, and put the resulting segment on the inclined straight line from the hip of the second leg. Draw the knee. Measure the distance from the knee to the ankle joint on the supporting leg and set the same distance from the knee of the bent leg so that the ankle is at the level of segment 8. Draw the leg. At the same time, keep in mind that the leg in profile is always wider than the leg en face.
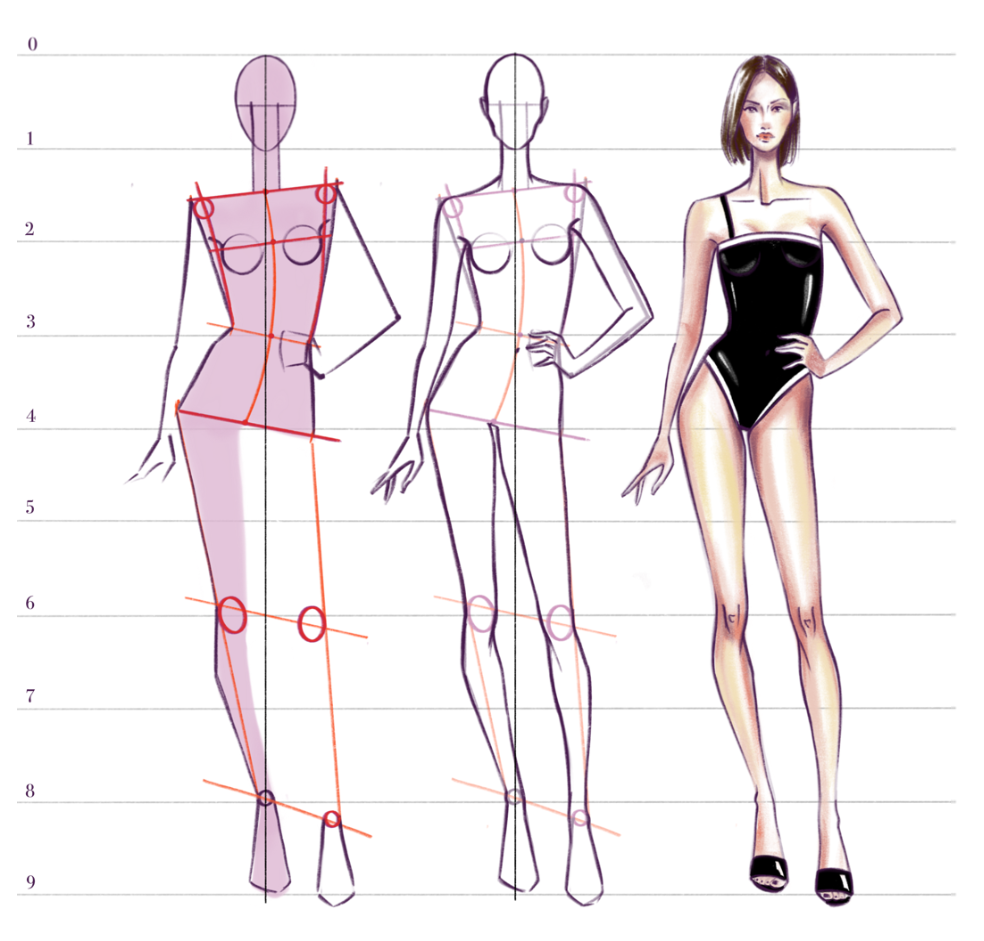
If you want to draw a leg laid aside, then the line of the knees and ankle joints will be parallel to the hip line (see the diagram).
12

In the case of a walking figure, the knee line will also be parallel to the hip line, but the lower part of the “walking” leg will go into contraction and be shorter than the lower part of the supporting leg. The lower leg itself will take on a more convex arched shape, and the toe of the foot will be more elongated. Make sure that the distance between the knee joints is not large, and that there is no feeling that the figure is “waddling”.
12
The figure in profile
Start building the figure with a layout on a sheet.
1
5
Mark 3 indicates the waist line. Mark 3.5 is the middle of the hip. Mark this line for yourself, and at mark 4, indicate the 1 thigh line.
Divide the segment into 9–10 equal parts and draw the vertical axis of symmetry relative to which you will build the figure.
2
6
Now, let’s start drawing the front part of the body. On the waist line to the side where the front part of the figure will be, mark a segment equal to half the head and put a point. At mark 6 or 6.5 (depending on how many heads you draw the figure on), put a point on the central axis. The feet are at segment 8–9. At mark 8, put a point on the central axis. This is the point where you will put the ankle joint. Next, smoothly connect all the points. Starting from the neck, draw a flowing line connecting the point at the waist, smoothly move to the knee, the point at mark 6, and connect the knee with the point of the ankle joint, going slightly beyond the central axis (see the diagram).
Segment 0–1 is the head. While you can fit the head en face into a rectangle, the head in profile fits into a square. Draw a square with the middle on the central axis. Fit the head into this square (see the construction diagram).
3
Mark the shoulder line slightly above the middle of segment 1–2. In front, you can already draw the neck. It starts from the middle of the lower jaw and ends at the intersection of the central axis and the shoulder line.
4
The middle of the chest is at mark 2. Draw the breast in front. At the back, at mark 2, indent a segment equal to half the head and put a point.
8
7
Draw the foot in profile.
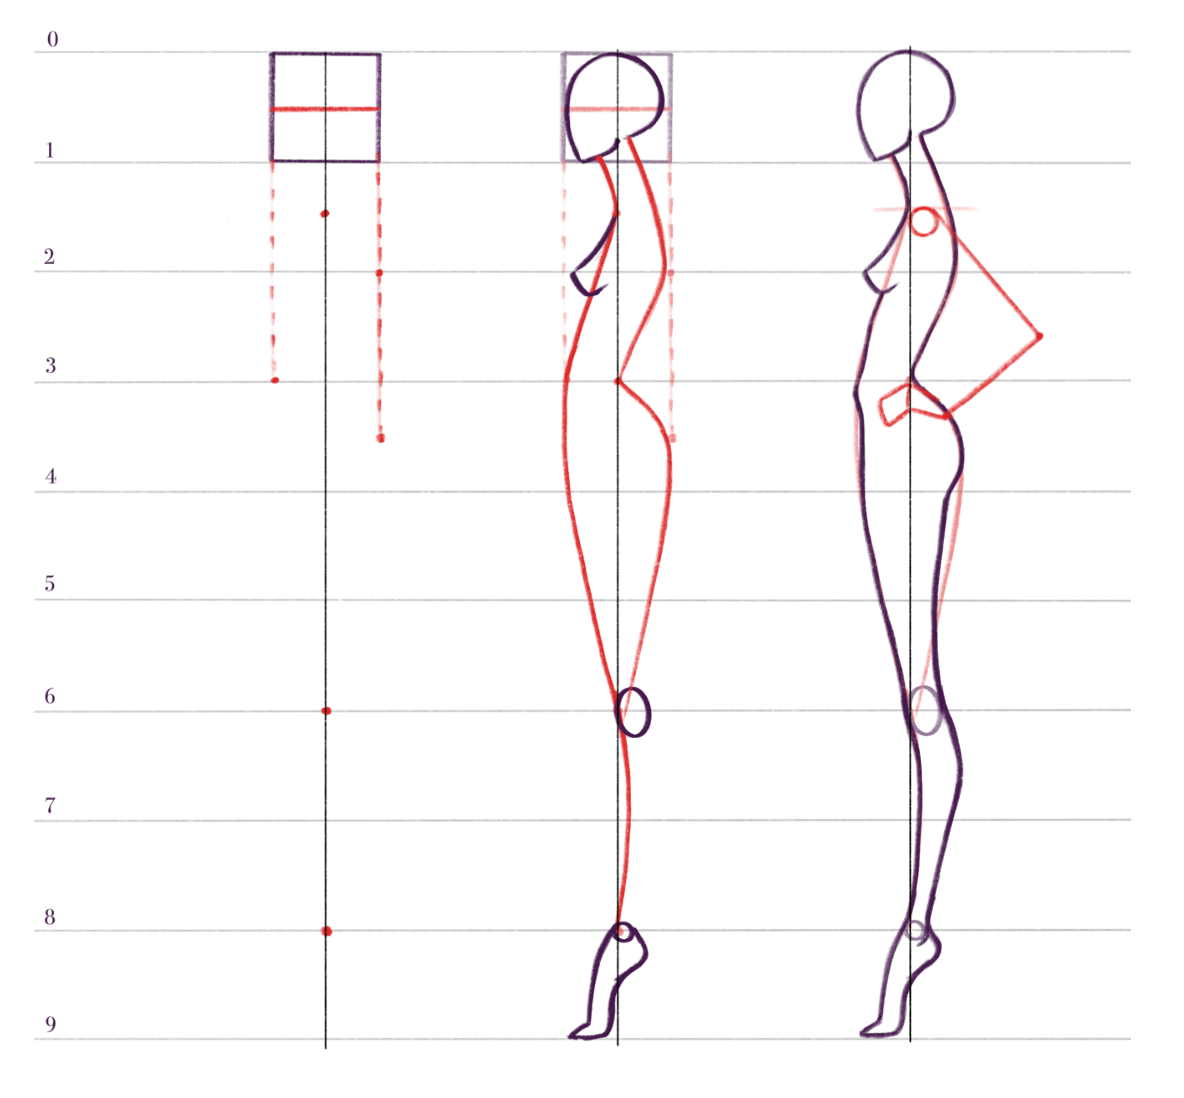
At mark 3 on the central axis, put a point, and at mark 3.5 (middle of the thigh) indent a segment equal to half the head and put a point.
9
From the head, starting a little further than the central axis, smoothly connect the obtained points with a line. (see the diagram).
10
Now draw the arm and the second leg.
12
11
At mark 6, draw a conditional knee joint in the form of an oval and draw the back surface of the leg. At mark 6.5–7, the lower leg expands and narrows towards the ankle joint.
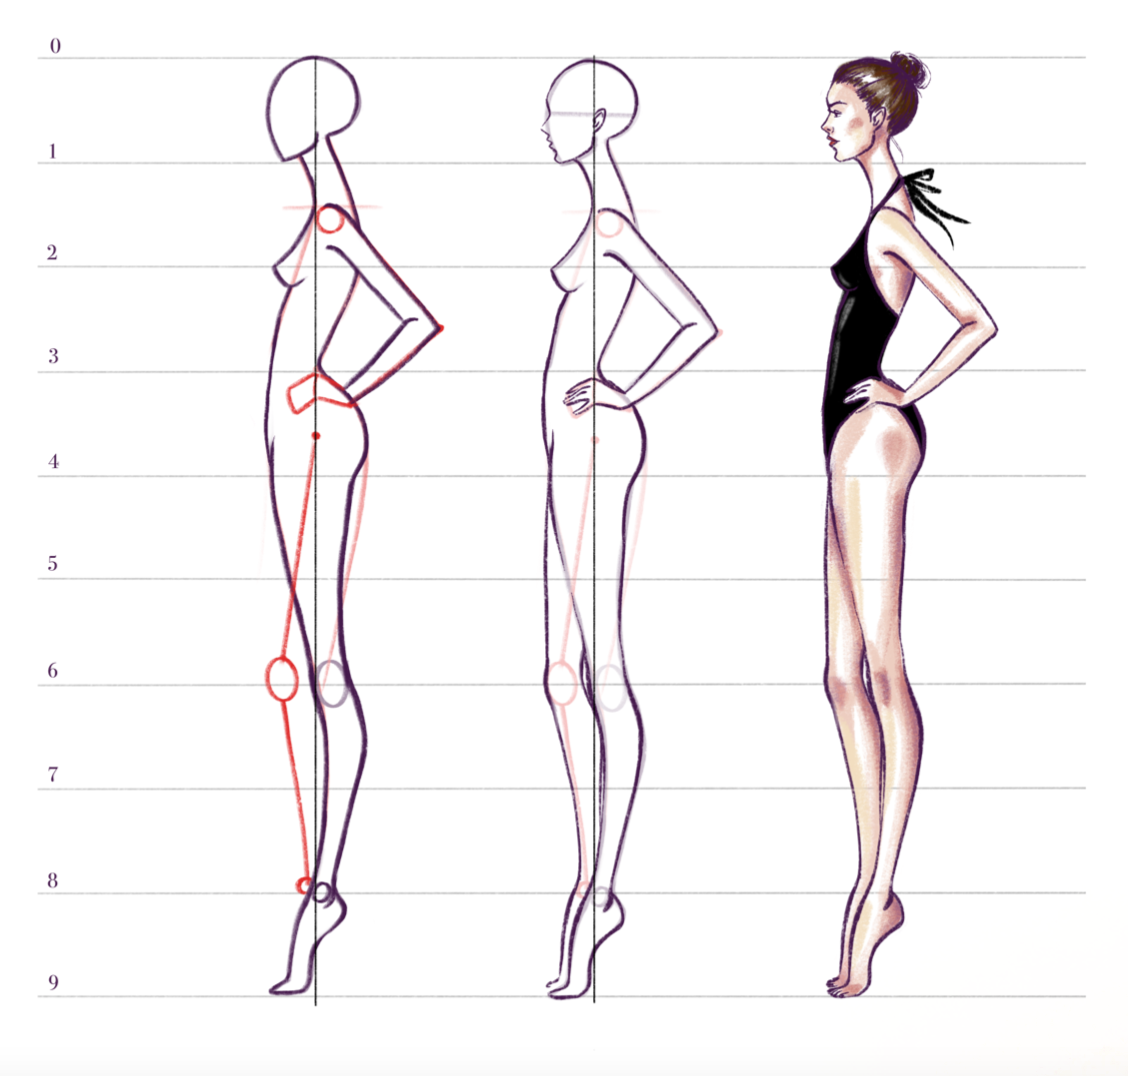
Behind the central axis, in the back, draw a small circle which will mark the shoulder joint. Let me remind you that on the waist line there is an elbow crease, segment 3– 4 is the forearm, and 2⁄3 of segment 4–5 is the hand. Draw the hand. Please also keep in mind that if you want to bend the arm at the elbow, the parameters of the arm, namely the length of the shoulder, the forearm and the hand (if not in perspective) do not change.
13
Next, draw the second leg. It should be borne in mind that the figure is in a pose, and the second leg is slightly less visible. Therefore, draw the knee joint not in the middle of mark 6, but slightly higher. The same thing happens with the ankle joint – draw it above mark 8. Draw the second foot.
14
Figure in 3⁄4 pose
Before drawing this pose, be aware that the figure is in perspective, and some parts of the body go into contraction and seem narrower or shorter than the rest. For example, a shoulder that goes into perspective visually looks narrower than one that is looking at us, and this will happen with all body parts. There are no formulas for building such poses, since the figure can be at different angles – from a slight contraction, almost en face, to in profile!
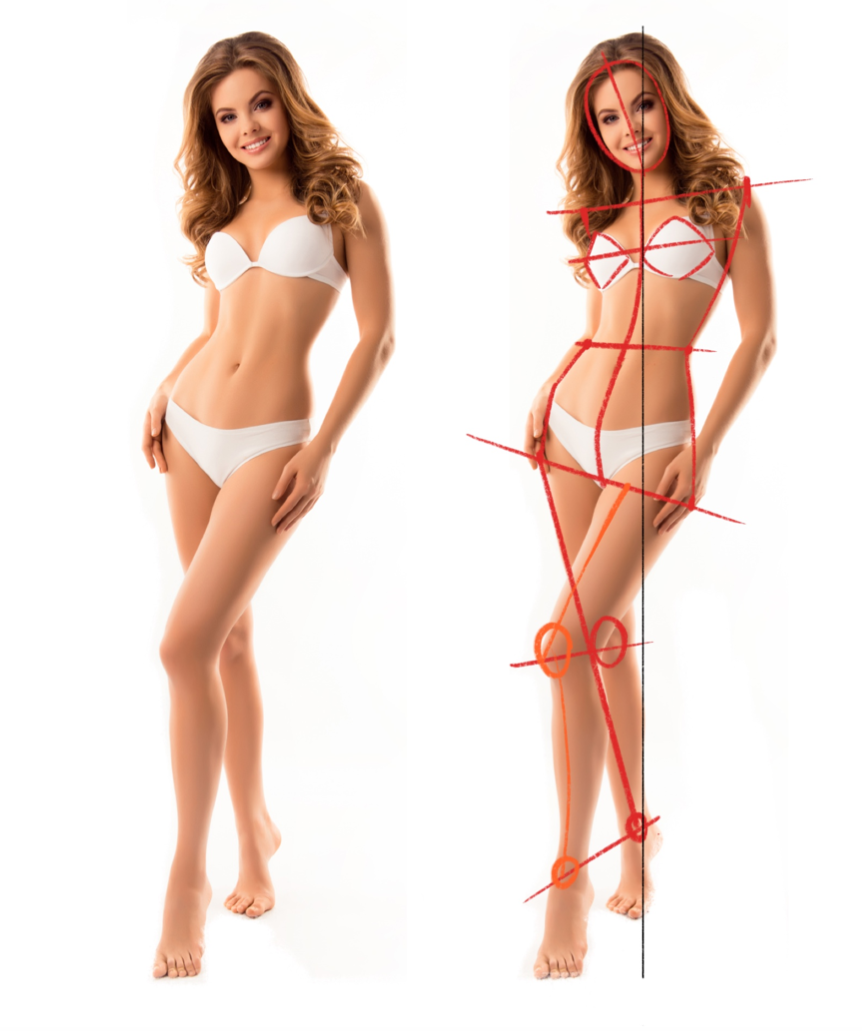
When drawing this pose, it is important to observe the nature and plasticity of the body and compare dimensions. If you understand the principles of building simple poses, 3⁄4 of them will no longer be so difficult to portray. But there are much more complex body angles for drawing! Therefore, it is very important to draw such figures from nature or from a photo in order for the eye to get used to different angles. If your photo is printed or you are drawing on a tablet, you can draw the main lines of the figure on the reference itself, so it will be easier to deal with the movements of the body and its construction directly on your sheet. Also, when building such figures, the dynamics axis or the centre of the body are very important, since the bend of the torso can be different, and the dynamics axis is not only the centre, but also a guideline for body movement.
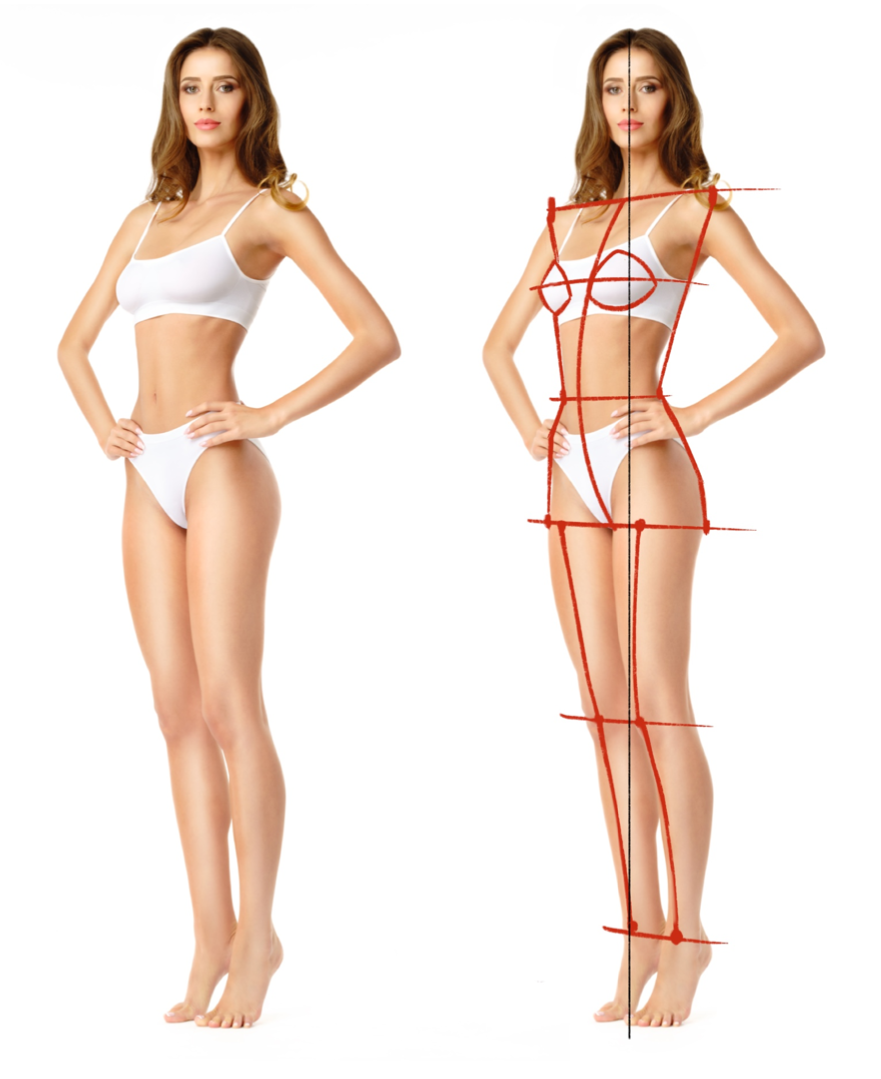
Let’s look at examples of drawing such poses. I will give you step-by-step diagrams for building figures with a deflection of the torso and a bend.
Pay attention to how the dynamics axis changes depending on the position of the torso.
Pay attention to how the dynamics axis changes depending on the position of the torso.
Step-by-step drawing of a figure with a deflection

Step-by-step drawing of a figure with a bend
© Fantasy Room 2014–2025
service@fantasyroom.online
All rights reserved


