


Get the first 30 pages of our book "The Art of Fashion Illustration"
We want to share with you the first 30 pages of our book so you can dive into the world of art. This Fashion Illustration book is a must-have for anyone interested in fashion design or illustration...
How to draw a face
Basic Principles of Construction
Historically, it is ancient Greek proportions — whether it be a human body, head or architecture — that became canonical, and we still use the rules of these proportions today.
Proportions in PORTRAIT
Consider an ancient human head. The average proportions are more or less like ours, but are idealized in the sense that the parts of the face are located in strict mathematical order relative to each other.

However, in real life things are not always as symmetrical as we would like them to be. You can clearly see this in the mirror: eyes eyebrows, and nostrils of different sizes and shapes, ears located at different angles, etc. And that is why, when drawing a portrait of a person, we need to look at their individual features whilst at the same time keeping in mind the canonical form, as we have to adhere to a number of rules. For example, for most people, the eye line is in the middle of their head. Less often, faces have an elongated lower part. Everyone is different!

And since fashion illustration is inextricably linked with portraits, you need to learn how to draw heads, or at least understand the proportions of the face and the correct arrangement of its parts, even if they are stylized in your illustration. This is to avoid drawing eyes at the eyebrow level and lips where the nose should be!
Learn to draw fashion portraits at Fantasy Room Online courses. In the Fashion Illustrator Profession: From Beginner to Professional course, we will work with various painting techniques such as watercolor, alcohol markers, gouache, ink, and collage. The course program includes a variety of fashion styles, teaching how to convey fabric texture, draw faces of different ethnicities, and illustrate fashion accessories.
In the Fashion Illustration in Procreate course, we will draw using the Procreate app on the iPad. We will also cover the basics of figure and portrait drawing, learn to depict different fabric textures, stylize our illustrations, and create animations.
In the Fashion Illustration in Procreate course, we will draw using the Procreate app on the iPad. We will also cover the basics of figure and portrait drawing, learn to depict different fabric textures, stylize our illustrations, and create animations.

Download program


[44+ TUTORIALS]
[21+ TUTORIALS]
[3 video classes]
SECTION 10.
ANIMAL SKETCH
ANIMAL SKETCH

[11 video classes]
SECTION 6. MEN'S FIGURET
SECTION 9.
DRAWING HUMAN
DRAWING HUMAN
VIEW DETAILS


[2 video classes]
SECTION 7. ABOUT THE PROFESSION OF FASHION ILLUSTRATOR
[5 video classes]
SECTION 5. MIXED TECHNIQUES
VIEW DETAILS

VIEW DETAILS

Online Course
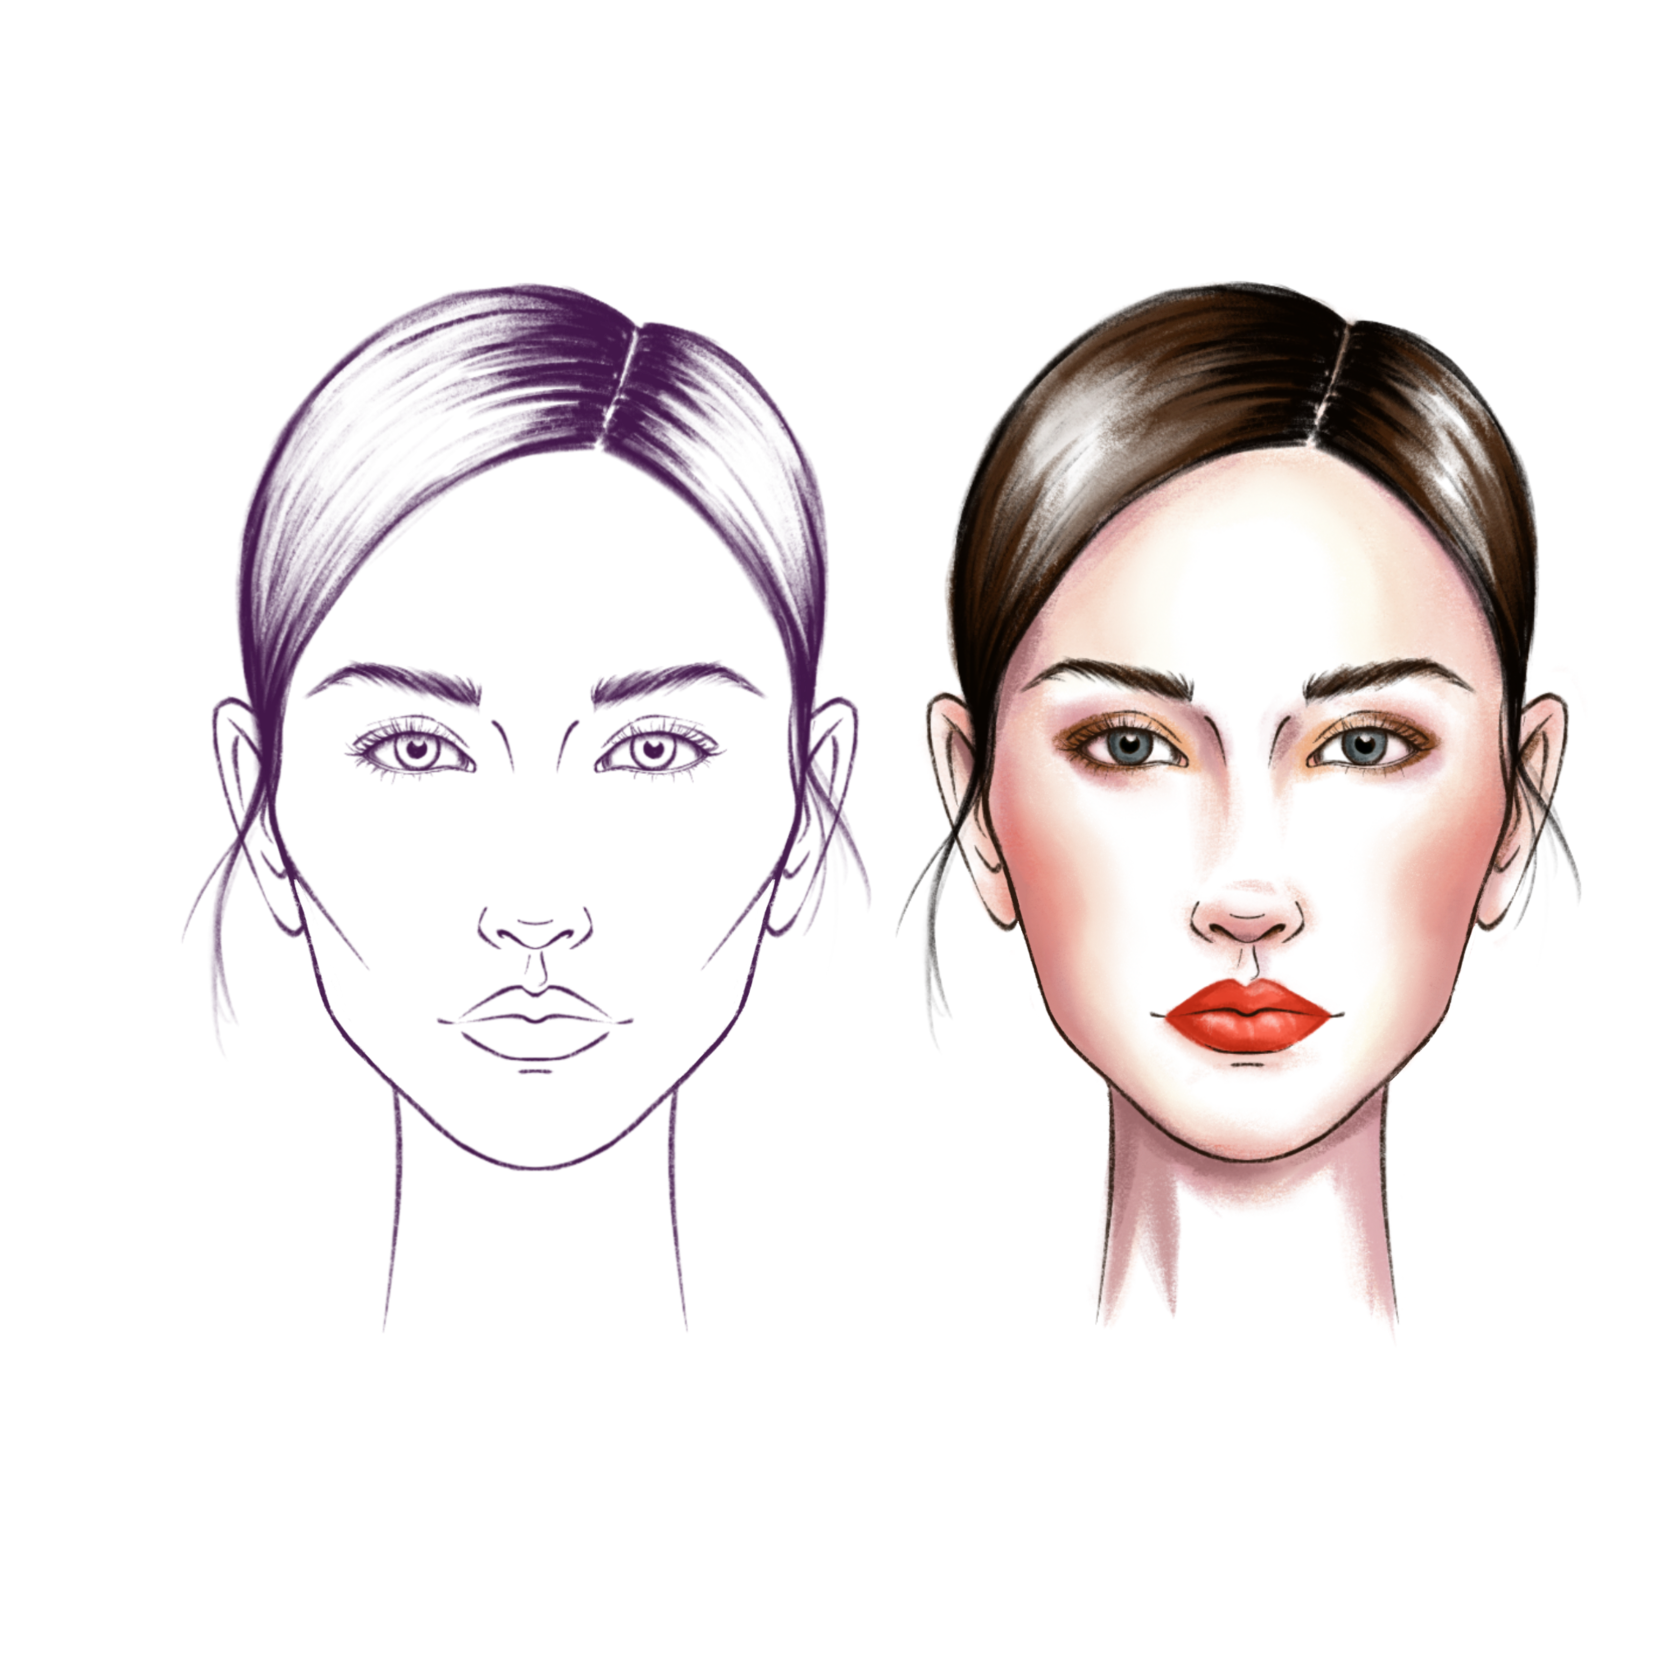
Head in full face
Let’s look at the proportions and basic head construction in full face.
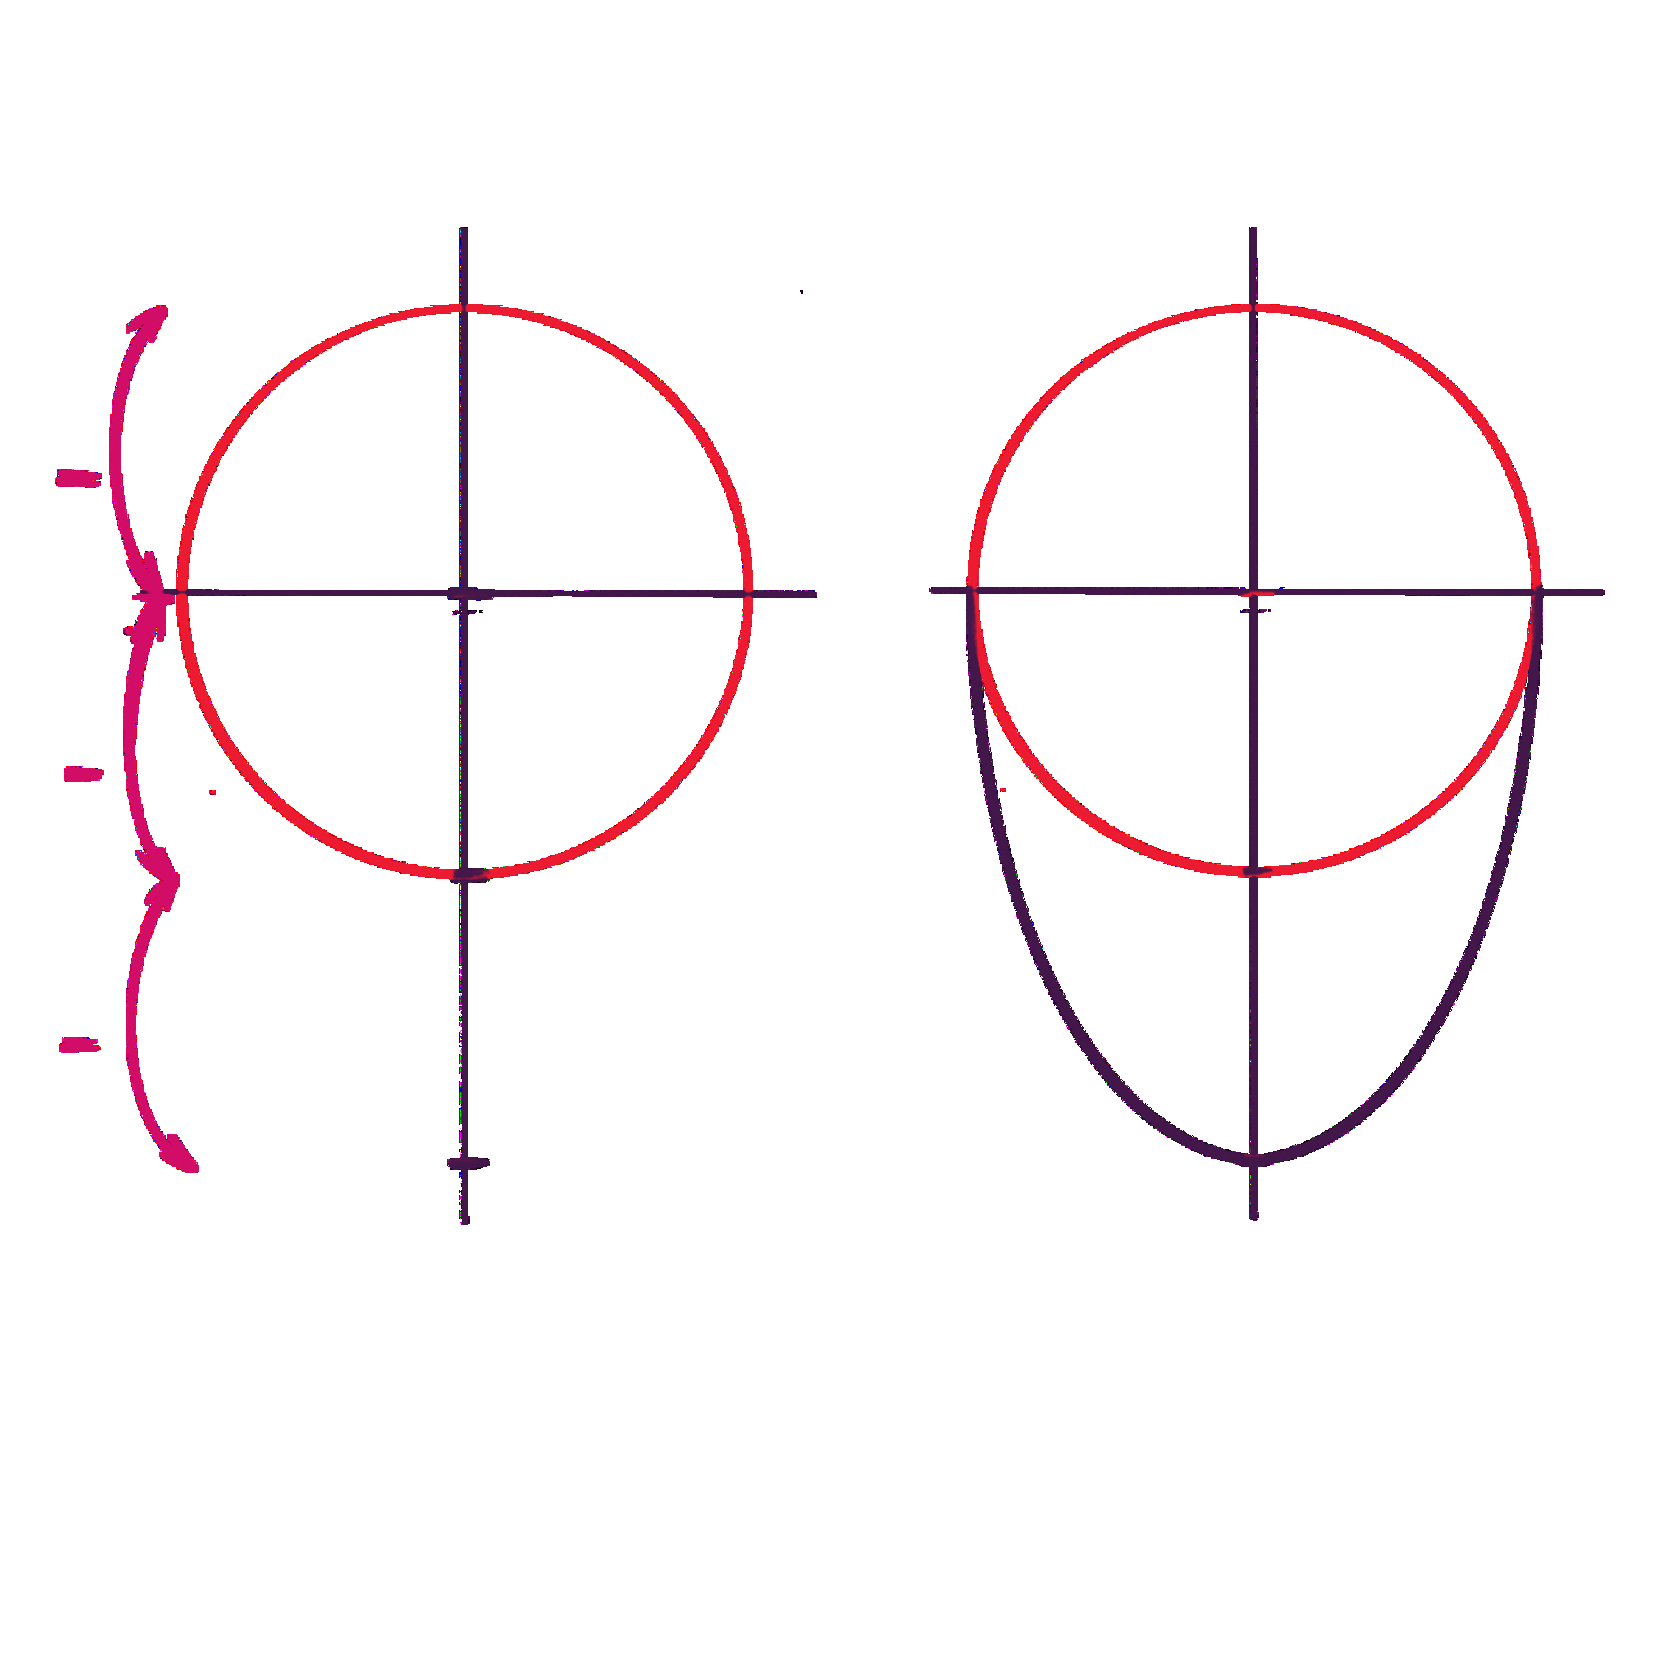
If you fit a human head into a geometric figure, it will be a rectangle.
There are several options for constructing the head:
Start with a rectangle with a ratio of 2:3 and fit an oval into it.
Draw an oval with a narrower lower part.
Draw a circle and add a pointed part to the bottom.
If you fit a human head into a geometric figure, it will be a rectangle.
There are several options for constructing the head:
Start with a rectangle with a ratio of 2:3 and fit an oval into it.
Draw an oval with a narrower lower part.
Draw a circle and add a pointed part to the bottom.
Draw a circle, divide it in half vertically and draw the central axis from which the head will be drawn.
1
3
Next, divide the resulting oval in half horizontally to get the eye line.
The circle radius is the distance down from the edge of the circle on the central axis to give the lower edge of the head. Combine the circle with the resulting point into a shape, which will resemble an oval.
2
4
Divide the segment from the eye line to the top of the head into 3 equal parts. The first part of the crown is the hairline.
The section from the hairline to the chin is the face. Divide this part into 3 equal parts, where the first line is the eyebrow line, and the second is the lower part of the nose.
5
Divide the section from the nose line to the chin into 3 equal parts, where the first line from the nose is the mouth section.
6
Next, divide the eye line into 5 equal parts, where segments 2 and 4 are the eyes. In line with the canonical rules, one more eye should fit between the two eyes. If we divide the width of the eye into 3 parts, then the middle third is the iris of the eye. On the sides of the outer corners of the eye, leave a distance equal to approximately 0.75 of the eye.
7
The width of the nose (together with its wings) is equal to the width of the eye, although this can vary in real life.
8
The ears are located between the highest point of the eyebrow line to the nose line.
10
9
The width of the mouth is measured along the inner edge of the irises.
The length of the eyebrow is determined by a diagonal from the nasal wing, through the outer corner of the eye to the eyebrow line. The eyebrow arch is also determined by a diagonal from the nasal wing, through the pupil of the eye to the eyebrow line.
11
The zygomatic bone begins from the eye line. Draw an arc towards the section of the mouth, but do not complete the line. It should end at about the half-way mark.
12
The angle of the lower jaw begins at the level of the section of the mouth.
13
Next, draw the oval of the face. From the cheekbone down, draw a smooth, concave line to the lower jaw, then draw a chin of any shape of your choosing. The main thing is not to draw it too sharp if you are drawing in a realistic style.
14
The width of the neck is determined by the perpendicular line lowered from the middle of the eye to the edge of the lower jaw. Depending on the style, it may be narrower.
15
Next, draw the hair. The hairline can be of different shapes: rounded, widow peak, etc. Choose the one that you like more and carefully outline this shape. (A lot still depends on the hairstyle. With loose hair, the hairline is not visible as clearly as when gathered back.) The main thing is not to do this with a solid thick line, or you will get the effect of wearing a cap with the hair gathered back. Remember that hair has volume and this volume will extend beyond the edges of the head. Also, keep in mind that there is hair in front of the ears too.
16
LET’S SUMMARIZE:
Remember that practicing different angles of the head and its features is crucial!
Just like with figures, it will be very useful to draw different angles of the head and individual facial features from time to time. This will help you grasp the forms and perspectives of the drawing subject more quickly.
Again, don't worry if it doesn't work out perfectly at first. It will all come with experience, so keep drawing! You can draw from life or from photographs, gradually reducing the time it takes to complete each angle.


© Fantasy Room 2014–2025
service@fantasyroom.online
All rights reserved