


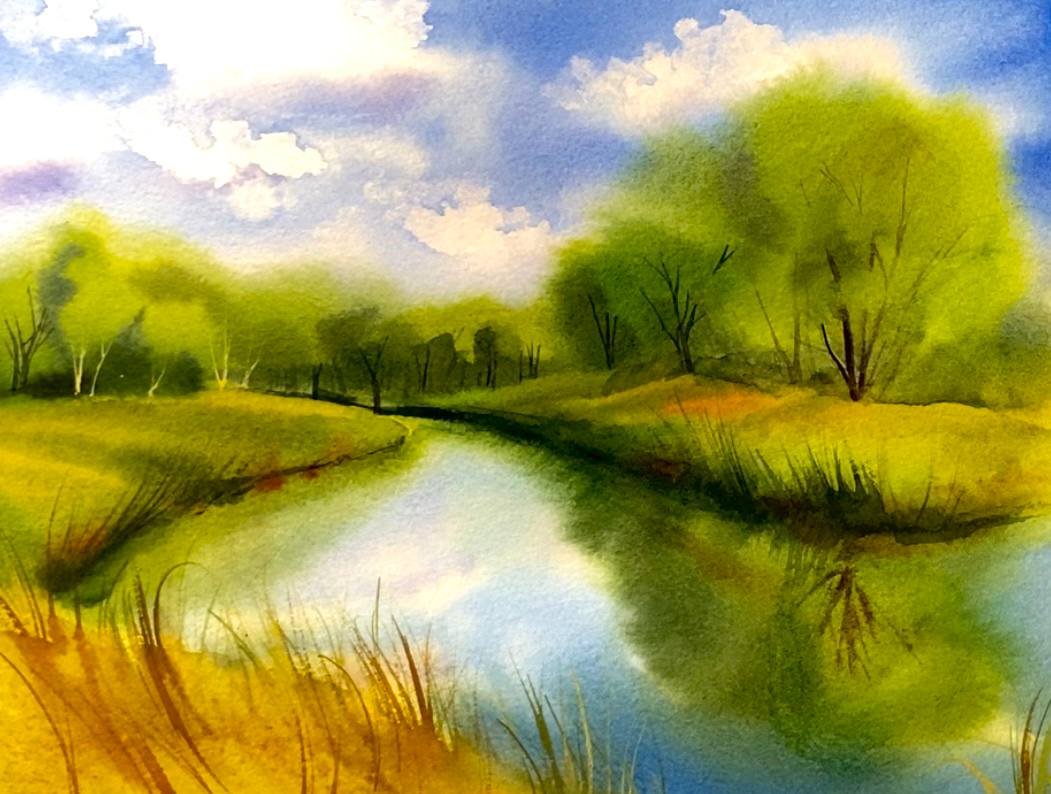
Watercolor painting is a mesmerizing art form that allows artists to capture the beauty of landscapes in a unique and ethereal way. In this step-by-step guide, we will explore the magical world of watercolors and learn how to paint a breathtaking landscape. Whether you're a seasoned artist or a beginner, this tutorial will take you through the process of creating a picturesque scene that includes a vivid sky, serene lake reflections, lush trees, and vibrant grass.
Through careful and deliberate steps, we will break down the landscape into its essential elements, making it accessible to artists of all skill levels. By the end of this tutorial, you will not only have a stunning watercolor masterpiece but also a newfound appreciation for the versatility of this captivating medium.
So, grab your watercolor palette, brushes, and paper, and let's embark on a creative journey as we unveil the secrets to painting a landscape that reflects the beauty of nature and the wonder of watercolors.
Materials You'll Need:
- Watercolor paper
- Watercolor brushes (round and flat)
- Watercolor paints
- Water container
- Paper towels
- Pencil and eraser
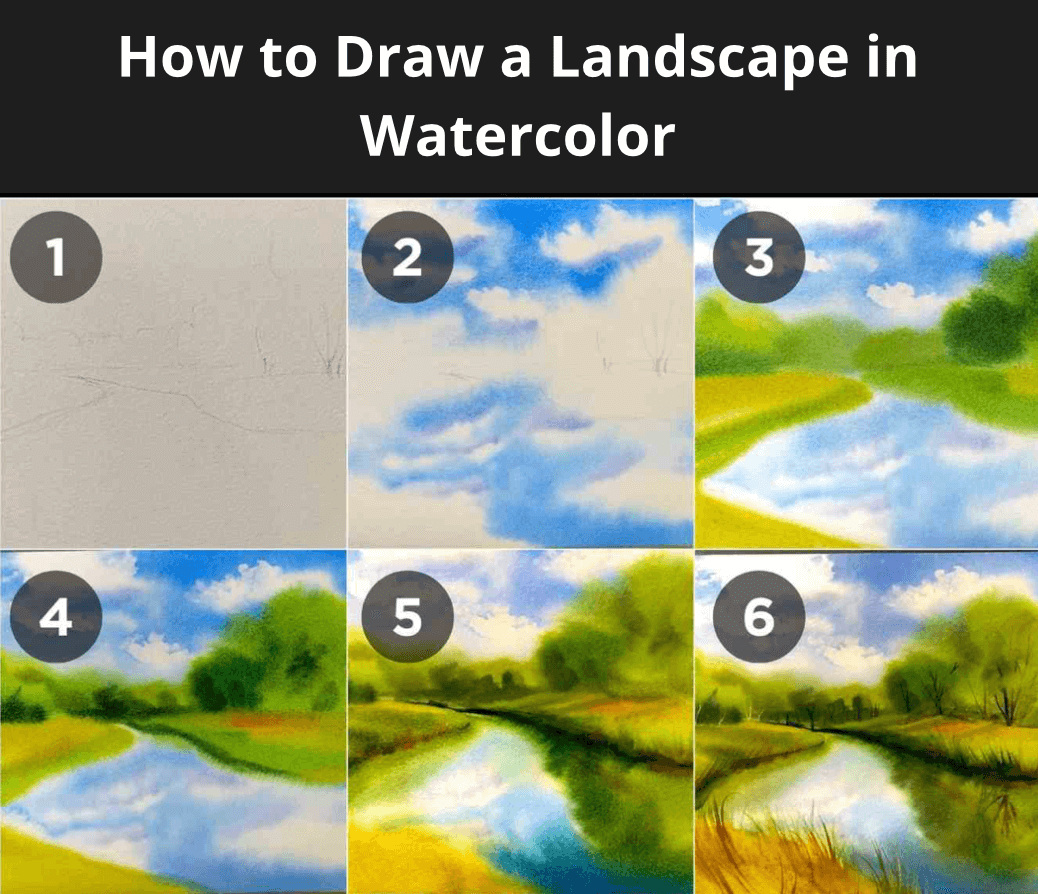
Step 1: Prepare Your Workspace
Set up your workspace with all the necessary materials. Make sure your watercolor paper is secured to a board to prevent warping. Fill your water container and have paper towels at the ready for blotting.
Step 2: Sketch Your Landscape
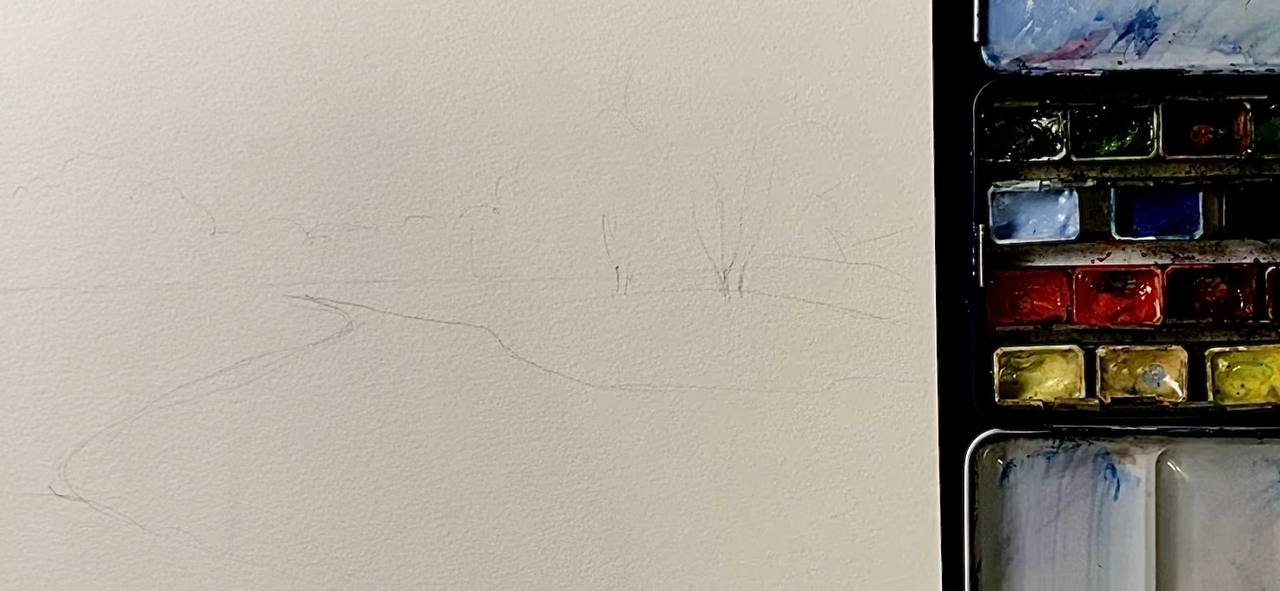
Start by lightly sketching the outline of your landscape using a pencil. You can create a simple horizon line with a few hills and a lake. Remember, the wet-on-wet technique allows for soft edges, so you don't need too much detail at this stage.
Use a moderately soft pencil like an HB4; it works perfectly. Try to avoid unnecessary lines, focusing on the critical details. When it comes to depicting clouds in the sky, it's best to use paint. Divide the canvas into primary areas and main objects. Avoid overloading the drawing with too many branches; it's not necessary with a pencil.
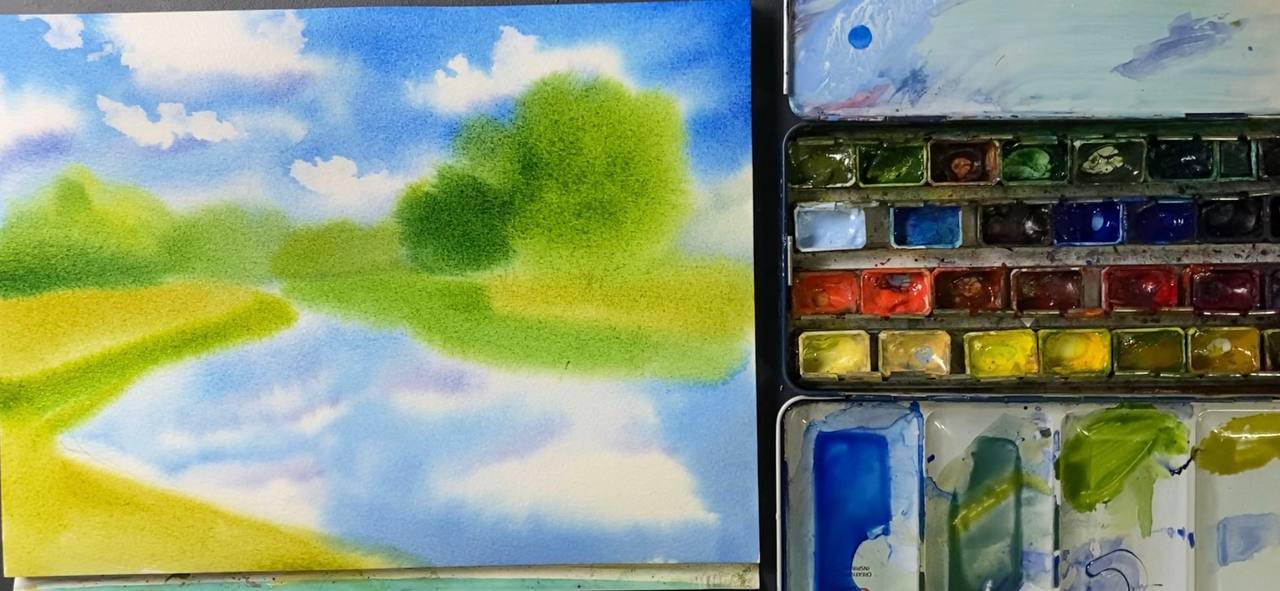
Step 3: Wet the Paper
Using a large, clean brush, wet the entire surface of your paper with clean water. Ensure an even, glossy sheen without puddles. This will act as your base for the wet-on-wet technique.
Step 4: Apply the Sky and Lake
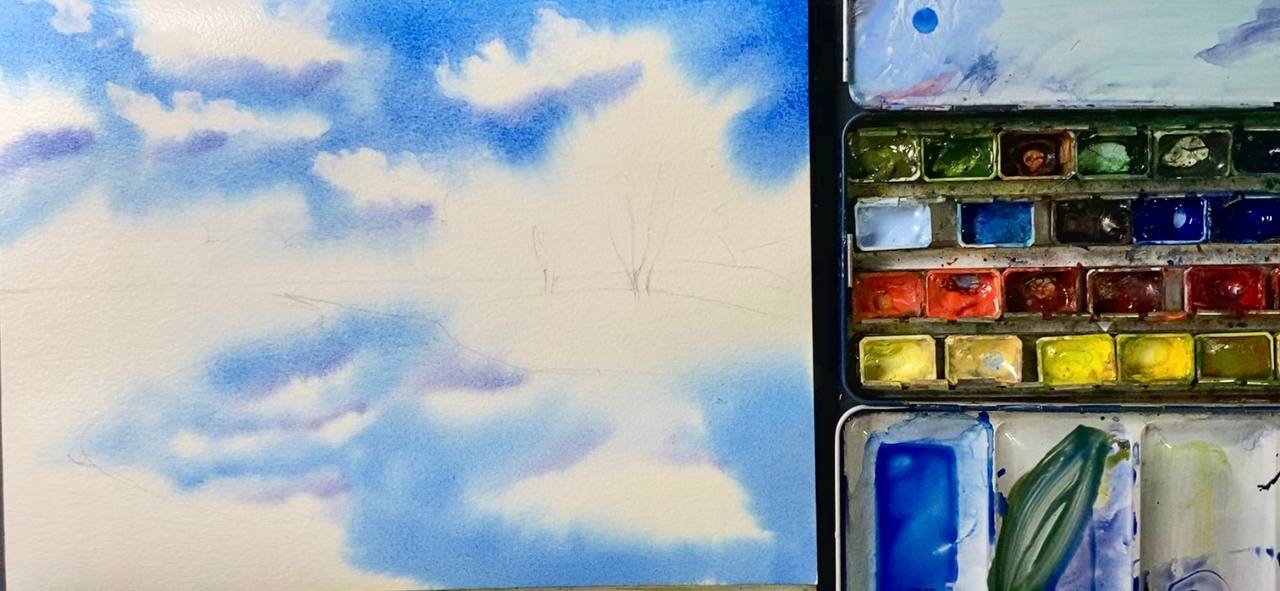
Create the sky and its reflection while the paper is still damp. Wet your paper multiple times, and ensure it's firmly secured with tape if it's not already in a block. To enhance cloud clarity, the smoother the water's surface (with fewer ripples), the crisper the reflections will be. After applying the initial wet layers, you can gently blot excess moisture with a paper towel to create distinct outlines.
Use ultramarine and cerulean blue for the sky. Remember that the higher the sky (closer to us), the darker it should be, while the lower part (closer to the horizon) should appear lighter. To give your clouds more depth, consider adding shadows beneath each cloud. These shadows should be cooler than the sky itself; for instance, you can incorporate a touch of red into the ultramarine.
Use ultramarine and cerulean blue for the sky. Remember that the higher the sky (closer to us), the darker it should be, while the lower part (closer to the horizon) should appear lighter. To give your clouds more depth, consider adding shadows beneath each cloud. These shadows should be cooler than the sky itself; for instance, you can incorporate a touch of red into the ultramarine.
Step 5: Add Colorful Accents
While the paper is still wet, we can add all the colorful accents. Let's go over the grass and trees with shades of green. For the background, opt for cooler tones. For instance, you can create a mixture of ultramarine, add a touch of yellow, but be sure to keep the yellow subtle. The closer objects are to the foreground, the more yellow you can use to emphasize vibrant grass. To create a sunlit effect, you can add shades of orange, yellow, or sienna to the green shade.
If your paper has already partially dried, wait for it to fully dry after the first layer, and then moisten it again to apply the second layer of green shades.
If your paper has already partially dried, wait for it to fully dry after the first layer, and then moisten it again to apply the second layer of green shades.
Step 6: Add Shadows to a Grass
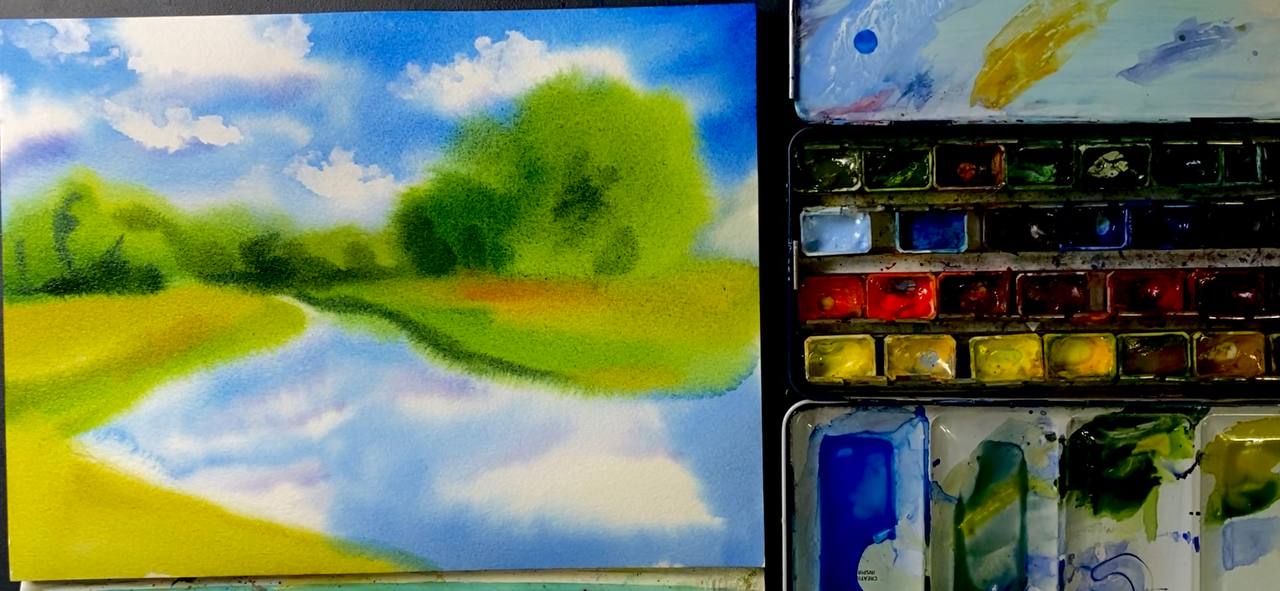
Add shadows to your grass. Determine the direction of your lighting. In this case, the light is coming from the right, so on the left side of our objects, add falling and cast shadows. To create shadow colors, you'll need to use a cooler shade of green. This can again be a mixture of ultramarine and yellow, or just ultramarine. It's best to perform this step while the paper is still wet, so I recommend doing it together with the previous step.
Step 7: Make Some Adjustments
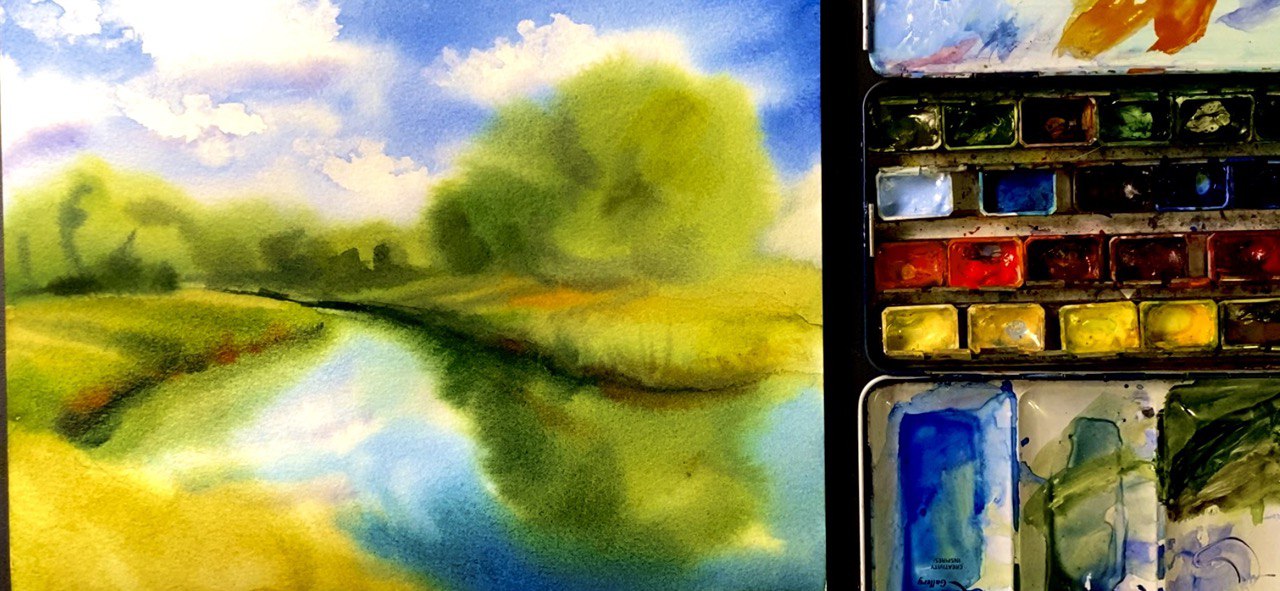
For the next step, you can work selectively. For example, if you are satisfied with how your trees and the sky look, you don't need to wet them again. Instead, moisten only the area you want to adjust, such as the entire foreground.
Moisten everything up to the horizon line and paint the reflections of the trees. Use the same colors, but mirror them in the reflections. You can make the reflections slightly darker than the trees in the original. Also, consider deepening the water, making it darker as it gets closer to you.
Moisten everything up to the horizon line and paint the reflections of the trees. Use the same colors, but mirror them in the reflections. You can make the reflections slightly darker than the trees in the original. Also, consider deepening the water, making it darker as it gets closer to you.
Step 8. Add Final Details
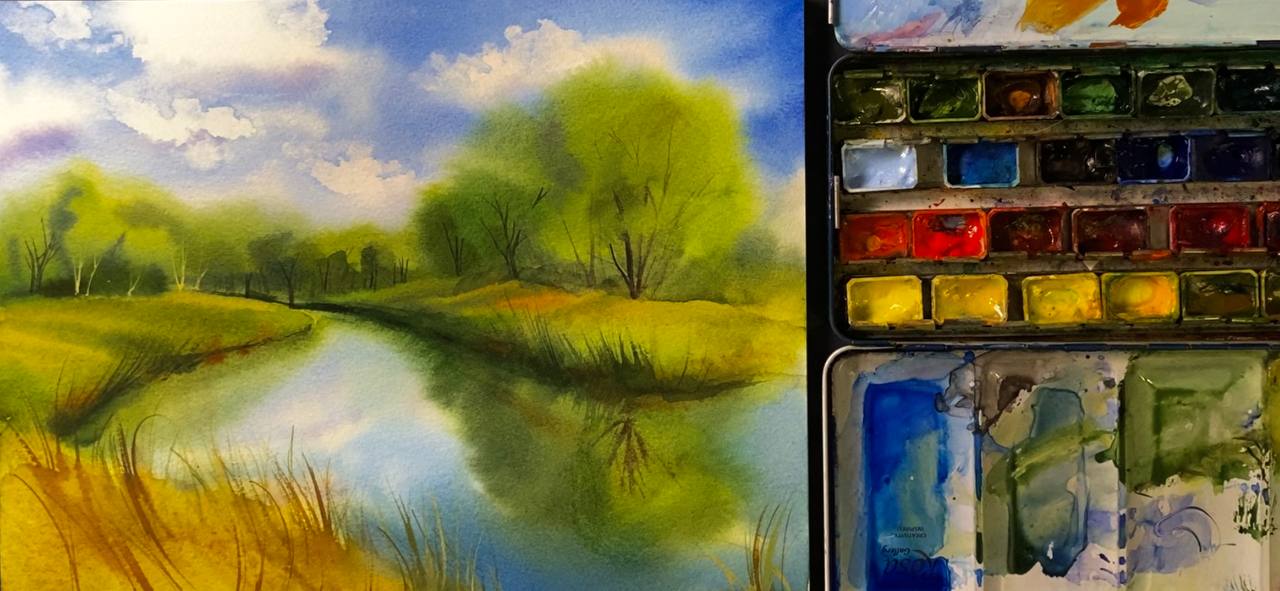
The main artwork is ready, and now we need to add details like tree branches and grass.
If you are painting birch trees, you can use titanium white or gouache for the branches. For most other trees, use dark shades like sepia or other brown tones.
As you approach the foreground, make the branches darker. In the background, it's good to dilute the colors semi-transparently to create an aerial perspective effect. Objects in the distance should appear lighter due to aerial perspective. This way, we create volume and variety. In the foreground, use contrasting and very dark shades.
To paint branches, use brushes with long synthetic bristles. You can also use the same brush to paint the grass. Spend ample time on the foreground and paint a lot of grass. Pay attention to contrast in the grass. If your background is light, use darker shades for the grass. If your background is already dark, select shades with a light pigment or apply the chosen shade thickly with a liner brush to create thin lines that are lighter than the background, adding detail and volume.


