


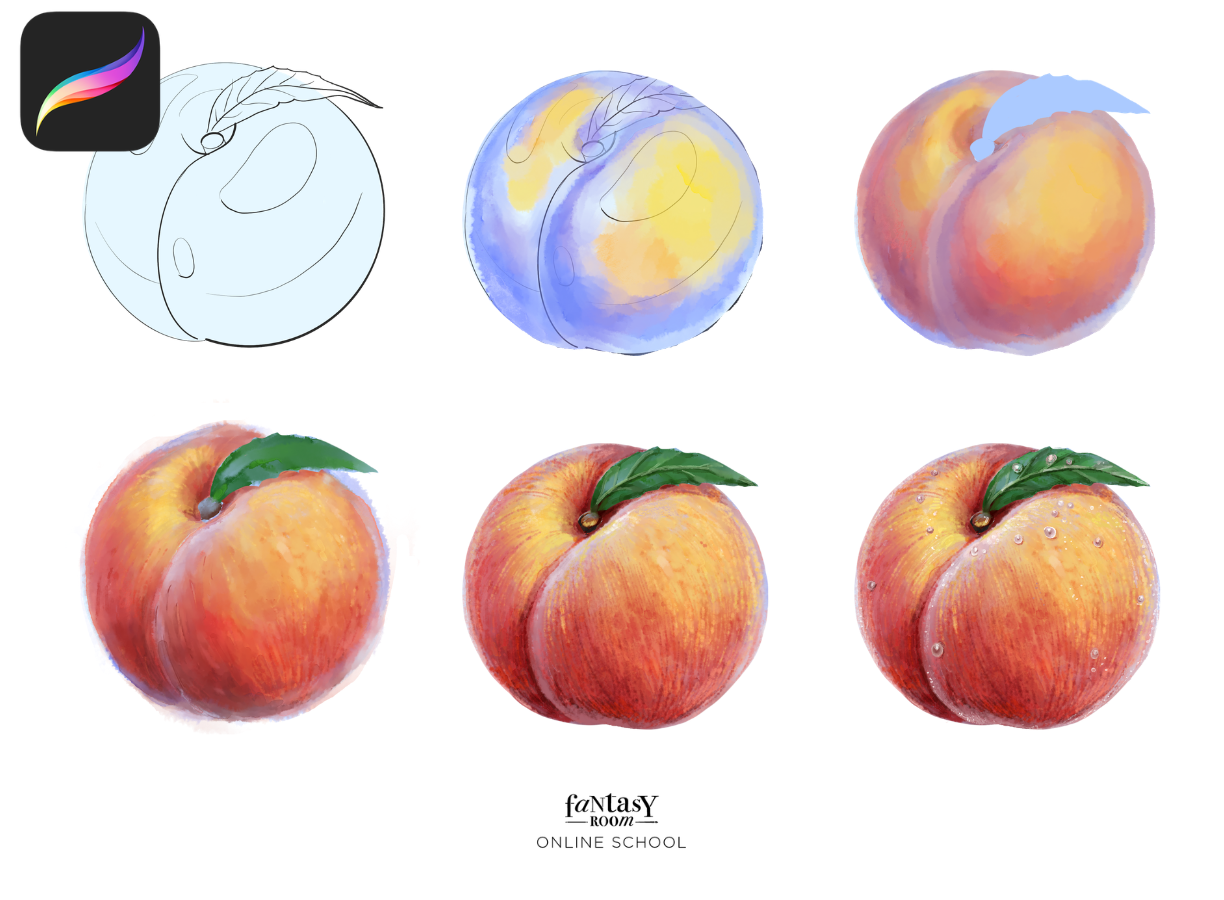
Painting a peach is an excellent way to practice digital watercolor in Procreate. Its rounded form helps you understand volume, while its warm color variations, soft texture, cool reflections, and delicate shadows make it an engaging subject to paint.
In this step-by-step tutorial, you’ll learn how to paint a realistic watercolor peach using Clipping Masks, layered color, textured brushes, selective blending, and carefully placed details.
The original illustration was created with the Naomi Watercolor 4 brush set. However, you can follow the same process using any textured watercolor, dry-edge, blending, and detail brushes available in your Procreate library.
In this step-by-step tutorial, you’ll learn how to paint a realistic watercolor peach using Clipping Masks, layered color, textured brushes, selective blending, and carefully placed details.
The original illustration was created with the Naomi Watercolor 4 brush set. However, you can follow the same process using any textured watercolor, dry-edge, blending, and detail brushes available in your Procreate library.
Tutorial Overview
Difficulty: Beginner to intermediate
Estimated time: 45 to 90 minutes
App: Procreate for iPad
Style: Digital watercolor
Main techniques: Clipping Masks, layered color, Smudge, texture, light and shadow
Original brush set: Naomi Watercolor 4
Estimated time: 45 to 90 minutes
App: Procreate for iPad
Style: Digital watercolor
Main techniques: Clipping Masks, layered color, Smudge, texture, light and shadow
Original brush set: Naomi Watercolor 4
Brushes Used in This Tutorial
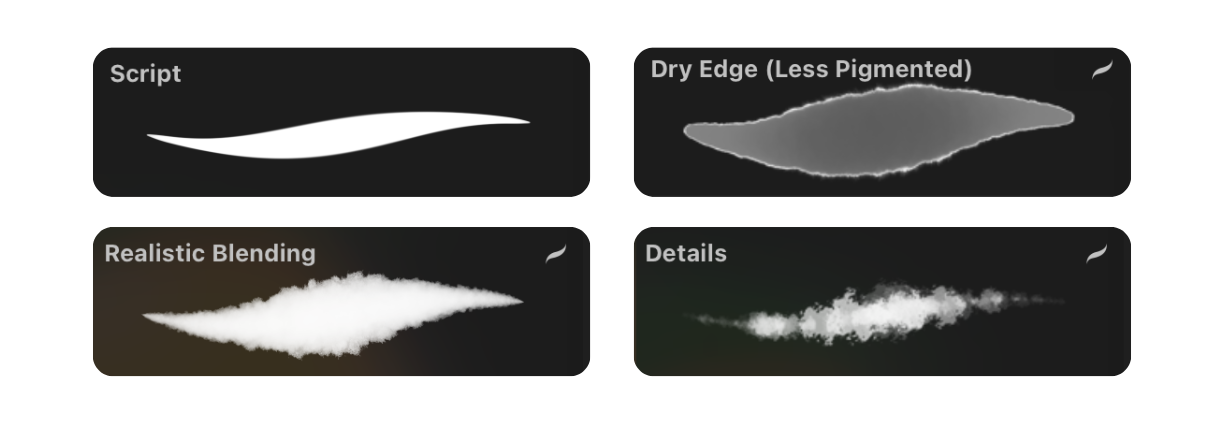
The following brushes were used to create the original peach illustration:
Script
Used to create the initial silhouette and define clean edges.
Dry Edge
Used for the main colors, reflections, shadows, and watercolor transitions.
Realistic Blending
Used with the Smudge tool to soften selected color transitions.
Details
Used to create the peach texture, small accents, and water droplets.
Script
Used to create the initial silhouette and define clean edges.
Dry Edge
Used for the main colors, reflections, shadows, and watercolor transitions.
Realistic Blending
Used with the Smudge tool to soften selected color transitions.
Details
Used to create the peach texture, small accents, and water droplets.
What to Use If You Do Not Have These Brushes
You do not need the Naomi Watercolor 4 set to complete the tutorial. Choose brushes with similar characteristics:
Use a clean inking or monoline brush instead of Script.
Use a dry watercolor, gouache, or textured painting brush instead of Dry Edge.
Use a soft textured brush with the Smudge tool instead of Realistic Blending.
Use a fine grain or detail brush instead of Details.
The exact brush is less important than understanding how shape, color, light, and texture work together.
Use a clean inking or monoline brush instead of Script.
Use a dry watercolor, gouache, or textured painting brush instead of Dry Edge.
Use a soft textured brush with the Smudge tool instead of Realistic Blending.
Use a fine grain or detail brush instead of Details.
The exact brush is less important than understanding how shape, color, light, and texture work together.
Peach Color Palette
The original illustration uses the following colors:
For the leaf:
You can adjust these colors to match your reference. The goal is not to reproduce every shade exactly, but to create a natural balance between warm peach tones, cool reflected light, and deeper shadows.
- Naples Yellow
- Lavender
- English Red
- Yellow Ochre
- Orange Red
- Sepia
- Crimson Lake
- Cadmium Yellow
- Cadmium Orange
For the leaf:
- Chrome Green
- Grass Green
- Yellow Green
You can adjust these colors to match your reference. The goal is not to reproduce every shade exactly, but to create a natural balance between warm peach tones, cool reflected light, and deeper shadows.
Step 1: Draw the Basic Peach Shape
Create a new canvas and add a fresh layer for the peach.
Using the Script brush, draw the basic silhouette. Focus on the overall shape before adding any color or texture.
Using the Script brush, draw the basic silhouette. Focus on the overall shape before adding any color or texture.
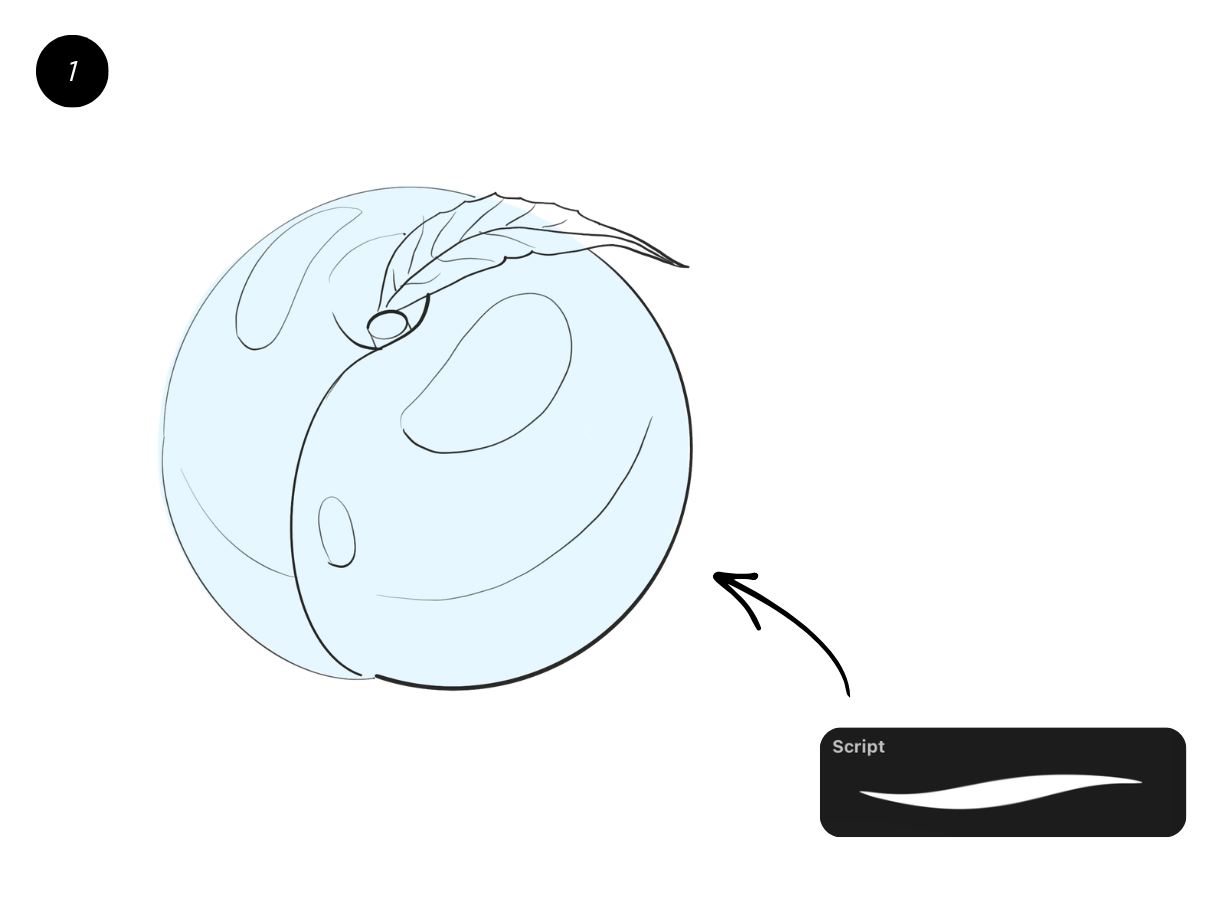
A peach is not a perfect circle. It usually has a slightly asymmetrical silhouette, a gentle indentation around the stem, and a subtle division along one side.
Keep the outer contour clean and easy to read. A strong silhouette will make the later stages much easier.
Once you are happy with the shape, fill it with a solid base color. This layer will define the visible area of the peach and support the Clipping Masks you create in the following steps.
Keep the outer contour clean and easy to read. A strong silhouette will make the later stages much easier.
Once you are happy with the shape, fill it with a solid base color. This layer will define the visible area of the peach and support the Clipping Masks you create in the following steps.
Step 2: Add Cool Reflections and Bright Yellow
Create a new layer directly above the base shape. Tap the new layer and select Clipping Mask.
A Clipping Mask allows you to paint on a separate layer while keeping everything inside the visible shape of the layer underneath. This gives you more control and lets you edit the color without changing the original silhouette.
A Clipping Mask allows you to paint on a separate layer while keeping everything inside the visible shape of the layer underneath. This gives you more control and lets you edit the color without changing the original silhouette.
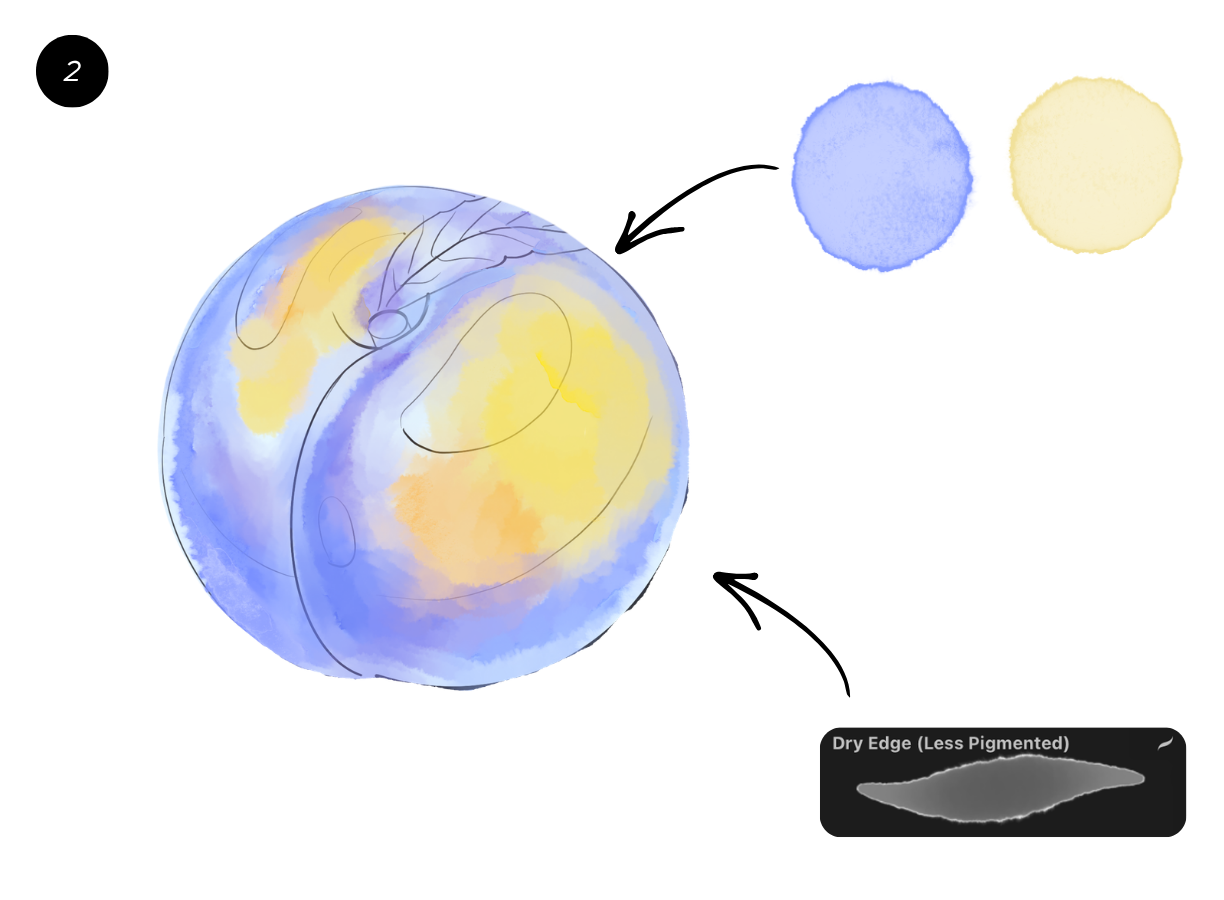
Select the Dry Edge brush and begin with Lavender.
Apply the lavender color lightly to the cooler areas of the peach. These reflected tones are often visible along the shadow side or in areas affected by surrounding colors.
Next, introduce Naples Yellow into the brightest parts of the fruit. Concentrate it near the main light source.
Avoid covering the entire peach with these colors. Leave enough of the base visible so the following layers can interact naturally.
Use the Smudge tool with Realistic Blending to soften selected transitions. Keep the Smudge strength relatively low for gentle gradients. At higher strength, the tool moves color more aggressively and can produce a wet paint effect.
Do not blend every brushstroke. Visible texture will help the final illustration feel more like watercolor.
Apply the lavender color lightly to the cooler areas of the peach. These reflected tones are often visible along the shadow side or in areas affected by surrounding colors.
Next, introduce Naples Yellow into the brightest parts of the fruit. Concentrate it near the main light source.
Avoid covering the entire peach with these colors. Leave enough of the base visible so the following layers can interact naturally.
Use the Smudge tool with Realistic Blending to soften selected transitions. Keep the Smudge strength relatively low for gentle gradients. At higher strength, the tool moves color more aggressively and can produce a wet paint effect.
Do not blend every brushstroke. Visible texture will help the final illustration feel more like watercolor.
Step 3: Build the Main Peach Color
Create another Clipping Mask above the reflection layer.
Mix English Red with white to create the main peach tone. Apply it gradually with the Dry Edge brush.
Add Yellow Ochre and Orange Red to create natural variation across the fruit.
Mix English Red with white to create the main peach tone. Apply it gradually with the Dry Edge brush.
Add Yellow Ochre and Orange Red to create natural variation across the fruit.
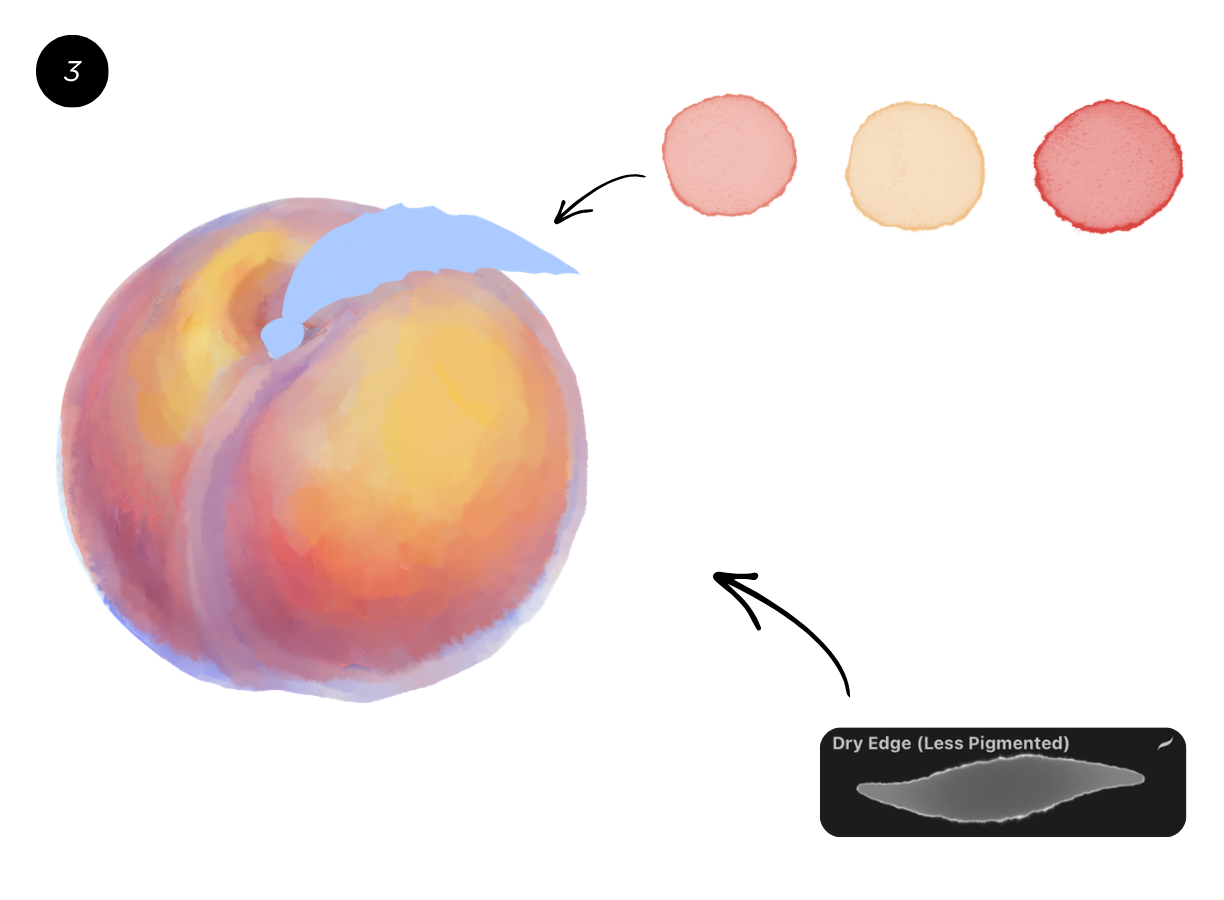
A realistic peach should not be one flat shade of orange. Some areas may lean toward pale yellow, while others may appear pink, coral, muted red, or warm orange.
Follow the rounded form of the fruit with your brushstrokes. Avoid applying color as a flat horizontal layer. The direction of your strokes should help communicate volume.
Blend only where the transitions need to be softer. Keep some textured edges and visible brush marks.
Allow parts of the Naples Yellow and Lavender from the previous layer to remain visible. These variations will make the peach look more dimensional.
Follow the rounded form of the fruit with your brushstrokes. Avoid applying color as a flat horizontal layer. The direction of your strokes should help communicate volume.
Blend only where the transitions need to be softer. Keep some textured edges and visible brush marks.
Allow parts of the Naples Yellow and Lavender from the previous layer to remain visible. These variations will make the peach look more dimensional.
Step 4: Paint the Leaf
Create a separate layer for the leaf.
Keeping the leaf independent from the peach allows you to adjust its shape, position, color, and shadows without affecting the fruit.
Start by drawing the leaf silhouette. Pay attention to the direction of the central vein and the way the leaf curves away from the stem.
Keeping the leaf independent from the peach allows you to adjust its shape, position, color, and shadows without affecting the fruit.
Start by drawing the leaf silhouette. Pay attention to the direction of the central vein and the way the leaf curves away from the stem.
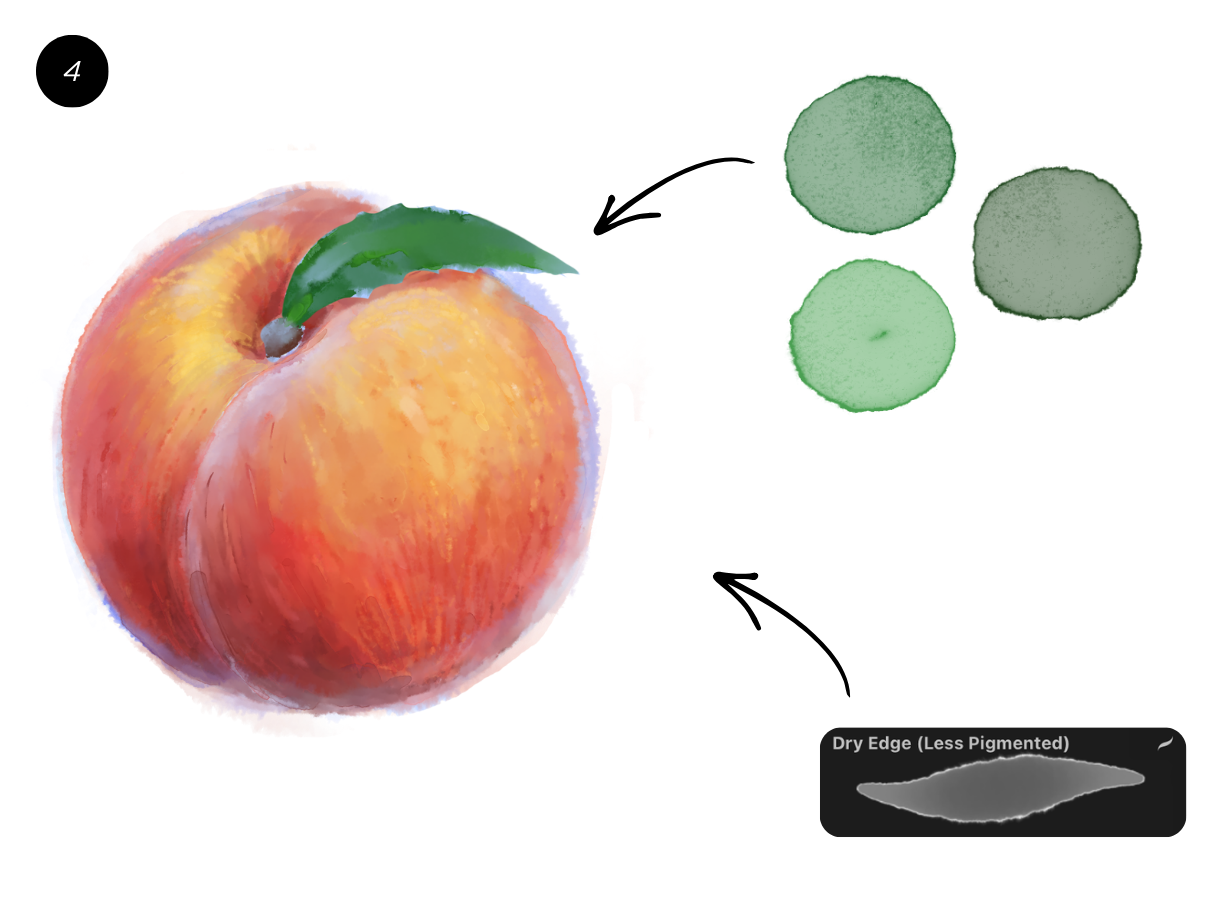
Apply Grass Green as the main color. Add Yellow Green to the areas receiving more light and Chrome Green to the cooler or darker sections.
Move your brush from the central vein toward the edges. This creates a more natural leaf structure and helps the brushstrokes support the form.
Create a Clipping Mask above the leaf layer for additional color, shadows, veins, and texture.
Move your brush from the central vein toward the edges. This creates a more natural leaf structure and helps the brushstrokes support the form.
Create a Clipping Mask above the leaf layer for additional color, shadows, veins, and texture.
Step 5: Paint the Peach Shadows
Create a new Clipping Mask above the peach color layers.
Mix Sepia with Crimson Lake to create a deep, warm shadow color.
Apply the mixture gradually to the side of the peach facing away from the light. Avoid using pure black. A combination of brown and deep red will create stronger shadows without making the fruit look gray or lifeless.
Mix Sepia with Crimson Lake to create a deep, warm shadow color.
Apply the mixture gradually to the side of the peach facing away from the light. Avoid using pure black. A combination of brown and deep red will create stronger shadows without making the fruit look gray or lifeless.
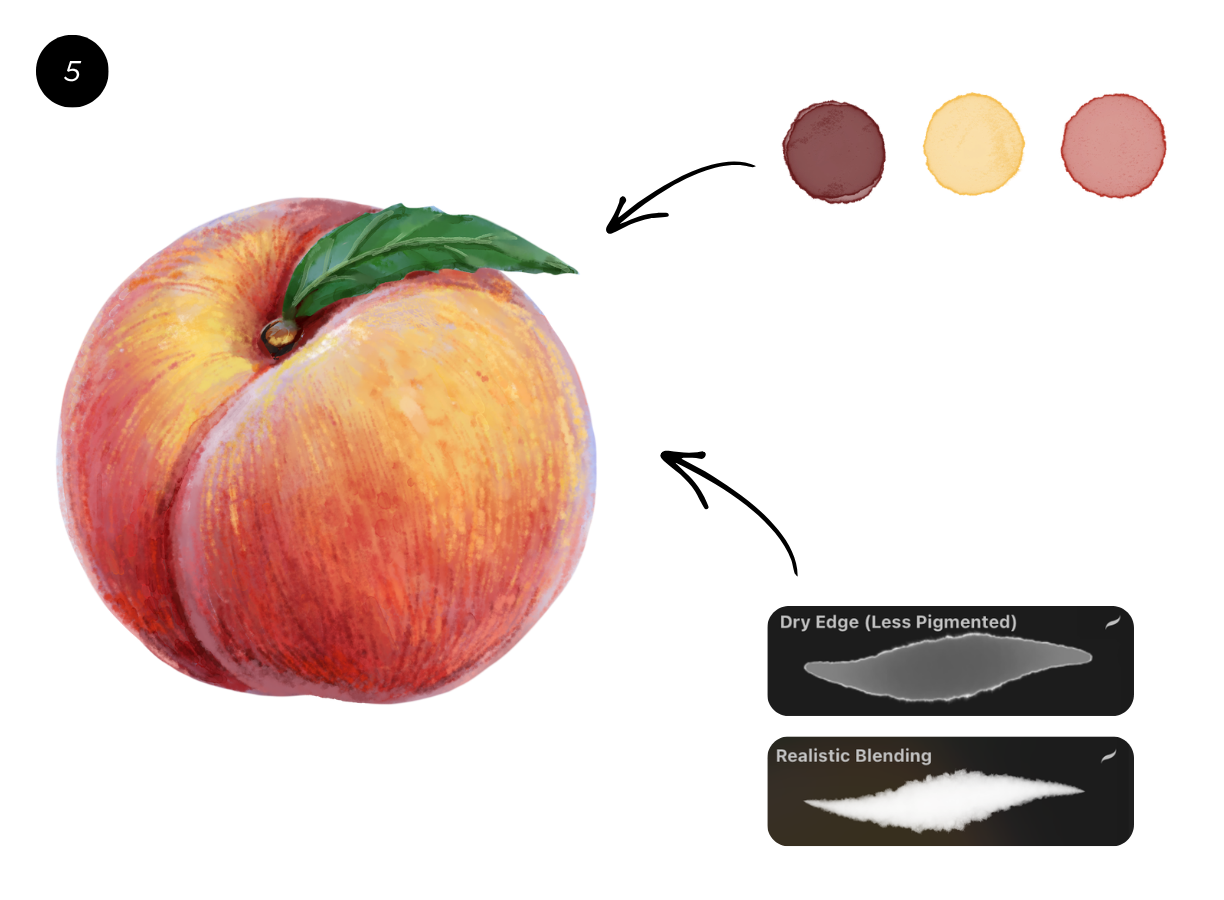
Concentrate the darkest values in a few key areas:
Add Cadmium Yellow and Cadmium Orange to the transition between light and shadow. These colors will help connect the bright and dark areas while maintaining the warmth of the fruit.
Do not make the entire shadow area equally dark. A convincing form requires variation. Keep the deepest accents limited and allow some reflected light to remain visible.
Use the Smudge tool selectively to soften transitions. Preserve a few sharper edges near the stem and overlapping leaf to create visual focus.
- Near the indentation around the stem
- Along the deepest part of the peach division
- Under the leaf
- On the side facing away from the light
Add Cadmium Yellow and Cadmium Orange to the transition between light and shadow. These colors will help connect the bright and dark areas while maintaining the warmth of the fruit.
Do not make the entire shadow area equally dark. A convincing form requires variation. Keep the deepest accents limited and allow some reflected light to remain visible.
Use the Smudge tool selectively to soften transitions. Preserve a few sharper edges near the stem and overlapping leaf to create visual focus.
Step 6: Add Shadows and Details to the Leaf
Return to the Clipping Mask above the leaf.
Use darker green to define the shadow side and reinforce the curve of the leaf.
Add lighter Yellow Green accents where the leaf catches the light. You can also introduce a small amount of warm reflected color near the peach.
Define the central vein and a few secondary veins, but avoid outlining every detail. Too many identical lines can make the leaf look decorative rather than natural.
Use a combination of soft transitions and sharper accents. This contrast will help the leaf remain readable while still feeling connected to the watercolor style.
Use darker green to define the shadow side and reinforce the curve of the leaf.
Add lighter Yellow Green accents where the leaf catches the light. You can also introduce a small amount of warm reflected color near the peach.
Define the central vein and a few secondary veins, but avoid outlining every detail. Too many identical lines can make the leaf look decorative rather than natural.
Use a combination of soft transitions and sharper accents. This contrast will help the leaf remain readable while still feeling connected to the watercolor style.
Step 7: Create the Peach Skin Texture
Create another Clipping Mask above the peach.
Select the Details brush and begin adding small textured strokes.
Follow the rounded direction of the fruit. The marks should wrap around the peach rather than sit flat on its surface.
Vary the size, spacing, direction, and opacity of the strokes. Avoid covering the entire fruit with an identical pattern.
Add more visible texture in the midtones and shadows. Keep the brightest area softer and less detailed so it continues to feel illuminated.
You can also add a few lighter marks along the edge of the light area to suggest the peach’s delicate fuzzy surface.
Zoom out regularly. The texture should enrich the illustration without becoming the first thing the viewer notices.
Select the Details brush and begin adding small textured strokes.
Follow the rounded direction of the fruit. The marks should wrap around the peach rather than sit flat on its surface.
Vary the size, spacing, direction, and opacity of the strokes. Avoid covering the entire fruit with an identical pattern.
Add more visible texture in the midtones and shadows. Keep the brightest area softer and less detailed so it continues to feel illuminated.
You can also add a few lighter marks along the edge of the light area to suggest the peach’s delicate fuzzy surface.
Zoom out regularly. The texture should enrich the illustration without becoming the first thing the viewer notices.
Step 8: Add Water Droplets and Final Accents
Use the Dry Edge and Details brushes for the finishing touches.
Add a few small water droplets to make the peach feel fresh and dimensional.
Each droplet should follow the same light source as the fruit. Place a small shadow on the side facing away from the light and a bright highlight on the opposite side.
Vary the size and shape of the droplets. Avoid placing too many across the surface, since a small number of carefully designed details will usually look more convincing.
Add a few small water droplets to make the peach feel fresh and dimensional.
Each droplet should follow the same light source as the fruit. Place a small shadow on the side facing away from the light and a bright highlight on the opposite side.
Vary the size and shape of the droplets. Avoid placing too many across the surface, since a small number of carefully designed details will usually look more convincing.
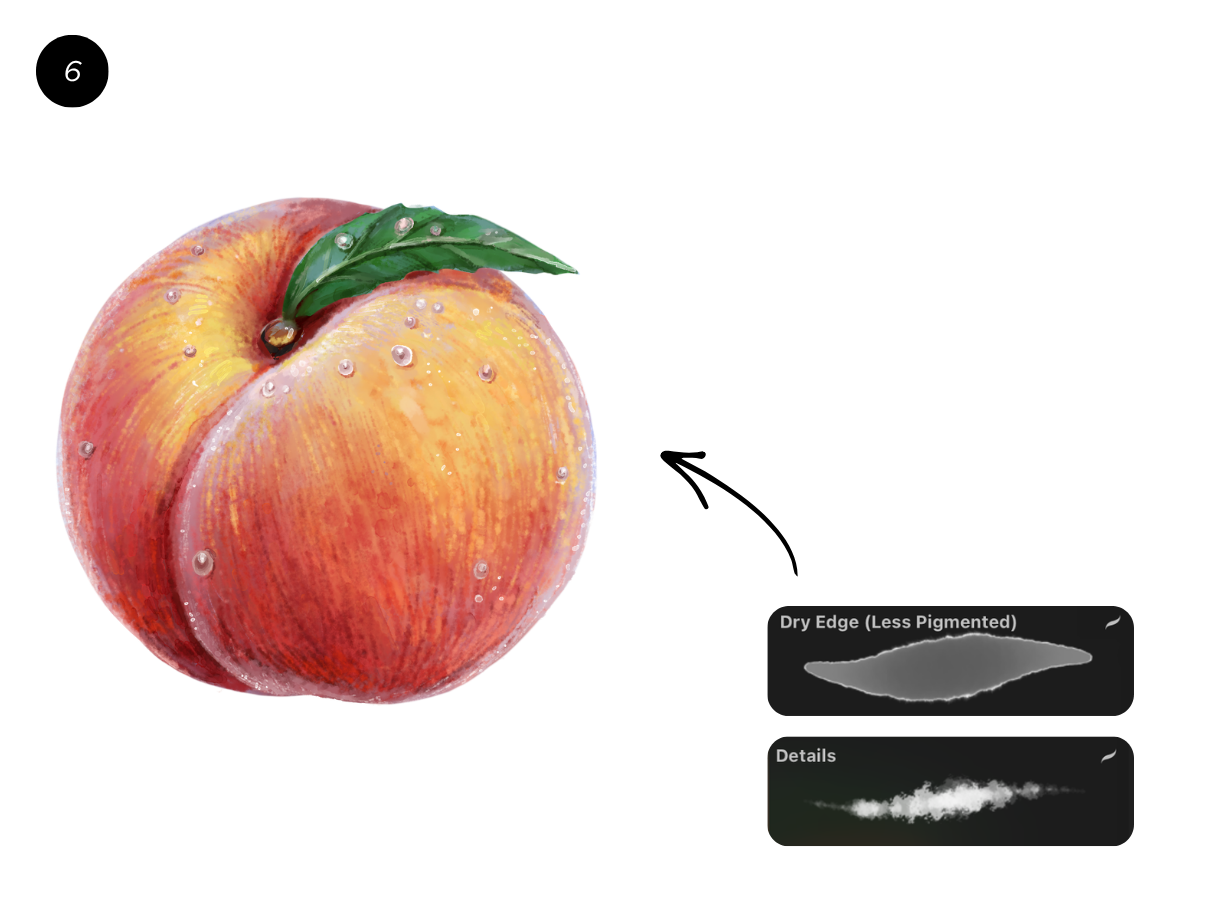
Finish the illustration by checking:
You can also flip the canvas horizontally to see the illustration with fresh eyes and notice proportion or composition issues that may have become difficult to see.
- The clarity of the peach silhouette
- The direction of the light
- The transition between warm and cool colors
- The depth of the shadows
- The visibility of reflected light
- The texture of the peach
- The contrast between the fruit and the leaf
- The placement of the final highlights
You can also flip the canvas horizontally to see the illustration with fresh eyes and notice proportion or composition issues that may have become difficult to see.
How to Make Digital Watercolor Look More Natural
Digital watercolor often looks artificial when every edge is equally smooth and every color transition is perfectly blended.
For a more natural result, combine different types of edges.
Use soft edges where colors gradually blend. Keep textured edges where the paint appears dry. Add a few sharper accents around the stem, leaf, or water droplets.
Build color through multiple light layers instead of trying to reach the final result with one heavy application.
Procreate layers let you separate and edit individual parts of an illustration without permanently changing the elements underneath. This makes it easier to experiment with color, texture, shadows, and blending.
It is also important to resist the urge to blend everything. Small imperfections, visible brushstrokes, and uneven pigment are part of what makes watercolor visually interesting.
For a more natural result, combine different types of edges.
Use soft edges where colors gradually blend. Keep textured edges where the paint appears dry. Add a few sharper accents around the stem, leaf, or water droplets.
Build color through multiple light layers instead of trying to reach the final result with one heavy application.
Procreate layers let you separate and edit individual parts of an illustration without permanently changing the elements underneath. This makes it easier to experiment with color, texture, shadows, and blending.
It is also important to resist the urge to blend everything. Small imperfections, visible brushstrokes, and uneven pigment are part of what makes watercolor visually interesting.
Clipping Mask or Alpha Lock: Which Should You Use?
Both tools can keep your color inside an existing shape, but they work differently.
Alpha Lock limits painting and smudging to pixels that already exist on the same layer.
Clipping Mask lets you paint on a separate layer while using the shape of the layer below as a boundary.
For this peach tutorial, Clipping Masks are the better option because they allow you to adjust reflections, local color, shadows, and texture independently.
Alpha Lock can still be useful for quick color changes when you do not need separate editable layers.
Alpha Lock limits painting and smudging to pixels that already exist on the same layer.
Clipping Mask lets you paint on a separate layer while using the shape of the layer below as a boundary.
For this peach tutorial, Clipping Masks are the better option because they allow you to adjust reflections, local color, shadows, and texture independently.
Alpha Lock can still be useful for quick color changes when you do not need separate editable layers.
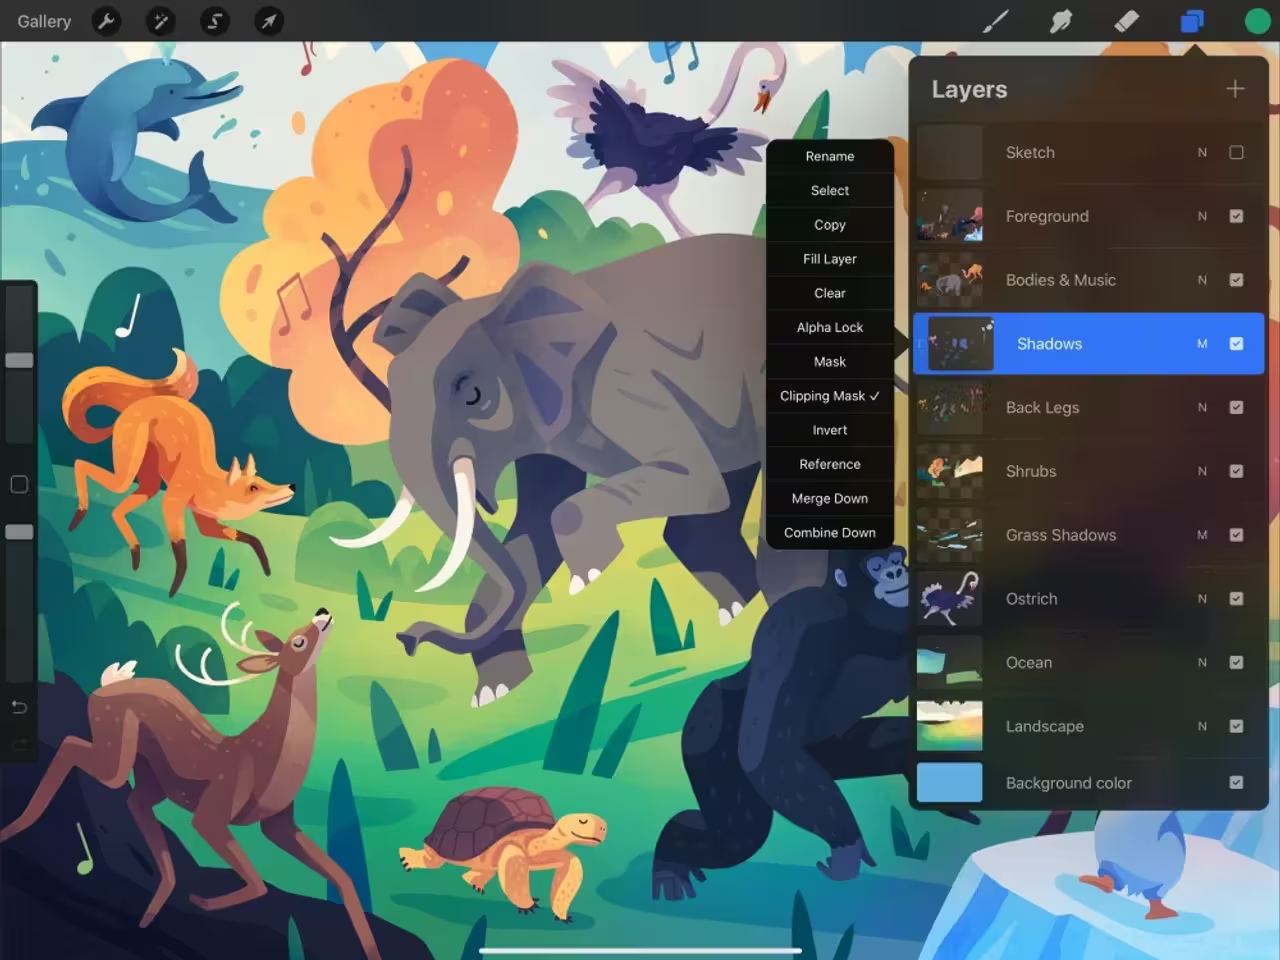
Learn Commercial Illustration in Procreate
This peach study introduces several important digital painting skills, including layered color, brush control, blending, texture, light, and shadow.
To develop these skills further, join Fantasy Room’s Commercial Illustration in Procreate course.
The course teaches students how to use Procreate while creating practical projects such as mood boards, art collages, patterns, web illustrations, animation, logos, and portfolio work. The current program includes eight sections, approximately 19 hours of lessons, and ten completed artworks.
You will learn how to move from individual exercises to complete illustrations that can be used for brands, websites, social media, products, and client projects.
To develop these skills further, join Fantasy Room’s Commercial Illustration in Procreate course.
The course teaches students how to use Procreate while creating practical projects such as mood boards, art collages, patterns, web illustrations, animation, logos, and portfolio work. The current program includes eight sections, approximately 19 hours of lessons, and ten completed artworks.
You will learn how to move from individual exercises to complete illustrations that can be used for brands, websites, social media, products, and client projects.
Frequently Asked Questions
Can you create realistic watercolor in Procreate?
Yes. Procreate can be used to create realistic watercolor effects by combining textured brushes, transparent color layers, Clipping Masks, selective blending, and varied edges.
The result depends less on one specific brush and more on how you control color, texture, opacity, and light.
The result depends less on one specific brush and more on how you control color, texture, opacity, and light.
What brushes should I use to paint a peach in Procreate?
The original illustration uses Script, Dry Edge, Realistic Blending, and Details from the Naomi Watercolor 4 brush set.
You can replace them with any clean drawing brush, dry textured watercolor brush, soft blending brush, and fine detail brush.
You can replace them with any clean drawing brush, dry textured watercolor brush, soft blending brush, and fine detail brush.
Do I need the Naomi Watercolor 4 brush set?
No. The brush set was used for the original artwork, but the painting process can be completed with other textured brushes.
Choose brushes based on their function rather than their name.
Choose brushes based on their function rather than their name.
How do I make a peach look realistic?
Focus on the silhouette, rounded form, warm and cool color variation, reflected light, concentrated shadows, subtle texture, and a clear light source.
Avoid painting the entire peach with one uniform orange color.
Avoid painting the entire peach with one uniform orange color.
Should I use a Clipping Mask or a Layer Mask?
Use a Clipping Mask when you want to add editable color, texture, or shading inside the shape of another layer.
A Layer Mask controls the visibility of a layer and is edited using black, white, and shades of gray. These are different Procreate functions.
A Layer Mask controls the visibility of a layer and is edited using black, white, and shades of gray. These are different Procreate functions.
How do I create peach skin texture in Procreate?
Use a small textured brush and apply short, irregular marks that follow the rounded form of the fruit.
Keep the texture subtle, vary the spacing, and avoid distributing it evenly across the entire peach.
Keep the texture subtle, vary the spacing, and avoid distributing it evenly across the entire peach.
Can beginners follow this Procreate tutorial?
Yes. Beginners can follow the process by keeping each stage on a separate layer and building the illustration gradually.
The exercise is especially useful for practicing Clipping Masks, blending, color transitions, texture, and basic light and shadow.
The exercise is especially useful for practicing Clipping Masks, blending, color transitions, texture, and basic light and shadow.
Related Procreate Resources
New to the app? Read our introduction to Procreate.
For another practical project, learn how to create a sticker pack in Procreate.
You can also explore all Fantasy Room drawing and painting courses.
For another practical project, learn how to create a sticker pack in Procreate.
You can also explore all Fantasy Room drawing and painting courses.
Final Thoughts
Learning how to paint a realistic peach in Procreate is about more than reproducing the appearance of a piece of fruit.
This exercise teaches you how to observe shape, distinguish warm and cool colors, create volume, control edges, build shadows, and apply texture with intention.
Start with a clear silhouette. Add color gradually. Keep your reflections visible. Concentrate the darkest values in a few important areas, and use texture to support the form rather than cover it.
Once you understand this process, you can apply the same principles to apples, pears, lemons, berries, flowers, and many other natural subjects.
This exercise teaches you how to observe shape, distinguish warm and cool colors, create volume, control edges, build shadows, and apply texture with intention.
Start with a clear silhouette. Add color gradually. Keep your reflections visible. Concentrate the darkest values in a few important areas, and use texture to support the form rather than cover it.
Once you understand this process, you can apply the same principles to apples, pears, lemons, berries, flowers, and many other natural subjects.