


Fashion sketching is one of the most important skills for anyone who wants to design clothes, build a fashion portfolio, or simply learn how to express style ideas on paper. But for beginners, fashion sketches often look stiff, flat, or unfinished even when the idea behind the outfit is good.
The problem is usually not a lack of talent. Most beginner fashion sketching mistakes come from skipping the basics: figure proportions, pose, silhouette, fabric movement, line quality, and contrast.
In this guide, we will break down the most common fashion sketching mistakes beginners make and show you how to fix them step by step.
Table of Contents
- Mistake #1: Ignoring Fashion Figure Proportions
- Mistake #2: Drawing Stiff Poses
- Mistake #3: Skipping the Fashion Croquis
- Mistake #4: Making the Silhouette Unclear
- Mistake #5: Drawing Clothes Too Flat
- Mistake #6: Placing Fabric Folds Randomly
- Mistake #7: Using the Same Line Weight Everywhere
- Mistake #8: Forgetting About Contrast
- Mistake #9: Overloading the Sketch with Details
- Mistake #10: Not Finishing the Sketch
- Fashion Sketching Practice Checklist
- FAQ About Fashion Sketching Mistakes
What Is Fashion Sketching?
Fashion sketching is a visual way to show a clothing idea. It helps communicate the silhouette, proportions, fabric, movement, color, and overall mood of a look.
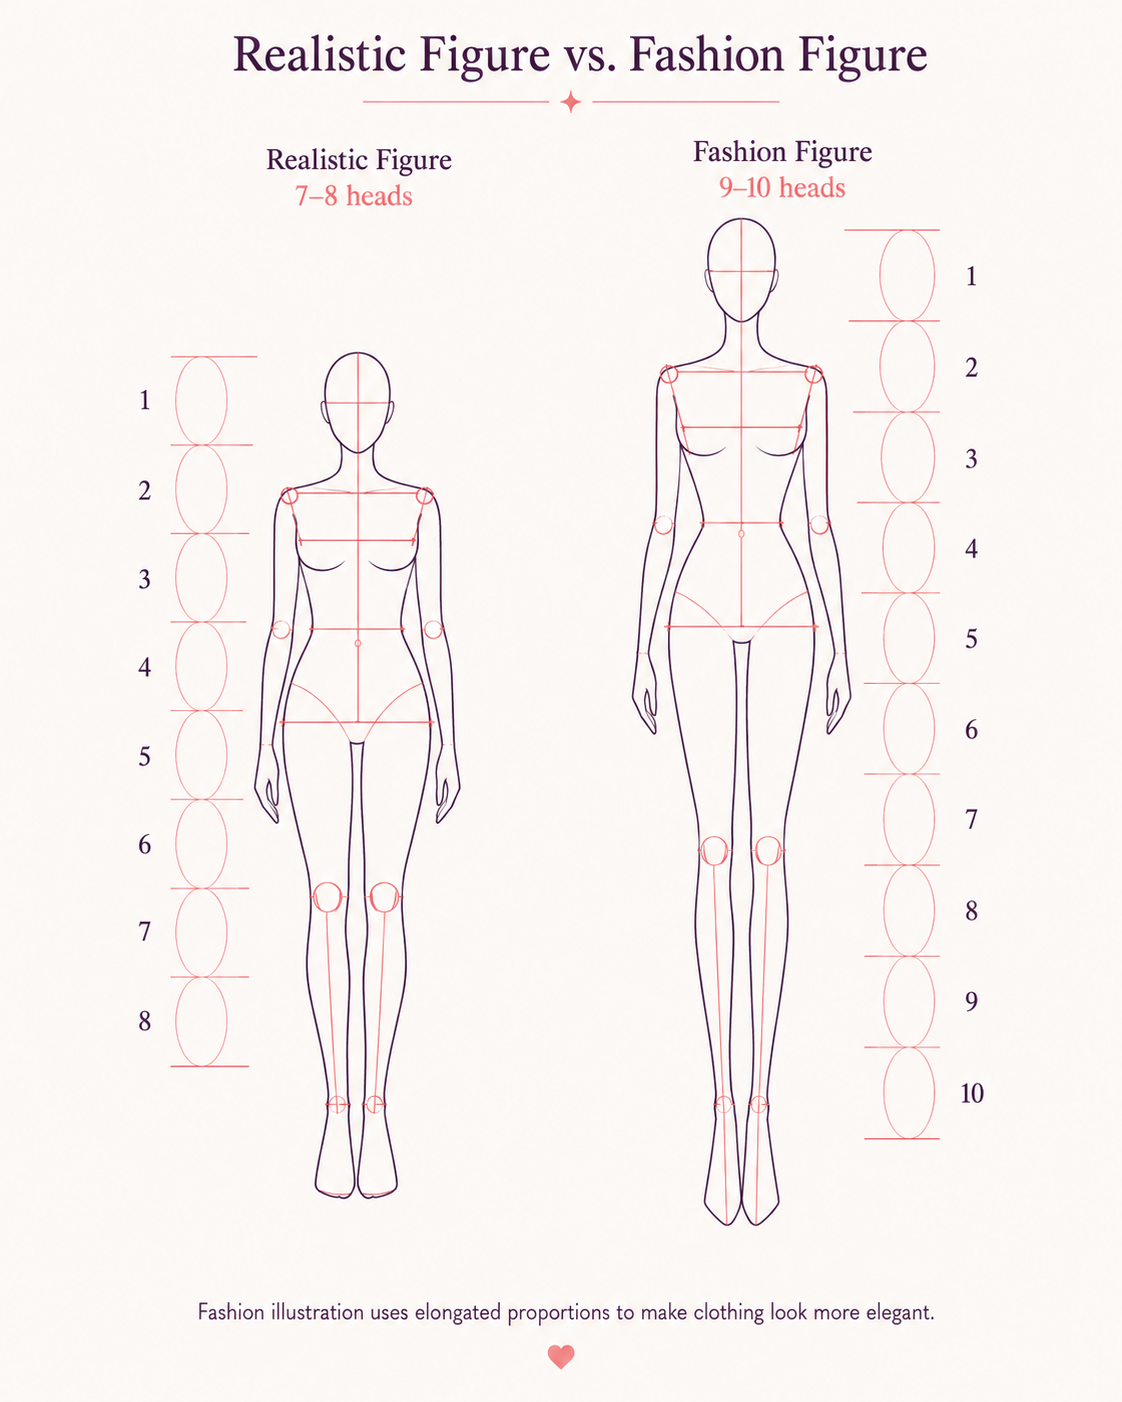
Unlike realistic portrait or figure drawing, fashion illustration does not always follow natural body proportions. Fashion figures are often elongated and stylized to make clothing look more elegant and expressive.
A good fashion sketch should answer a few simple questions:
What is the main shape of the outfit?
How does the garment sit on the body?
What fabric is it made from?
Where are the folds, shadows, and details?
What mood or style does the look communicate?
How does the garment sit on the body?
What fabric is it made from?
Where are the folds, shadows, and details?
What mood or style does the look communicate?
Once you understand these basics, your sketches become clearer, more professional, and easier to develop into finished fashion illustrations.
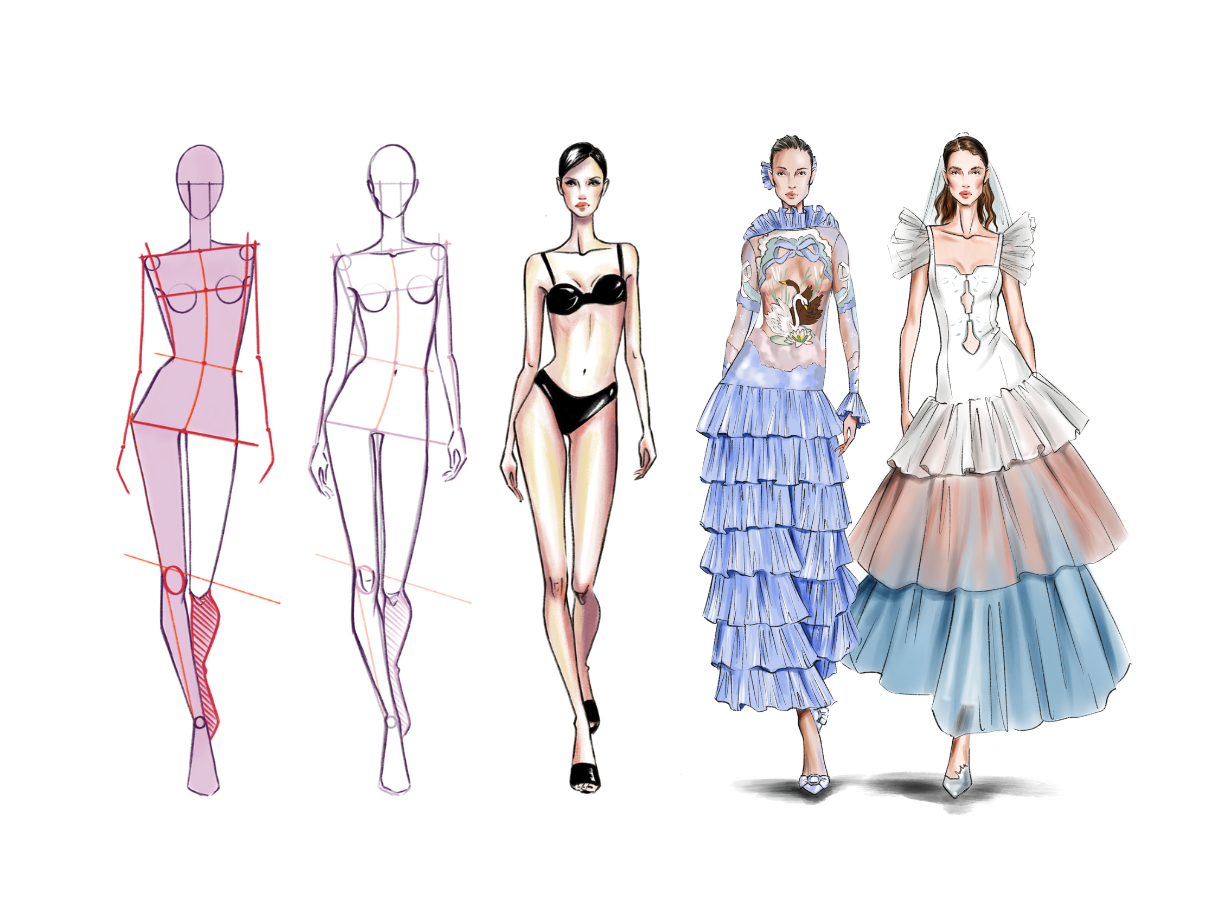
1. Drawing the Fashion Figure Too Realistically
One of the first mistakes beginners make is trying to draw a realistic human body instead of a fashion figure.
In fashion sketching, the body is not the final focus. The figure supports the clothing. That is why fashion figures are usually taller, slimmer, and more elongated than realistic human proportions.
When beginners draw the figure too realistically, the sketch can look heavy or static. The outfit may lose elegance, and the design may not look like a fashion illustration.
How to fix it
Start with a simple fashion croquis. A croquis is a basic fashion figure template that helps you draw clothing with consistent proportions.
Many fashion figures are drawn using the 9-head or 10-head proportion method. This means the body is divided into equal sections based on the size of the head. The elongated proportions help make dresses, coats, trousers, and other garments look more graceful.
You do not need to master anatomy perfectly at the beginning. Focus first on the main body structure: head, shoulders, waist, hips, knees, ankles, and pose direction.
Practice exercise
Draw the same outfit on two figures: one realistic and one elongated fashion figure. Compare how the garment looks on both. You will notice that the elongated figure often makes the design look more stylish and editorial.
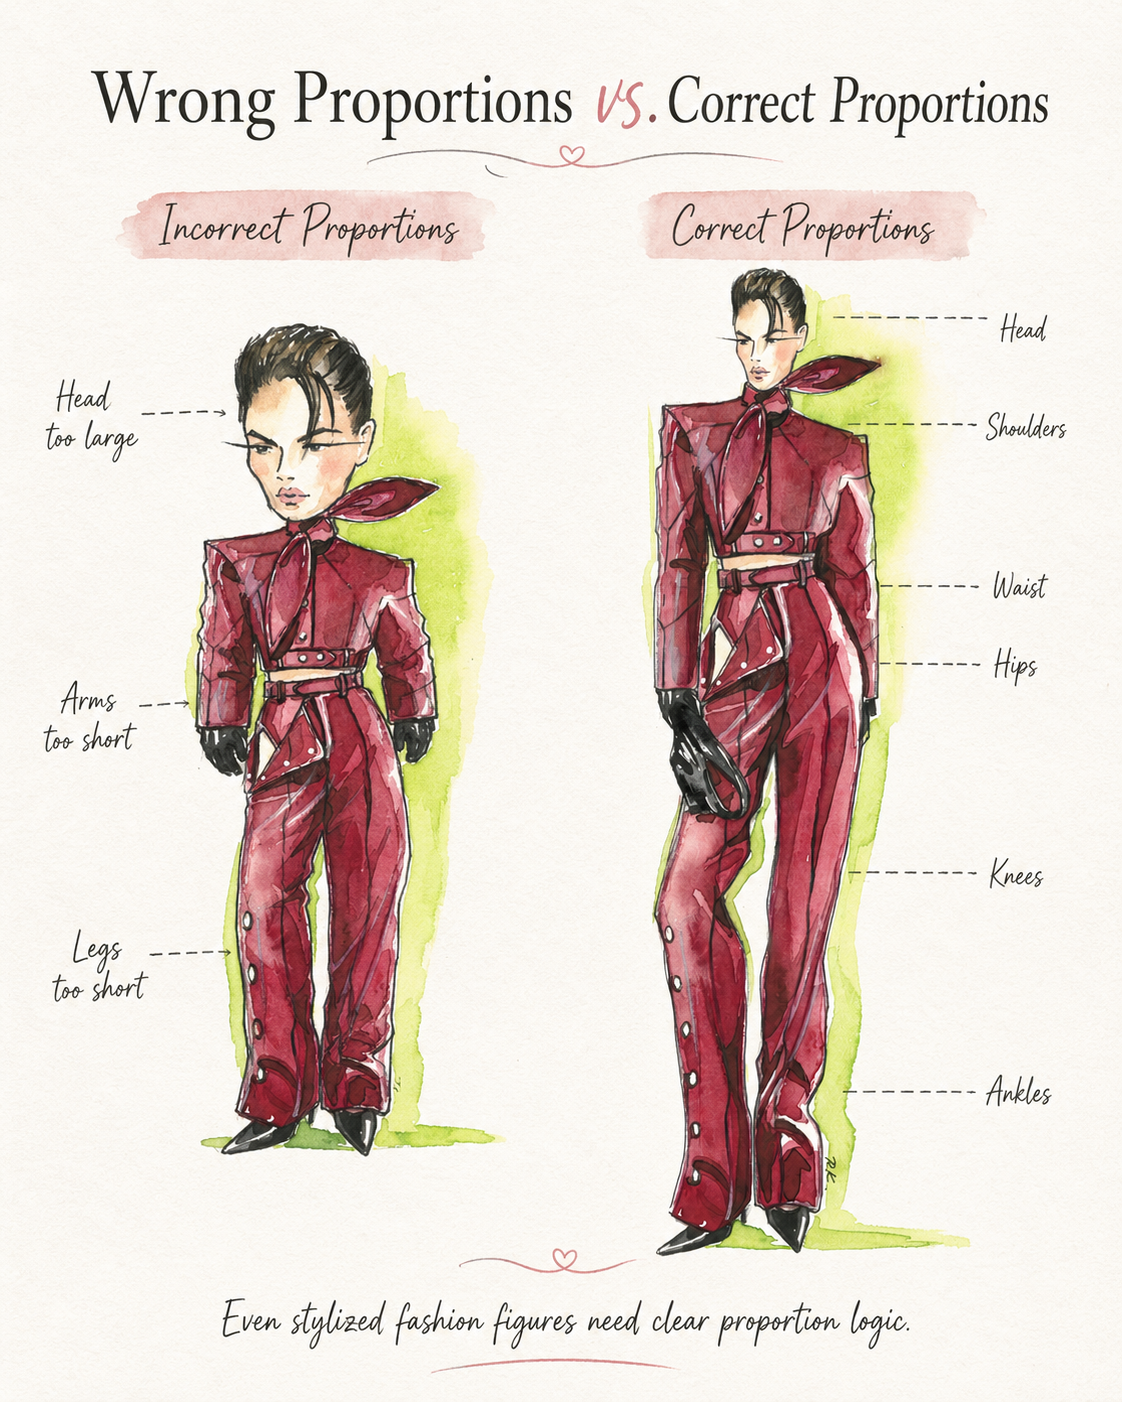
2. Ignoring Fashion Figure Proportions
Another common fashion illustration mistake is drawing the figure without a clear proportion system.
Beginners often draw legs too short, arms too long, heads too large, or shoulders too wide. Even if the outfit idea is interesting, incorrect proportions can make the entire sketch look awkward.
Fashion proportions do not have to be realistic, but they do need to be intentional.
How to fix it
Before adding clothing, lightly map the body. Mark the key points:
Head
Shoulders
Chest
Waist
Hips
Knees
Ankles
Feet
Shoulders
Chest
Waist
Hips
Knees
Ankles
Feet
Keep the shoulders and hips aligned with the pose. If the body weight shifts to one side, one hip will usually be higher than the other. This creates a more natural and dynamic fashion pose.
Practice exercise
Create a page of simple fashion figures without clothing. Focus only on proportion. Do not add hair, fabric, or details. Repeat this until the body structure feels easier and faster to draw.
3. Skipping the Croquis
Many beginners try to draw a new body from scratch every time they sketch an outfit. This slows down the process and often leads to inconsistent results.
A croquis is not cheating. It is a professional tool that allows you to focus on clothing design instead of redrawing the body again and again.
How to fix it
Use a simple croquis template when practicing clothing design. You can draw your own croquis or use a printed template.
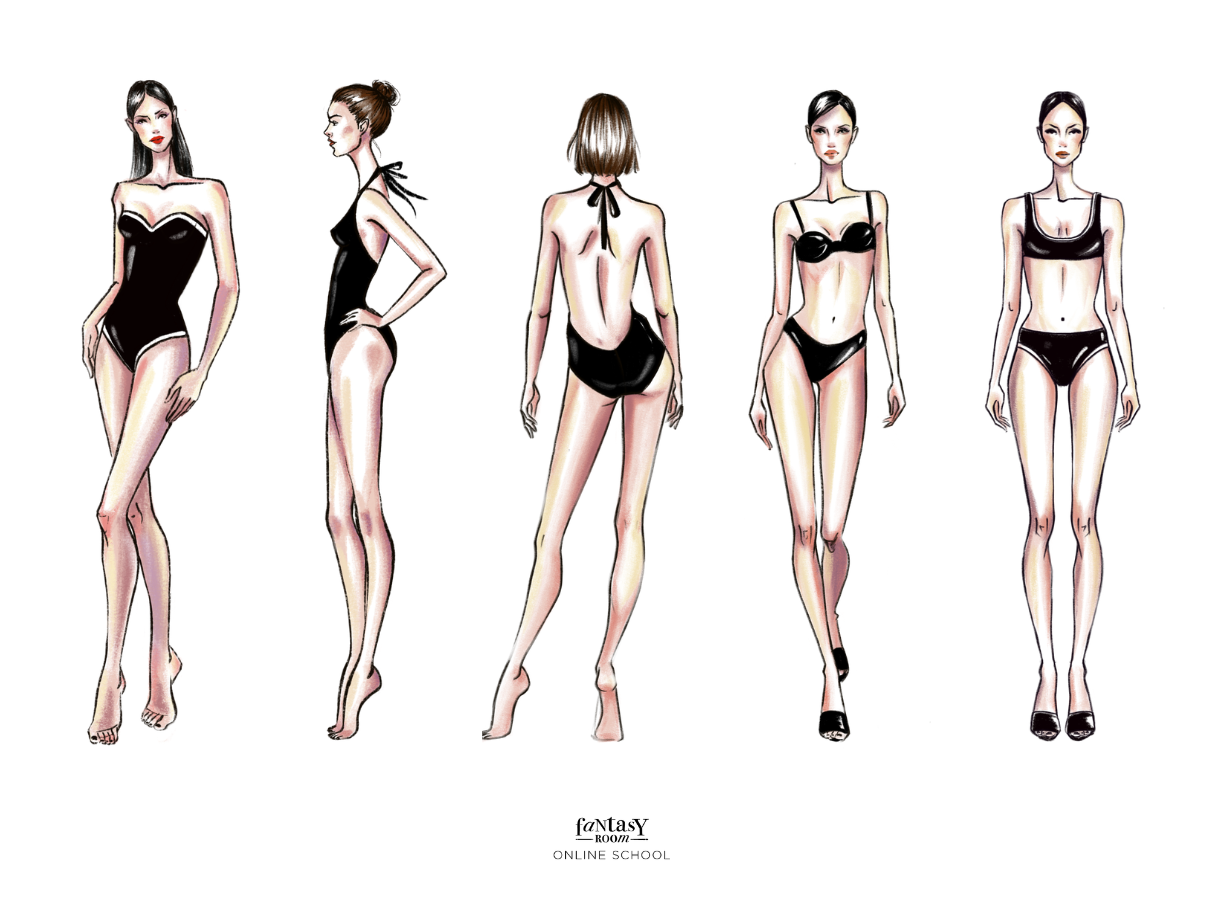
Start with basic standing poses. Then move to more expressive poses, such as:
Walking pose
Contrapposto pose
Side pose
Runway pose
Seated pose
Back view pose
Contrapposto pose
Side pose
Runway pose
Seated pose
Back view pose
The goal is not to hide behind the template. The goal is to build confidence and consistency while you learn how clothing fits the figure.
Practice exercise
Choose one croquis and draw five different outfits on it: a dress, a blazer, wide-leg trousers, a coat, and a skirt. This will help you understand how different garment shapes change the silhouette.
To make your fashion sketches look more expressive, it helps to understand which pose works best for each outfit. In our guide to poses for fashion illustration, we explain how to use static and dynamic poses to show movement, silhouette, and garment structure more clearly.
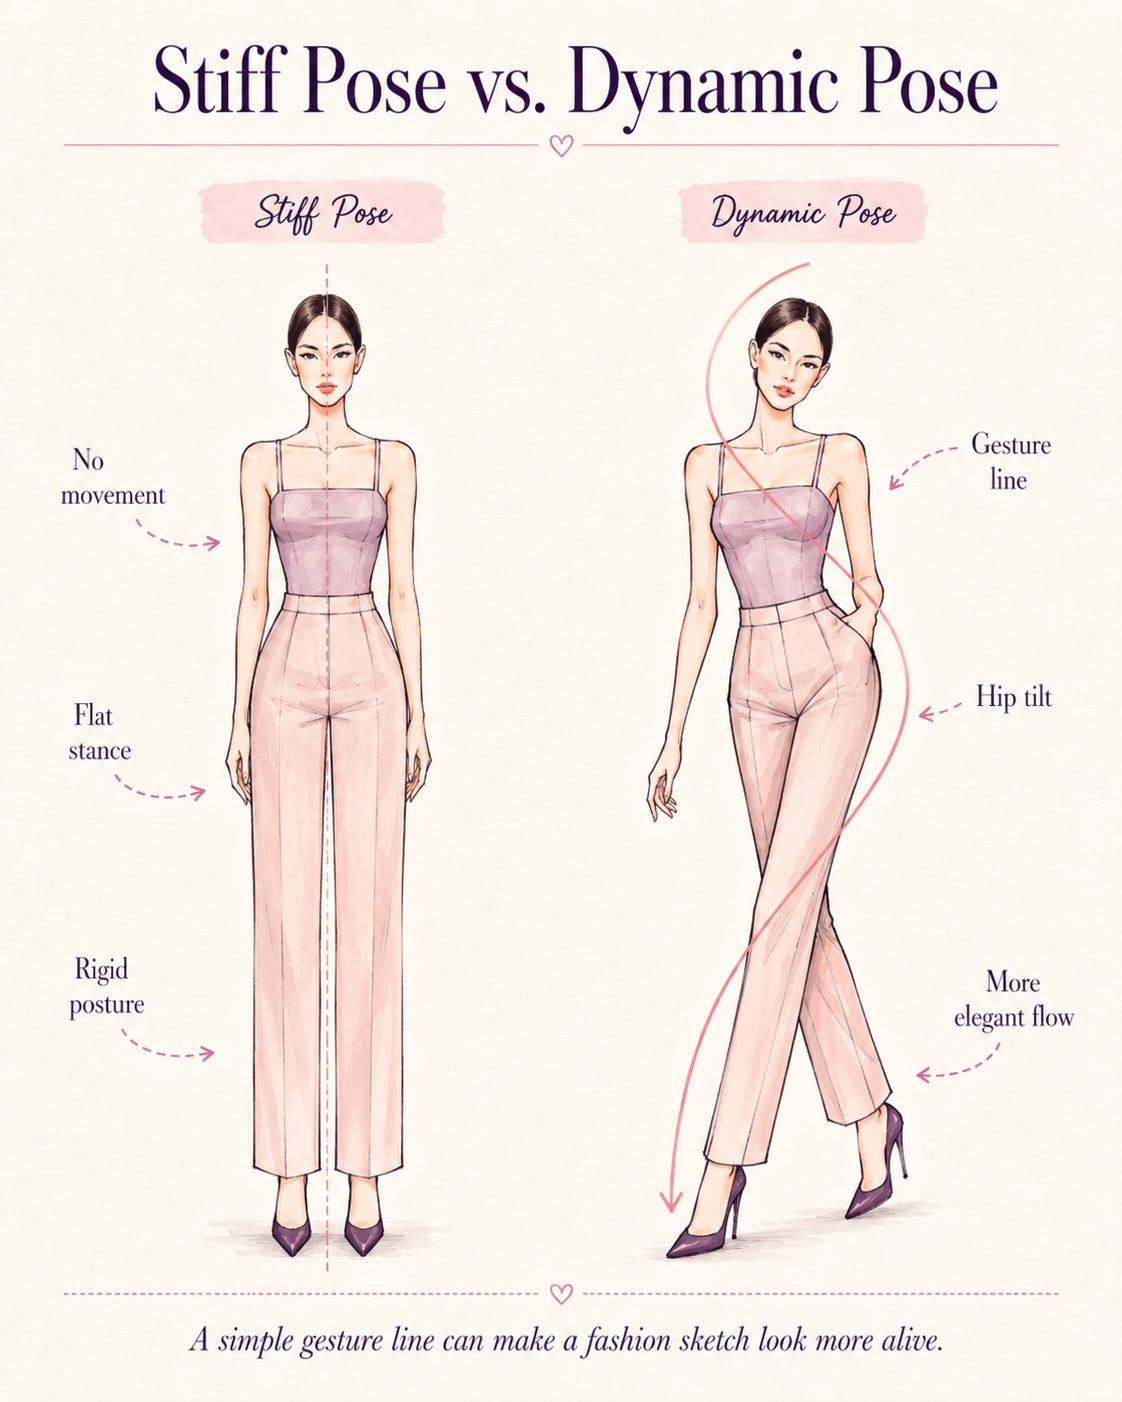
4. Drawing Stiff Poses Without Movement
A fashion sketch can have correct proportions and still look lifeless if the pose is stiff.
Beginners often draw figures standing straight with arms hanging down and no sense of balance or gesture. This makes the outfit look flat and less expressive.
Fashion illustration depends on movement. Even a simple standing pose should have rhythm.
How to fix it
Begin every sketch with a gesture line. This is a simple curved or angled line that shows the direction of the pose.
Ask yourself:
Where is the body weight?
Which hip is higher?
Are the shoulders tilted?
Is the figure standing, walking, turning, or posing?
Does the pose match the mood of the outfit?
Which hip is higher?
Are the shoulders tilted?
Is the figure standing, walking, turning, or posing?
Does the pose match the mood of the outfit?
A flowing dress may need a softer, more elegant pose. A structured blazer may look better with a confident, angular pose.
Practice exercise
Draw 10 quick fashion poses in 30 seconds each. Do not add clothing. Focus only on movement and balance.
5. Making the Clothing Silhouette Unclear
Silhouette is one of the most important parts of fashion sketching. Before anyone notices the buttons, seams, or fabric texture, they see the overall shape of the garment.
A common beginner mistake is adding small details before the main silhouette is clear. As a result, the outfit looks confusing.
The viewer should immediately understand whether the design is fitted, oversized, flowing, structured, short, long, narrow, or voluminous.
How to fix it
Before adding details, look at the outer contour of the clothing.
Ask yourself:
Is the dress fitted or loose?
Is the jacket oversized or tailored?
Are the trousers slim, straight, flared, or wide-leg?
Is the skirt A-line, pencil, pleated, or full?
Where is the main volume?
Is the jacket oversized or tailored?
Are the trousers slim, straight, flared, or wide-leg?
Is the skirt A-line, pencil, pleated, or full?
Where is the main volume?
If the silhouette does not read clearly in black and white, color will not fix it.
Practice exercise
Draw 10 dress silhouettes without details. Use only the outer shape. Then label each silhouette: A-line, bodycon, empire waist, ball gown, slip dress, wrap dress, oversized, structured, asymmetrical, or draped.
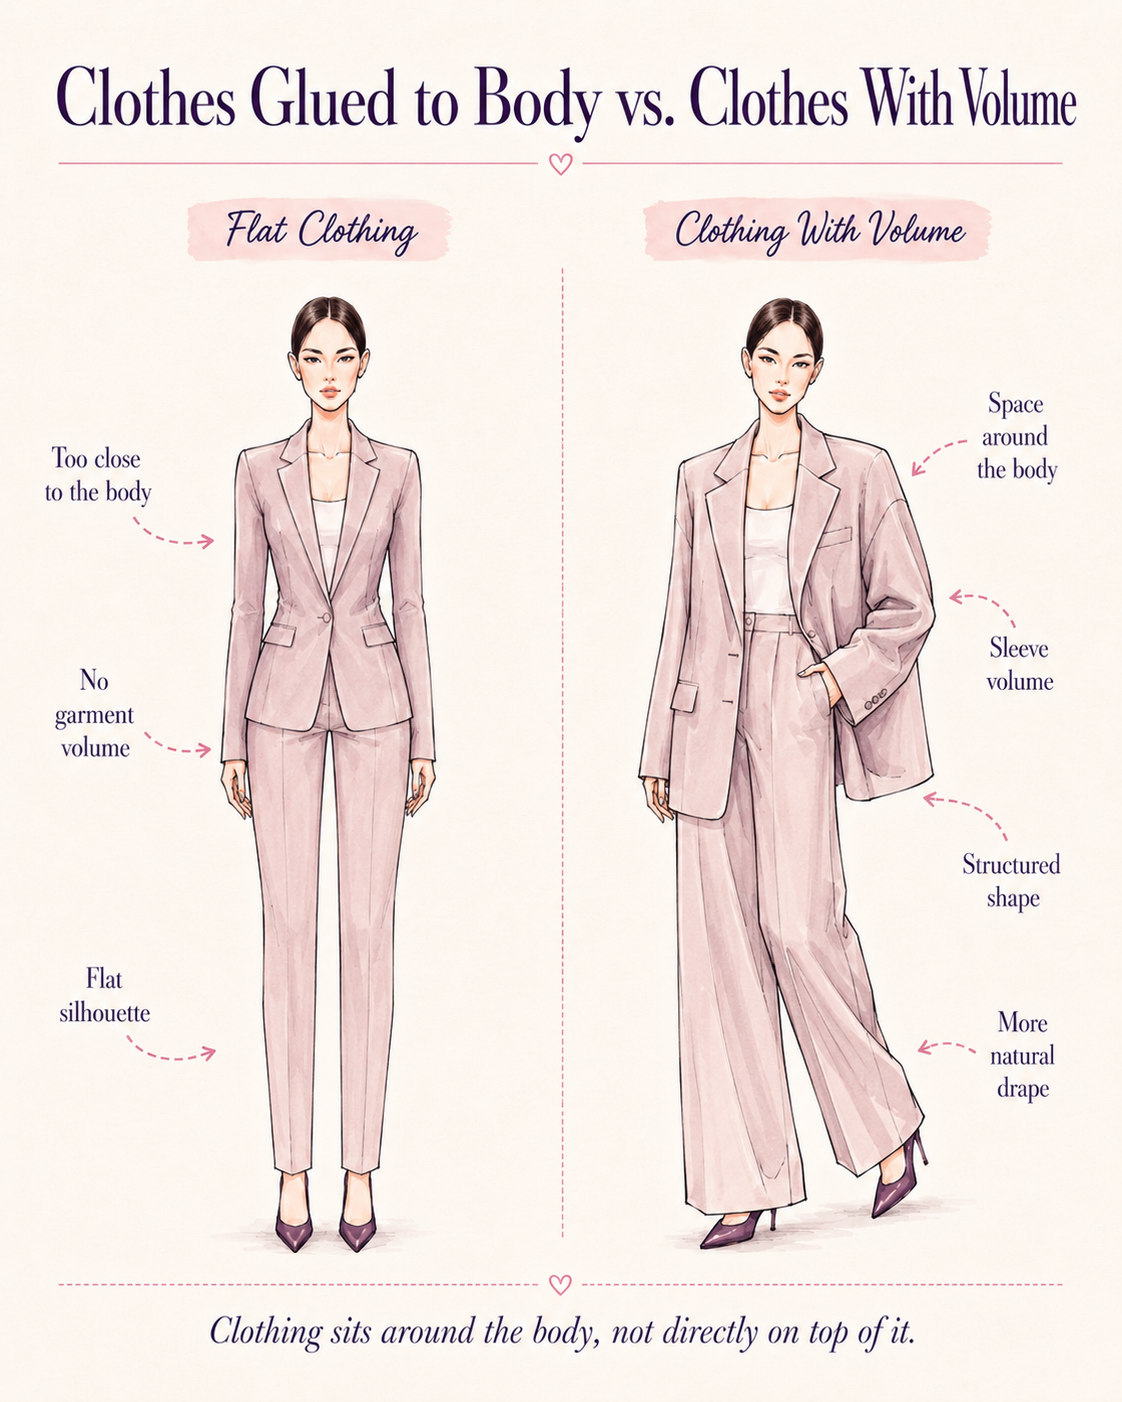
6. Drawing Clothes Flat on the Body
Beginners often draw clothing as if it is glued directly to the figure. This makes garments look flat and unrealistic.
In real life, clothes sit around the body. Fabric has thickness, weight, and volume. A coat does not follow the body as tightly as a T-shirt. A silk dress moves differently from denim jeans.
How to fix it
Leave space between the body and the garment where needed.
For example:
A coat should extend beyond the shoulders and arms.
Wide trousers should not follow the exact shape of the legs.
A full skirt should have volume around the hips and hem.
A sleeve should wrap around the arm, not appear as a flat tube.
Think of the body as the structure underneath and the clothing as a separate layer placed over it.
Practice exercise
Draw a simple figure. First draw a tight dress directly on the body. Then draw an oversized coat over the same figure. Notice how much more space the coat needs around the shoulders, sleeves, and hem.
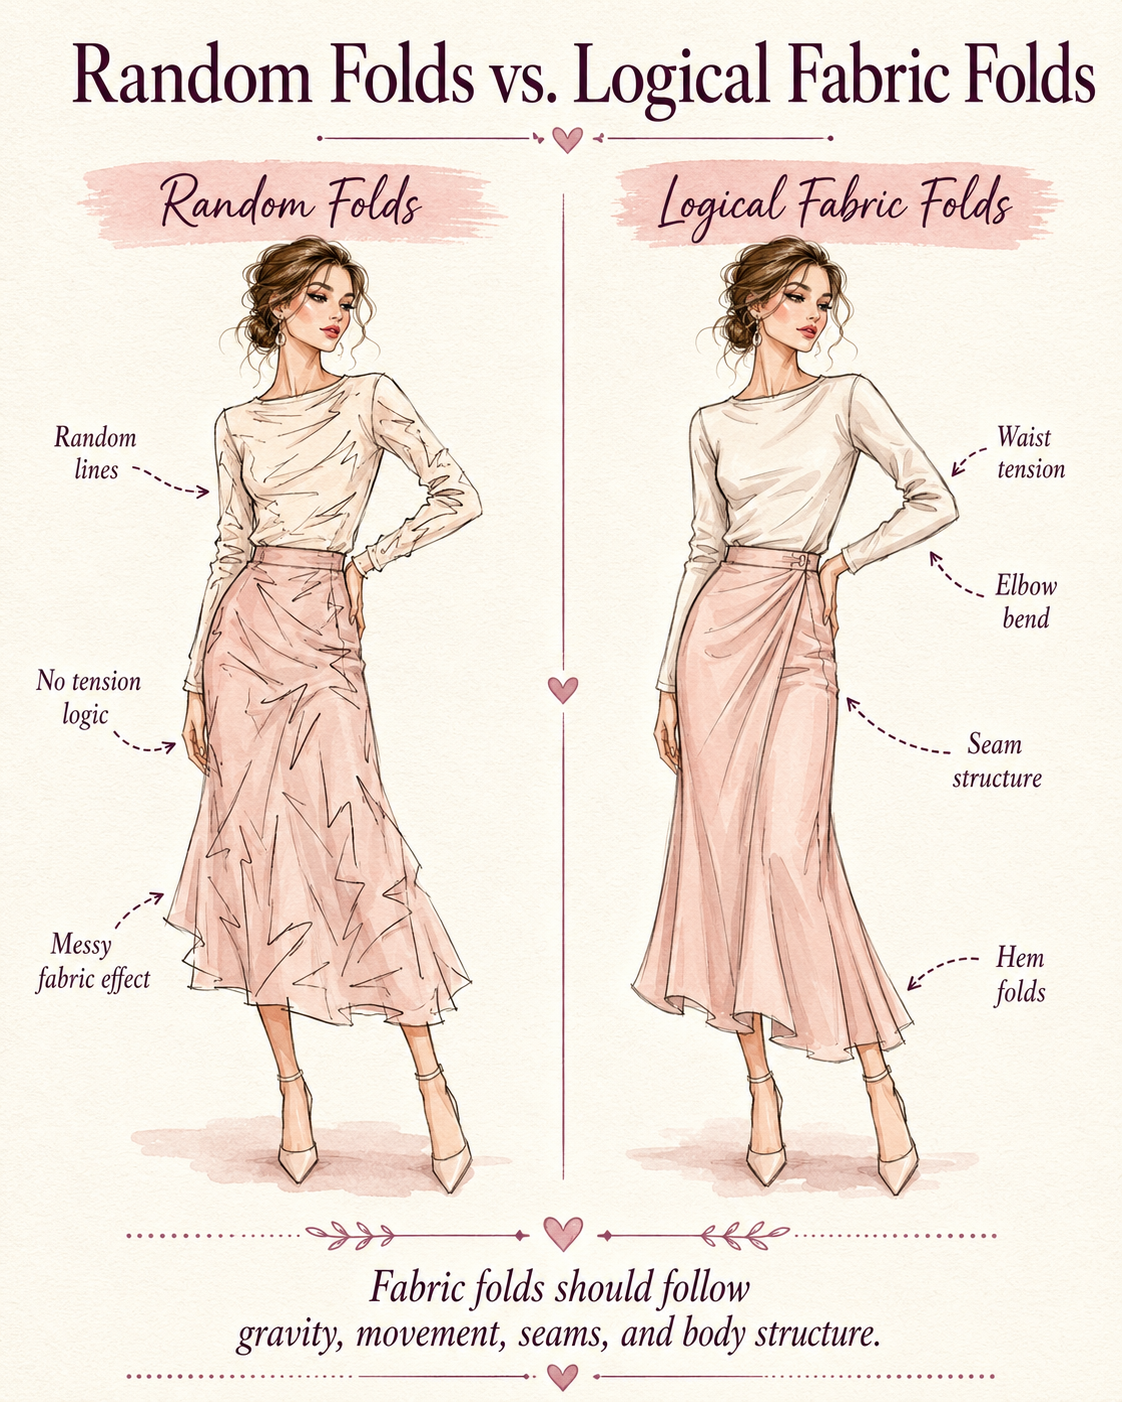
7. Adding Random Fabric Folds
Fabric folds are difficult for beginners because they can easily become messy. Many new artists add random lines all over the garment, hoping it will look more realistic.
But folds are not random. They appear because of tension, gravity, movement, seams, and body structure.
When folds are placed without logic, the sketch looks cluttered and confusing.
How to fix it
Place folds only where fabric naturally bends, stretches, or gathers.
Common fold areas include:
- Elbows
- Waist
- Hips
- Knees
- Cuffs
- Sleeves
- Under the bust
- Around seams
Where fabric is tucked, tied, or gathered
Different fabrics also create different folds. Silk creates soft flowing folds. Denim creates sharper, heavier folds. Tulle creates light transparent volume. Leather creates firm shapes and strong highlights.
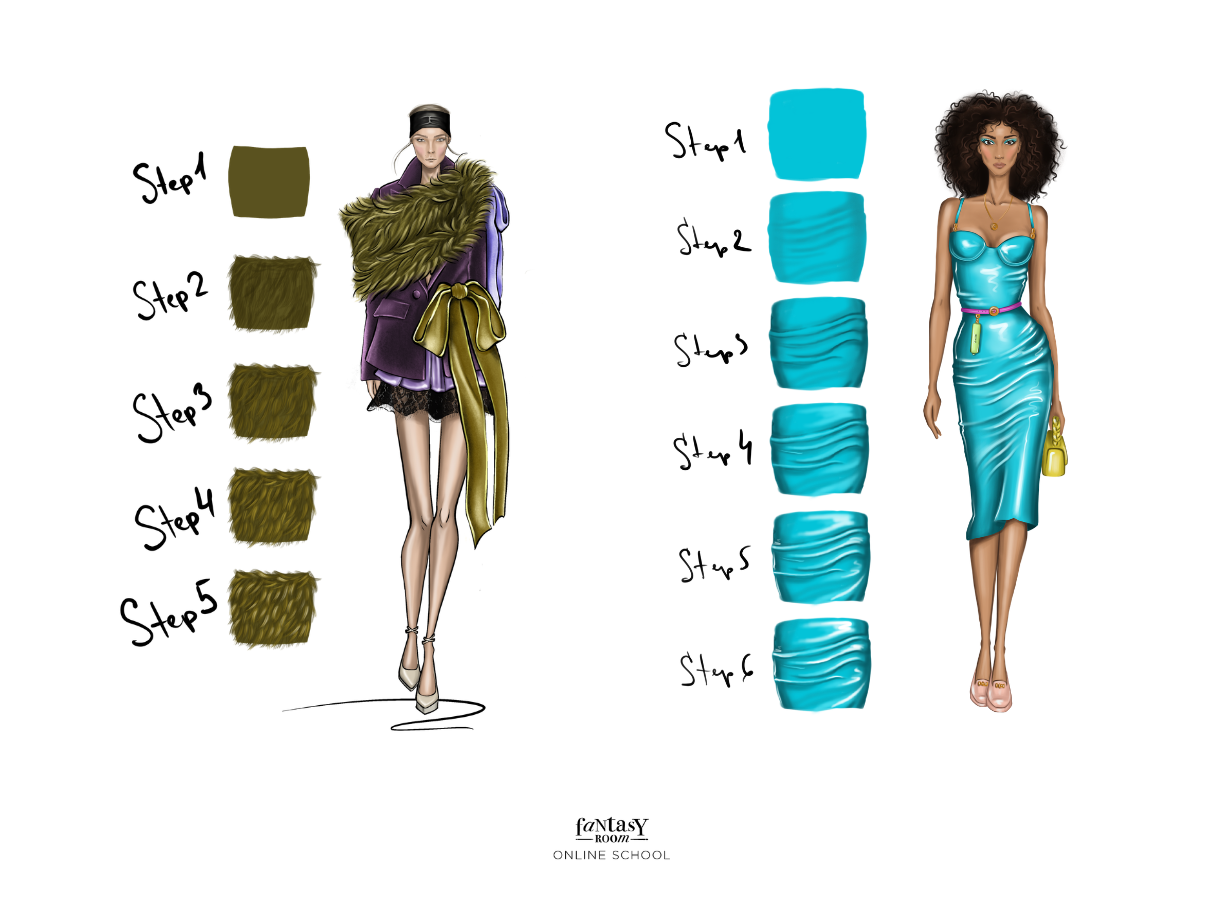
Practice exercise
Take one garment, such as a shirt sleeve, and draw it in three fabrics: silk, cotton, and leather. Use different fold types for each material.
8. Using the Same Line Weight Everywhere
Line weight means how thick, thin, dark, or light your lines are.
A common beginner mistake is using the same line weight for the entire sketch. When all lines look equal, the drawing becomes flat. There is no depth, focus, or hierarchy.
Line variation helps show structure, shadow, fabric weight, and important design details.
How to fix it
Use stronger lines for:
- Outer silhouette
- Shadow areas
- Heavy fabric edges
- Areas closer to the viewer
- Important garment structure
Use lighter lines for:
- Construction lines
- Soft folds
- Delicate fabrics
- Highlights
- Background details
- Areas farther from the viewer
You do not need many tools to practice this. Even one pencil can create different line weights if you change the pressure.
Practice exercise
Draw the same dress three times. In the first version, use one line weight only. In the second, make the outer silhouette darker. In the third, add lighter fold lines and stronger shadow lines. Compare which version looks more professional.
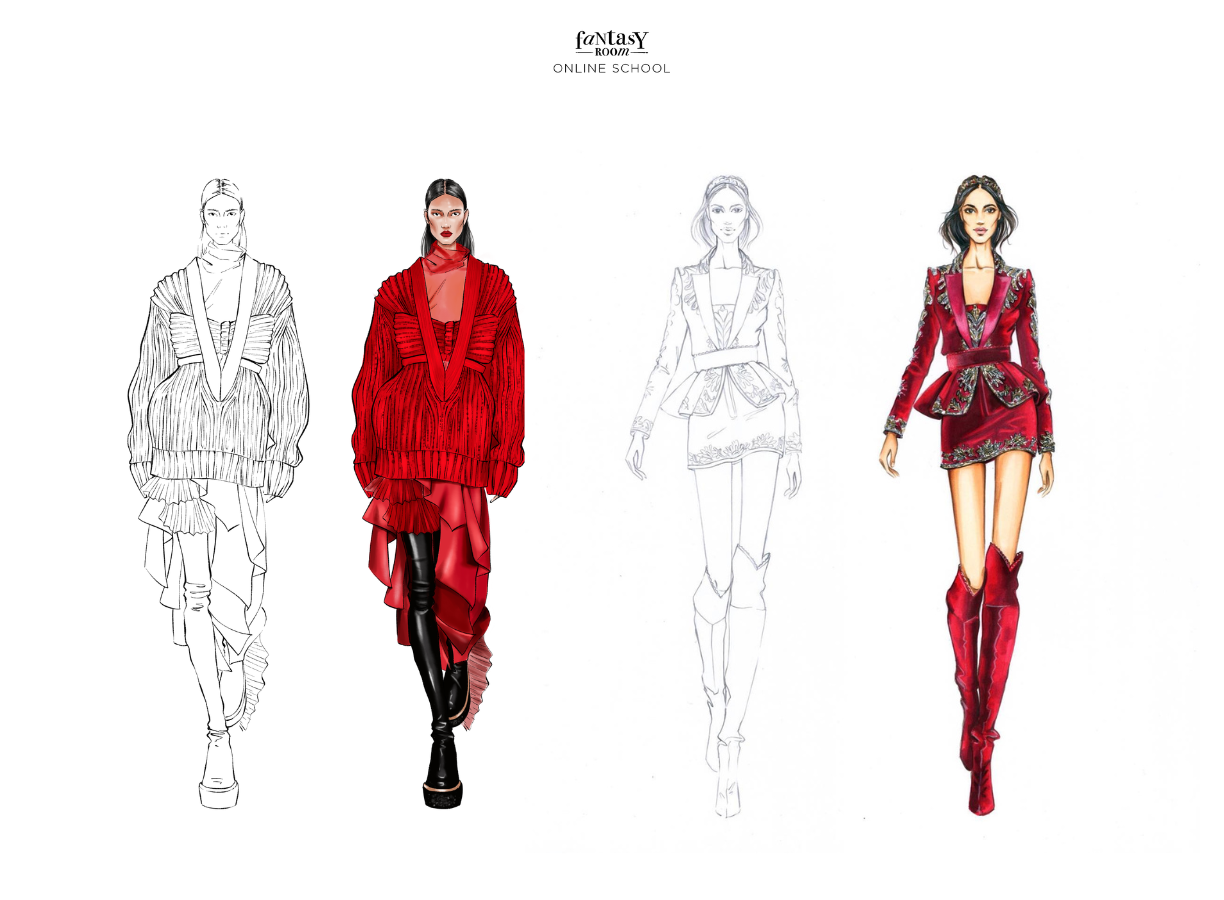
9. Relying on Color Instead of Structure
Color can make a fashion sketch more attractive, but it cannot fix weak drawing.
Beginners sometimes add bright colors before the figure, silhouette, folds, or proportions are correct. This can make the sketch look decorative but not well-constructed.
A strong fashion sketch should work even before color is added.
How to fix it
Before coloring, check the structure:
Are the proportions clear?
Is the pose readable?
Is the silhouette strong?
Do the clothes sit correctly on the body?
Are the folds logical?
Is the design understandable without color?
Is the pose readable?
Is the silhouette strong?
Do the clothes sit correctly on the body?
Are the folds logical?
Is the design understandable without color?
Once the drawing works in pencil, color becomes an enhancement rather than a cover-up.
Use color to show mood, material, contrast, and focus. For example, a satin dress may need smooth gradients and highlights, while a wool coat may need softer, matte shading.
Practice exercise
Draw one outfit in black and white first. Add light, medium, and dark tones. Only after that, create a second version in color.
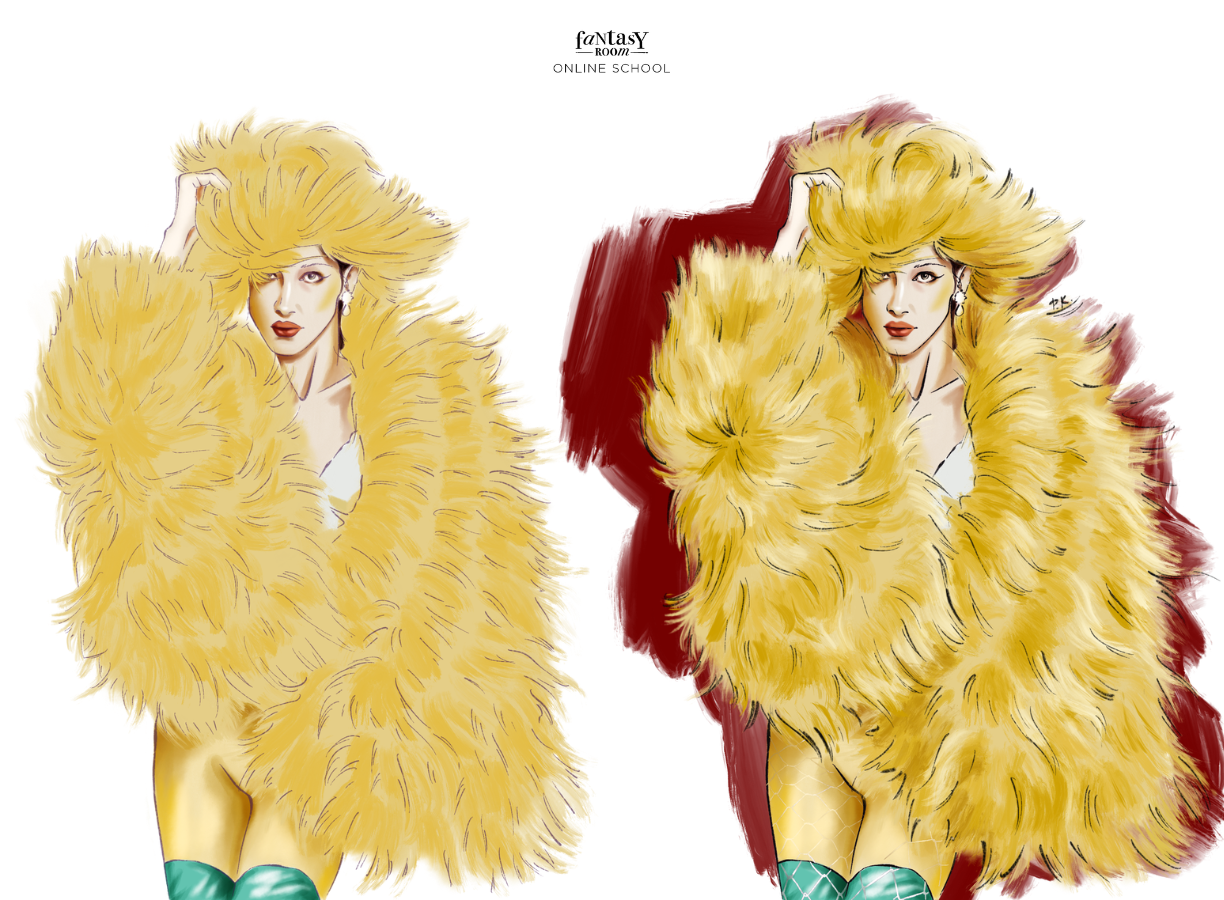
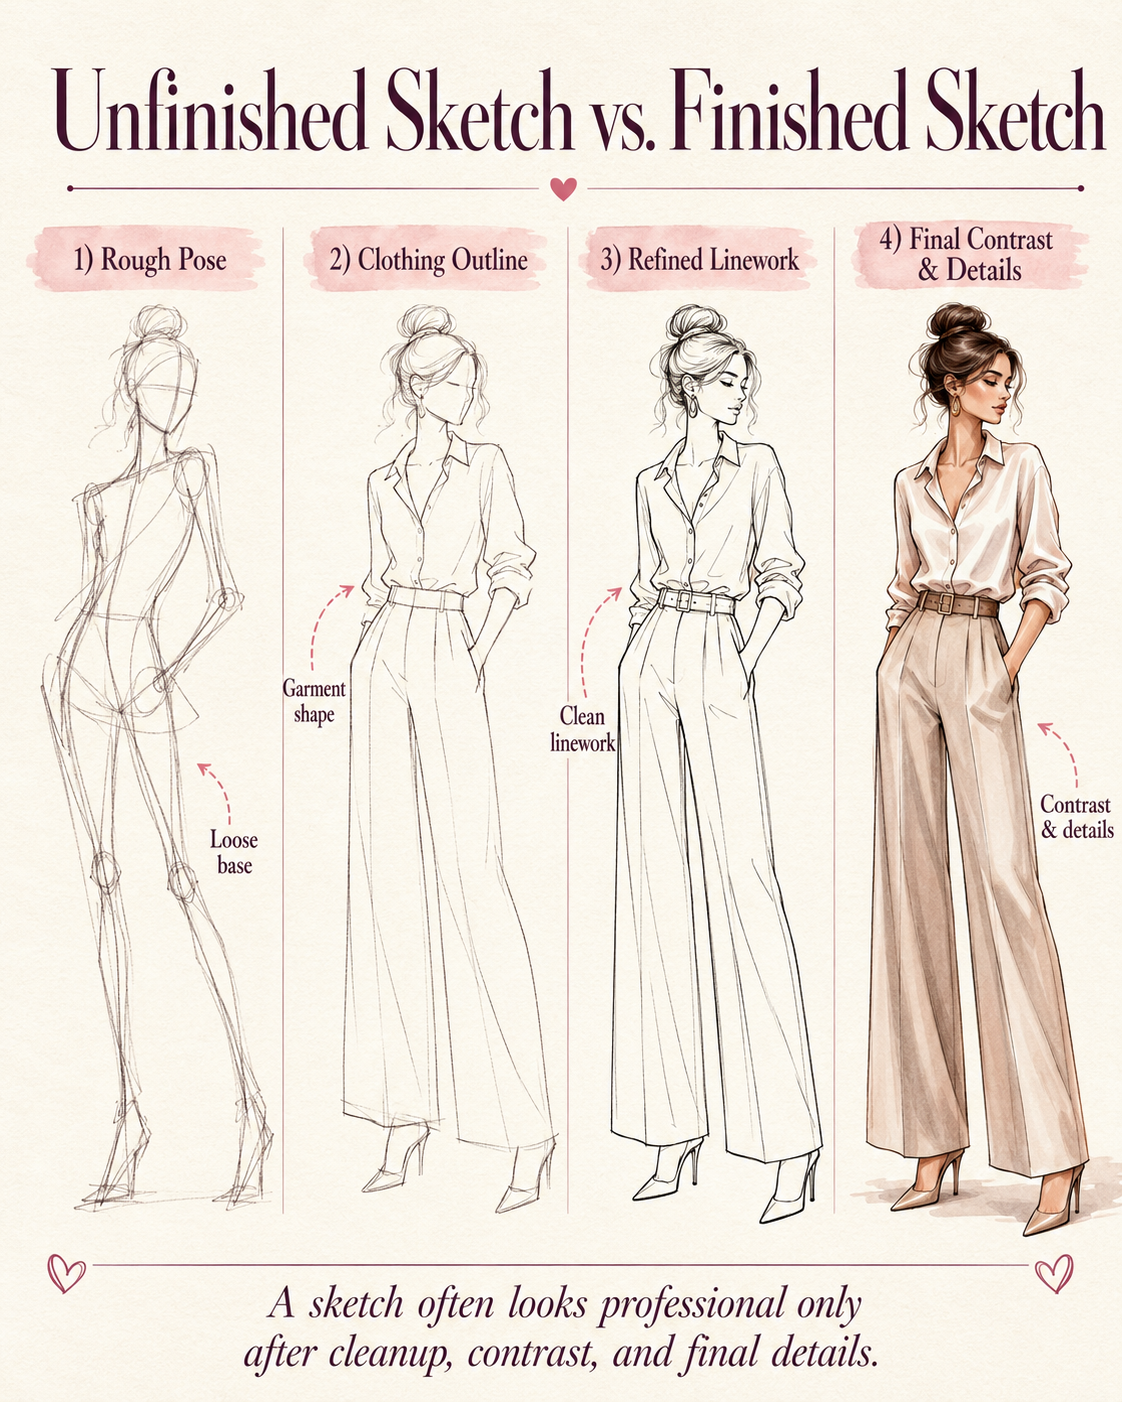
10. Not Finishing the Sketch with Contrast and Details
Many beginners stop too early. They draw the figure and clothing outline, but they do not finish the sketch with contrast, shadows, texture, accessories, or final details.
As a result, the fashion sketch looks unfinished.
Finishing does not mean adding hundreds of small elements. It means giving the drawing enough clarity and polish to communicate the design.
How to fix it
At the final stage, check these elements:
Does the sketch have light, medium, and dark tones?
Are the most important details visible?
Are seams, buttons, zippers, pockets, or accessories shown if needed?
Is the fabric type understandable?
Does the figure have shoes, hair, and basic styling?
Is the silhouette clean?
Are the most important details visible?
Are seams, buttons, zippers, pockets, or accessories shown if needed?
Is the fabric type understandable?
Does the figure have shoes, hair, and basic styling?
Is the silhouette clean?
Small finishing touches can make a major difference.
Practice exercise
Take one old unfinished sketch and improve only the final stage. Add stronger contrast, clean the silhouette, define the fabric, and include key garment details.
Bonus Mistake: Copying References Without Understanding Them
Reference images are useful, but copying them without analysis can slow your progress.
Beginners often copy every line from a photo without understanding the pose, fabric, silhouette, or garment construction. This creates drawings that look copied but not designed.
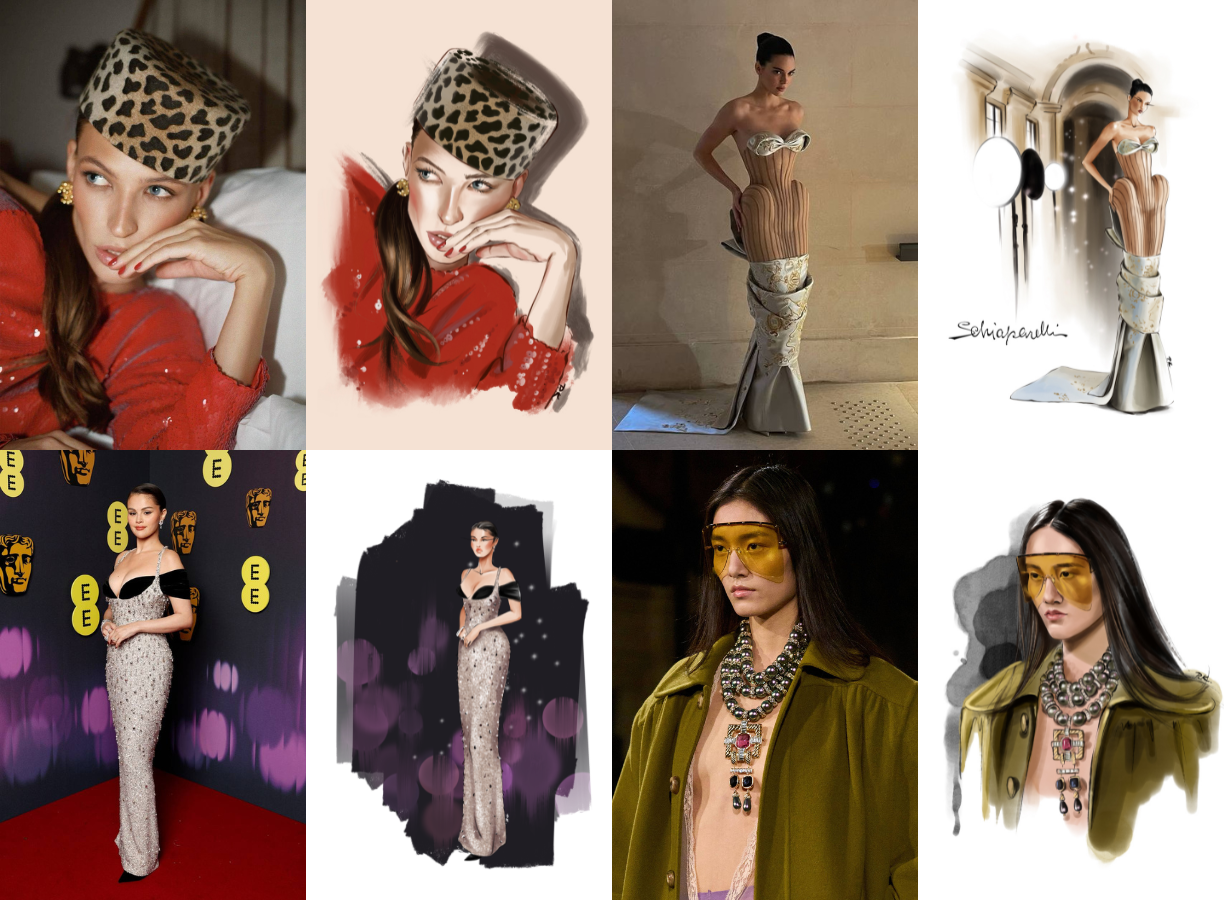
How to fix it
Before sketching from a reference, analyze it.
Ask:
What is the main silhouette?
Where is the body weight?
What fabric is the garment made from?
What details are essential?
What can be simplified?
Where is the body weight?
What fabric is the garment made from?
What details are essential?
What can be simplified?
Fashion sketching is not about copying everything. It is about understanding what matters and translating it clearly.
Beginner Fashion Sketching Practice Plan
If you want to improve your fashion sketches, practice one skill at a time. Do not try to fix anatomy, pose, folds, shading, color, and details all in one drawing.
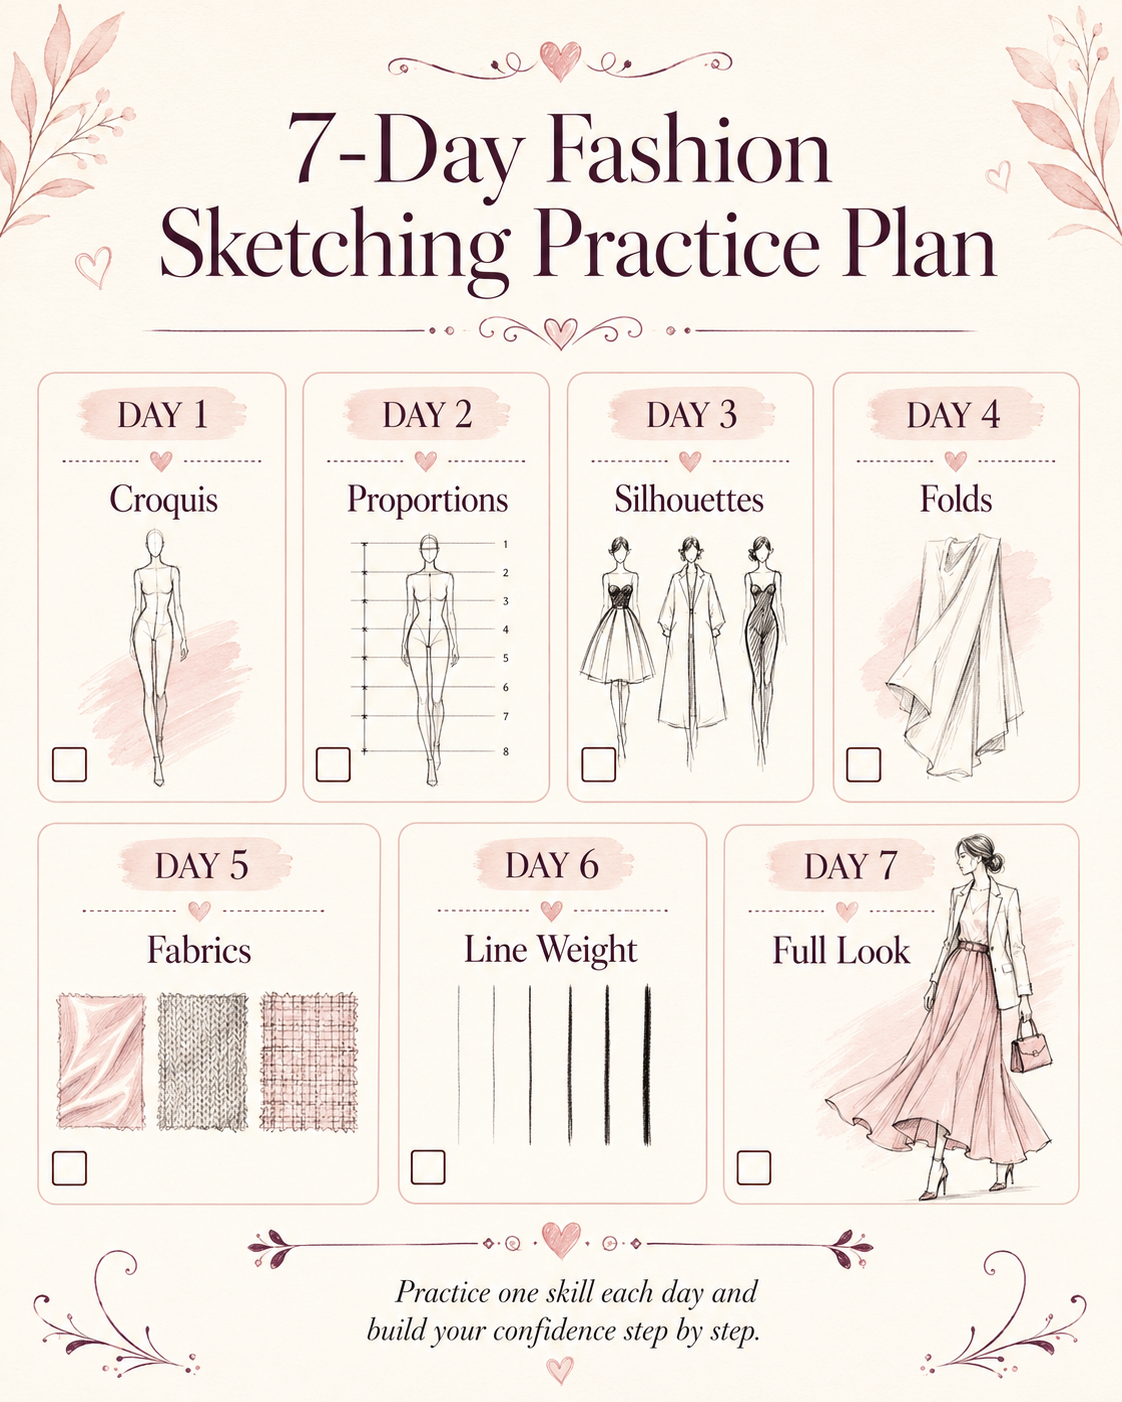
Use this simple 7-day practice plan:
Day 1: Draw 10 fashion croquis poses.
Day 2: Practice fashion figure proportions.
Day 3: Draw 10 clothing silhouettes.
Day 4: Practice sleeves, skirts, and trouser folds.
Day 5: Draw three different fabric types.
Day 6: Practice line weight and contrast.
Day 7: Complete one full fashion illustration.
Repeat this plan with different outfits, poses, and fabrics. Over time, you will start to notice which parts feel easier and which skills need more practice.
How to Improve Fashion Sketching Faster
The fastest way to improve is to stop expecting every sketch to be perfect.
Use sketching as training. Some drawings will be messy. Some poses will look awkward. Some fabrics will not work the first time. That is normal.
What matters is that each sketch teaches you something specific.
To improve faster:
- Practice fashion figures separately from clothing.
- Study real garments and fashion photos.
- Use croquis templates to build consistency.
- Draw the same outfit in different poses.
- Practice fabric folds from real references.
- Work in black and white before adding color.
- Finish your sketches instead of abandoning them halfway.
- Compare old and new drawings to see progress.
Fashion sketching becomes easier when you understand the system behind it. You are not just drawing pretty outfits. You are learning how to communicate design visually.
Want to learn fashion sketching step by step?
Explore Fantasy Room’s online fashion illustration courses and learn how to draw fashion figures, clothing, fabrics, stylish outfits, and complete fashion illustrations with beginner-friendly lessons.
Explore Fantasy Room’s online fashion illustration courses and learn how to draw fashion figures, clothing, fabrics, stylish outfits, and complete fashion illustrations with beginner-friendly lessons.
Fashion Sketching Mistakes FAQ
What is the most common fashion sketching mistake beginners make?
The most common mistake is focusing on details too early. Beginners often start with hair, patterns, color, or accessories before the pose, proportions, and silhouette are correct. A strong fashion sketch should begin with structure first.
Do I need to know anatomy to learn fashion sketching?
Yes, but you do not need advanced anatomy at the beginning. You need to understand basic body structure, joints, balance, and proportions. Fashion figures are stylized, but they still need to look believable.
What is a croquis in fashion sketching?
A croquis is a simple fashion figure template used as a base for drawing clothes. It helps beginners keep proportions consistent and focus more on the garment design.
Why do my fashion sketches look flat?
Fashion sketches often look flat because of weak line weight, no contrast, unclear folds, or clothing that is drawn too close to the body. To fix this, add variation in line thickness, use light and shadow, and show how the fabric sits around the figure.
How can I make my fashion sketches look more professional?
Focus on clean proportions, expressive poses, strong silhouettes, logical fabric folds, varied line weight, and clear contrast. You do not need excessive detail. You need clarity, structure, and intentional design choices.
Should beginners use fashion sketching templates?
Yes. Templates can help beginners practice clothing design without struggling with body proportions every time. Over time, you can learn to draw your own croquis and create different poses.
How long does it take to get good at fashion sketching?
It depends on how consistently you practice. Beginners often see visible improvement after a few weeks of focused exercises, especially if they practice proportions, poses, silhouettes, and fabric folds separately.
Final Thoughts
Fashion sketching is a skill that develops through practice, observation, and patience. Most beginner mistakes are fixable once you understand what causes them.
If your fashion sketches look stiff, flat, or unfinished, do not assume you are bad at drawing. You may simply need to improve the foundation: figure proportions, gesture, silhouette, fabric, line weight, and contrast.
Once you learn how to build a fashion sketch step by step, your illustrations become clearer, more expressive, and more professional.


